
In this tutorial, we’ll be building a fully-functional an NFT minting app, EPIC NFT Collection. We’ll be starting out with knowing what NFTs actually are, building the complete decentralized application, and at the end, we’ll get our app live for everyone to use.
What are Non Fungible Tokens or NFTs?
An NFT or Non-Fungible Token is a digital asset that links to some particular “data” (e.g digital art, an image, etc). The main function of an NFT is that each “token” has a unique identifier that lets its owner prove that it’s one of a kind.
Here’s an example of a popular collection of NFTs with a shared theme amongst them, called Bored Ape Yacht Club.
What We’re Building
We’ll be building a decentralized NFT collection app called EPIC NFTs. The application will let users mint NFTs for the collection, and later claim them using their wallet addresses.
Prerequisites
- Beginner to intermediate knowledge of React.
- Familiarity with Solidity programming language.
- Conceptual understanding of blockchain, NFTs, crypto wallets and Etherscan.
We’ll be using a number of tools at our disposal to build the app from scratch. All these tools are free and should be easy to integrate into your system.
- Visual Studio Code or any other text editor.
- Hardhat for Ethereum development.
- Metamask as a crypto wallet.
- OpenSea for NFT hosting.
- Vercel and Alchemy as hosting platforms.
Let’s Begin!
Now that we have a slight hint of what we’re going to build. Let’s start writing code!
We’ll start with writing a smart contract for our NFT collection. We’re deploying the contract to a publicly-accessible blockchain so that anyone can mint NFTs through our contract. Later on, we’ll build a client website to enable minting the same NFTs.

Building Our Smart Contract
1. Setting Up the Tools
We’ll be using Hardhat to run our smart contract locally. Before that, we need to install node/npm in our system. Download it here.
Next, let’s head to the terminal in order to set up the environment. Once you’re there, run the following commands:
mkdir nft-collection cd nft-collection npm init -y npm install --save-dev hardhat Now that we have set up the environment, let’s get the project running. Run this line of code and choose the option to create a basic sample project. You can say yes to everything:
npx hardhat In case these dependencies didn’t get installed by default, install them by running the following code:
npm install --save-dev @nomiclabs/hardhat-waffle ethereum-waffle chai @nomiclabs/hardhat-ethers ethers We’ll also use something called OpenZeppelin to write our smart contract. Install it by running the following line of code:
npm install @openzeppelin/contracts In the final step, run the following code to run the sample script:
npx hardhat run scripts/sample-script.js You’ll see something like this:
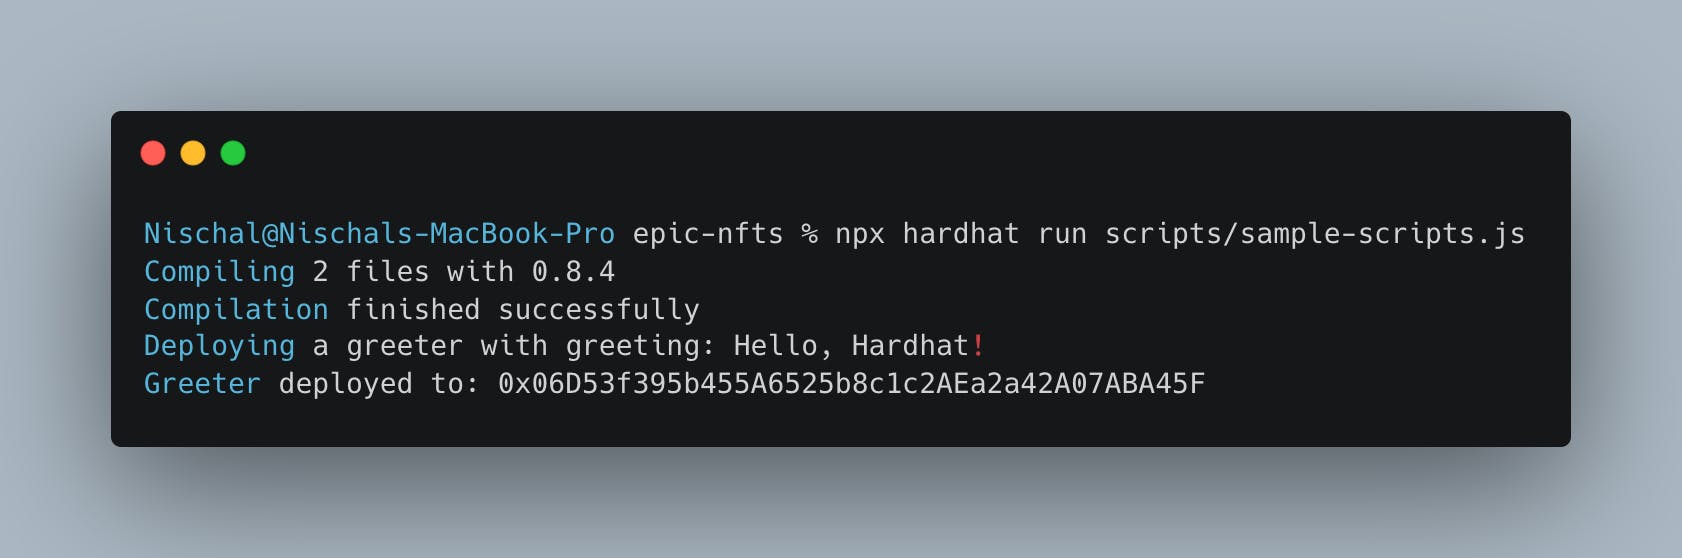
That’s it! This means our local environment is set up, and at the same time, we also ran/deployed a smart contract to a local blockchain.
2. Writing a Contract…
Read More: web3.hashnode.com


 Bitcoin
  Ethereum
  Tether
  BNB
BNB  Solana
  USDC
USDC  XRP
XRP  Dogecoin
  Toncoin
  Cardano
  Shiba Inu
  Avalanche
  Polkadot
  Wrapped Bitcoin
  Bitcoin Cash
  NEAR Protocol
  Polygon
  Litecoin
  Uniswap
  LEO Token
  Fetch.ai
  Aptos
Aptos  First Digital USD
  Hedera
  Cosmos Hub
  Pepe
Pepe  Filecoin
  Immutable
  Stellar
  Render
  XT.com
  Optimism
  OKB
OKB  dogwifhat
  Arbitrum
  Bittensor
  Wrapped eETH
  Sui
Sui  Maker
Maker