Want to use Firebase and other Web2 dev skills to create a Web3 wallet tracker? If so, follow along in this article and tackle the presented step-by-step tutorial! But, before moving into the central part of this article, you need to understand the basics. Thus, you’ll first learn what a Web3 wallet tracker is and why it makes sense to use Firebase to create one. With the basics under your belt, we’ll briefly examine the end result of our example wallet tracker dapp. That way, you’ll know exactly what to expect from the tutorial, and you’ll be ready to create a Firebase Web3 wallet tracker!
On the other hand, if you already know all the fundamentals, you are probably eager to jump straight into the “BUIDLing” process. In that case, create your free Moralis account and follow our steps in the “Tutorial: Create a Firebase Web3 Wallet Tracker with Moralis” section right away!
What is a Web3 Wallet Tracker?
A Web3 wallet tracker is typically a decentralized application (dapp) that is able to track the activities of blockchain wallets. With it, users can explore wallet transactions and balances. Furthermore, in some dapps, users can search by wallet addresses. In others, users need to connect their wallets to get the full insight. Our tutorial will focus on the latter – solely focusing on transactions.
Web3 wallets are essentially all public blockchain addresses that can store cryptocurrencies/tokens. A crypto wallet can store crypto coins, fungible tokens, non-fungible tokens (NFTs), and even semi-fungible tokens (SFTs). Moreover, Web3 or crypto wallets come in many forms – from pieces of paper to hardware devices, such as the wallet models from Ledger. However, the most popular Web3 wallet to this day is arguably MetaMask. This hot wallet comes in the form of a mobile app and browser extension. For development and testing purposes, the MetaMask browser extension tends to be the best option. As such, it’s the wallet we’ll use to demonstrate our example Web3 wallet tracker dapp.

Why Use Firebase When Creating a Web3 Wallet Tracker
In short, it makes sense to use Firebase when creating Web3 dapps because of its impressive Web2 backend features and Firebase’s integration with Moralis.
Firebase is a development platform for building, growing, improving, and maintaining all sorts of applications, including complex games. This backed dev platform is built on top of Google’s infrastructure, which gives it a high reputation. After all, there are millions of businesses using the Firebase platform worldwide, including Twitch, Glovo, 9gag, and many others. Furthermore, Firebase can easily be integrated with other practical tools, such as ads, business messaging apps (e.g., Slack), and even the Moralis Web3 API! Moreover, the integration with Moralis enables you to use Firebase when creating a Web3 wallet tracker.
All in all, Firebase can save you a lot of time as it supplies you with features and tools you’d otherwise need to build yourself. This includes hosting and database solutions, analytics, file storage services, push messaging, and much more. In addition, Firebase comes with impressive scaling opportunities that can make things a lot simpler for you. Essentially, with Firebase on your side, you do not need to reinvent the wheel. Instead, you get to devote your maximum attention to creating seamless application experiences. Nonetheless, thanks to Moralis’ Firebase integration, you can now integrate Firebase features in all your dapps. Consequently, Firebase becomes “Web3 Firebase“.
As we show you how to create a Web3 wallet tracker, we’ll focus on using Web3 webhooks via Moralis’ Web3 Streams API. Of course, you can also use the combined power of the two backend platforms mentioned to create a Web3 Firebase login.
If you’d like more content regarding Firebase, check out our article exploring how to use Firebase as a proxy API.
Tutorial: Create a Firebase Web3 Wallet Tracker with Moralis
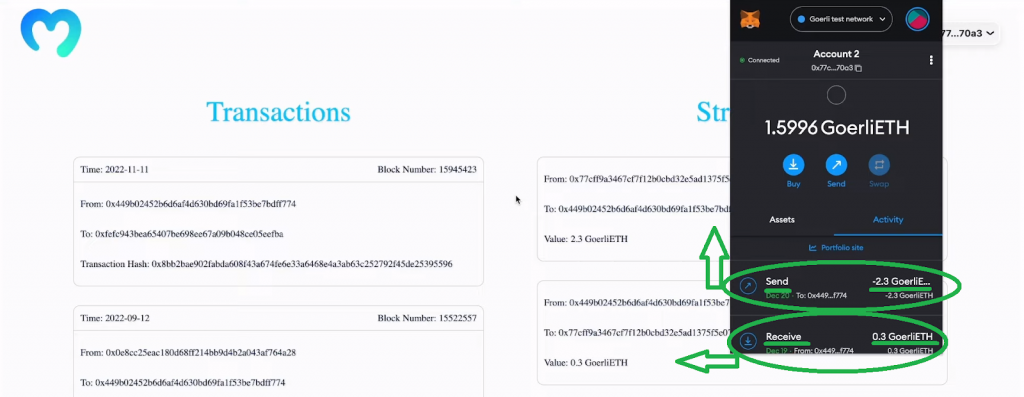
Before we show you how to create a Web3 wallet tracker with Moralis and Firebase, let’s do a quick demo of our example dapp. Hence, make sure to take a closer look at the screenshot above. The latter indicates the gist of our tracker dapp. You can see that our dapp contains two sections: “Transactions” and “Streams”. The transaction section displays all the transactions associated with the connected wallet. Moreover, it displays the time, block number, “from” address, “to” address, and transaction hash. On the other hand, the “Streams” section listens to live transactions for any connected wallet and displays the “from” and “to” addresses and the value of the transaction in question.
In addition, as you can see in the screenshot above, we are focusing on the Goerli testnet. However, thanks to Moralis’ cross-chain interoperability, we could be targeting any supported blockchain or all of them. Furthermore, you can also see that our example dapp displays the connected wallet’s Goerli ETH balance and address (top-right corner). Now, let’s look at how our dapp connects wallets and how it registers “Streams”.
This is what our dapp looks like before we connect our wallet:
Once we click on the above “Connect Wallet” button, we can choose which wallet we want to use. Since we have MateMask ready, we select that wallet:

Now that we are connected, we can actually execute an on-chain transaction on the Goerli testnet; the “Streams” section will register it:
Required Setups
The above dapp uses Moralis’ EVM API for transactions and Moralis’ Streams API to listen to on-chain events and, in turn, feed the “Streams” section. In addition, it uses Firebase as a database and for hosting. Furthermore, the dapp uses RainbowKit and Moralis’ Web3 Auth API for seamless wallet connection, and NextJS for the frontend. Last but not least, it utilizes several dependencies, including “wagmi” and “axios“. Moreover, you will learn how to implement all these tools if you follow our lead as we show you how to create a Web3 wallet tracker like the one demonstrated above.
Moving on, you’ll first get to see how to take care of the initial setup in Firebase. We’ll show you how to install the required dependencies and create both the backend and frontend for your tracker dapp. Of course, you do not need to start from scratch; the complete code awaits you on our GitHub repository page. So, essentially, you just need to take care of the setup, install the correct dependencies, and tweak our code by populating certain variables with your keys.
Initial Firebase Setup
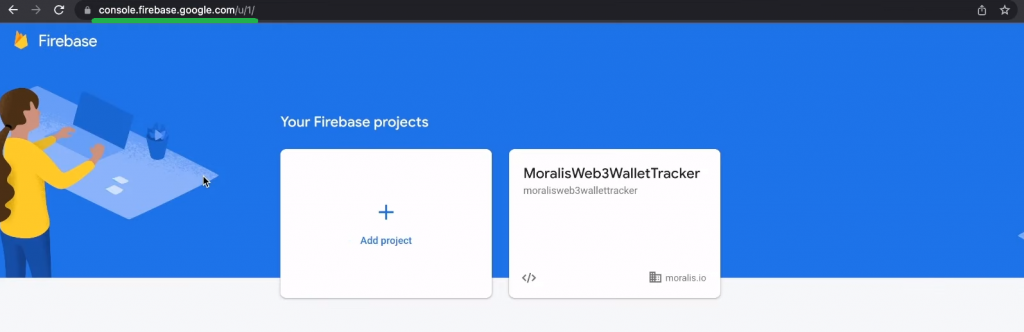
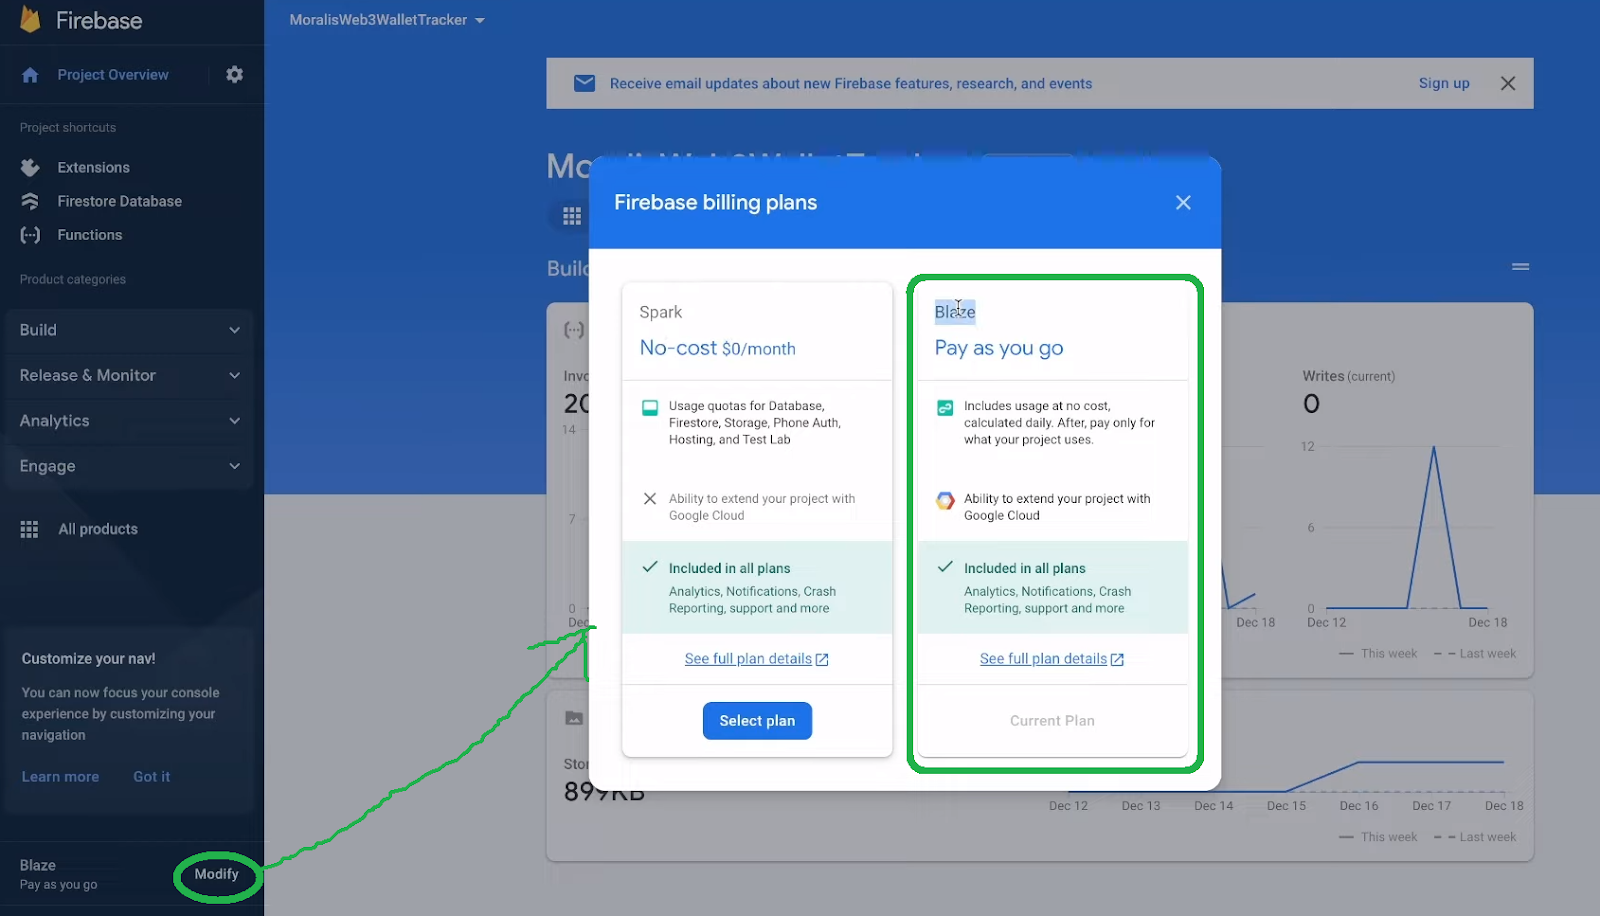
In case you don’t have your Firebase account yet, create it now. Next, add a new project. As you can see in the above screenshot, we named our project “MoralisWeb3WalletTracker”. So, to avoid any confusion moving forward, we encourage you to use the same name. Furthermore, in order to be able to use the features required to complete today’s tutorial, you also need to modify your Firebase billing plans. Thus, make sure to switch to the “Blaze” plan:
Next, create the “moralis-firebase-web3-tracker” folder and open it in Visual Studio Code (VSC). Then, use VSC’s terminal inside that folder and execute the following command:
npm install -g firebase-tools
The above command will set up your system with Firebase. As such, you’ll be able to accomplish the Firebase login with this command:
firebase login
By running the above command, the terminal will prompt your browser, and you’ll be able to log in using your credentials. Next, initialize your Firebase projects by entering the command below:
firebase init hosting
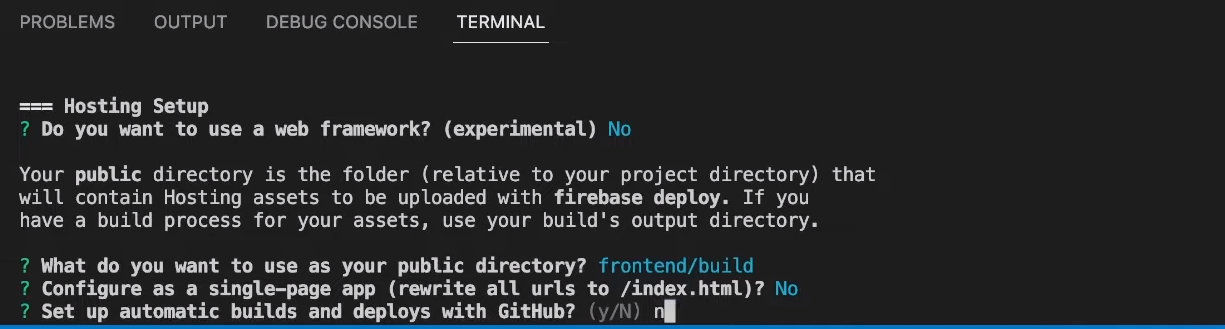
After running the above command, you’ll need to use your terminal to select the suitable options. Since you’ve already created your Firebase project above, select the “Use an existing project” option. Then, choose “MoralisWeb3WalletTracker” (if you used that project name). Next, you might be asked if you want to use a web framework. In that case, choose “no” and hit enter. Then, enter “frontend/build” to use as your public directory. Moreover, you don’t need to configure it as a single-page app, nor do you need to set up automatic builds and deploys with GitHub:
By completing the above setup, your Firebase project should be ready to create a Web3 wallet tracker:

Installing the Moralis Streams Extension for Firebase
To install the Moralis Streams API extension for Firebase, enter the following command:
firebase ext:install moralis/moralis-streams
Then, you’ll be asked if you wish to continue, so make sure to hit “Y”. Next, you’ll get to select one of the given locations:

As the above screenshot indicates, you can choose “Iowa (us-central1)”. Furthermore, you’ll also need to decide where you want to store your secrets. Again, feel free to follow our lead and go with Google Cloud Secret Manager:

In the next substep, you need to input your Moralis Web3 API key:

Note: If you face an error with the above substep, make sure to use the video at the bottom of this article, starting at 5:52.
To obtain your Moralis Web3 API key, you need to have your Moralis account ready. In case you haven’t created your account yet, do so now (you may use the link at the outset of the article). With your Moralis account up and running, you’ll be able to access your admin area. From there, you can copy your API key in these two steps:

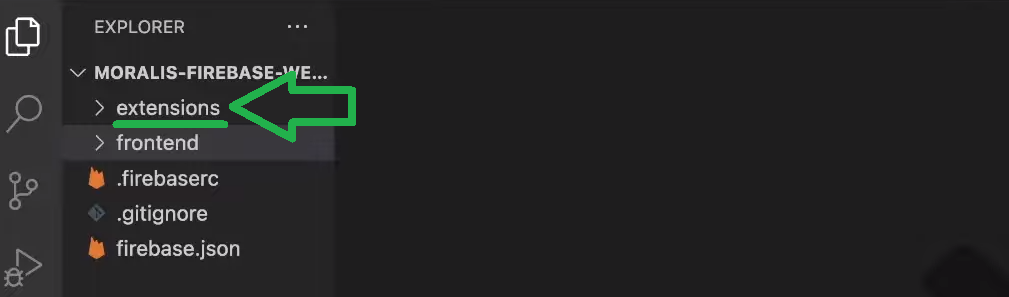
Finally, return to your terminal, paste in the copied key, and hit enter. As a result, you will get the “extensions” folder in your project’s folder:
Moving on, you need to run your Firebase project using the following command:
firebase deploy --only extensions
After running the above command, you’ll also need to confirm that you want to continue deploying these extensions. Plus, you’ll need to paste in your Moralis Web3 API key once more:

Note: It can take about five minutes for the extensions to install.
Additional Firebase Setup
Once the extension is installed, you can open it inside your Firebase panel (via the “Manage” button). Next, select the “How this extension works” option:

As indicated in the image above, make sure to select and copy the rules for this extension. Then, go to “Build/Firestore Database”:

There, you can create a new database in test mode. With your database ready, you’ll be able to go to the “Rules” tab, where you need to paste the above-copied rules:

Your database is empty for now; however, once you set up your stream, it will register on-chain events.
Finally, select the “Functions” option inside the “Build” section:

Once on the “Functions” page, you’ll be able to copy your trigger URL:

Setting Up Your Moralis Stream
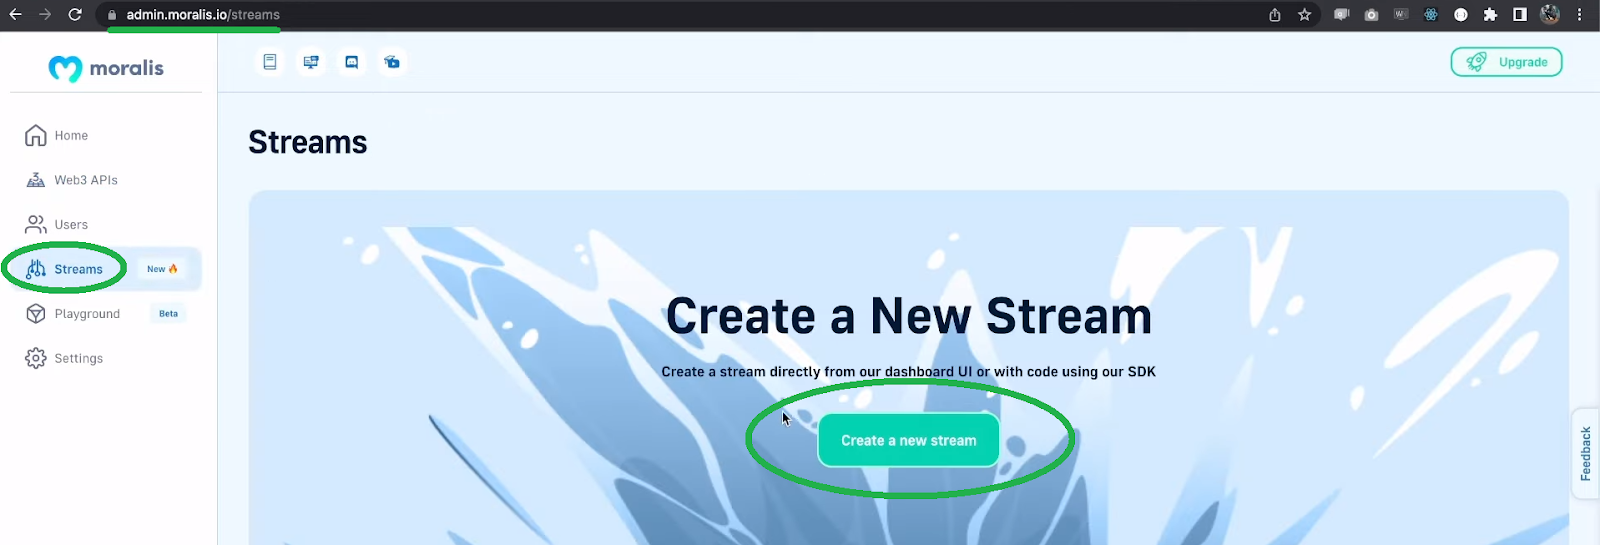
Our “how to create a Web3 wallet tracker” quest is coming along nicely. You’ve reached a point where you need to create your Web3 stream. As such, go to your Moralis admin area and select the “Streams” panel. Then, click on the “Create a new stream” button:
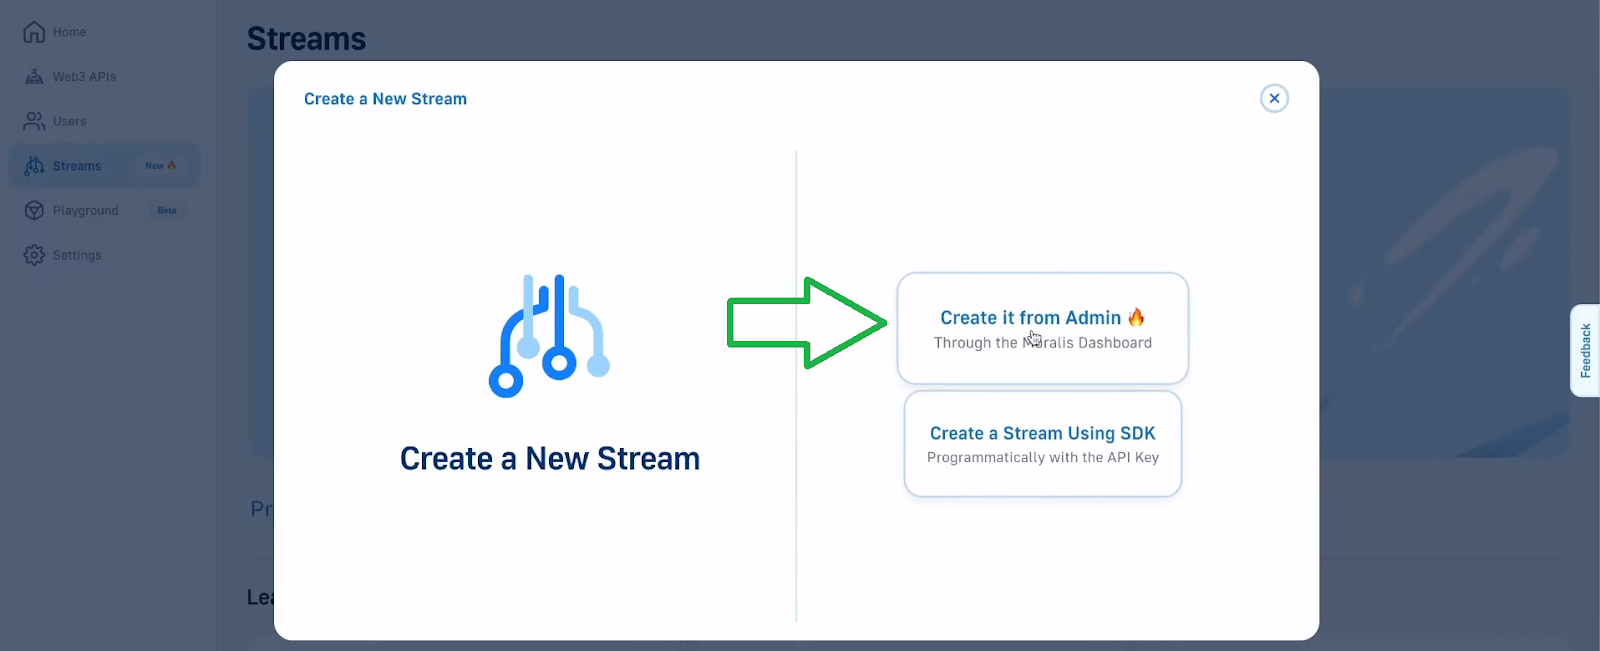
Next, select the “Create it from Admin” option:
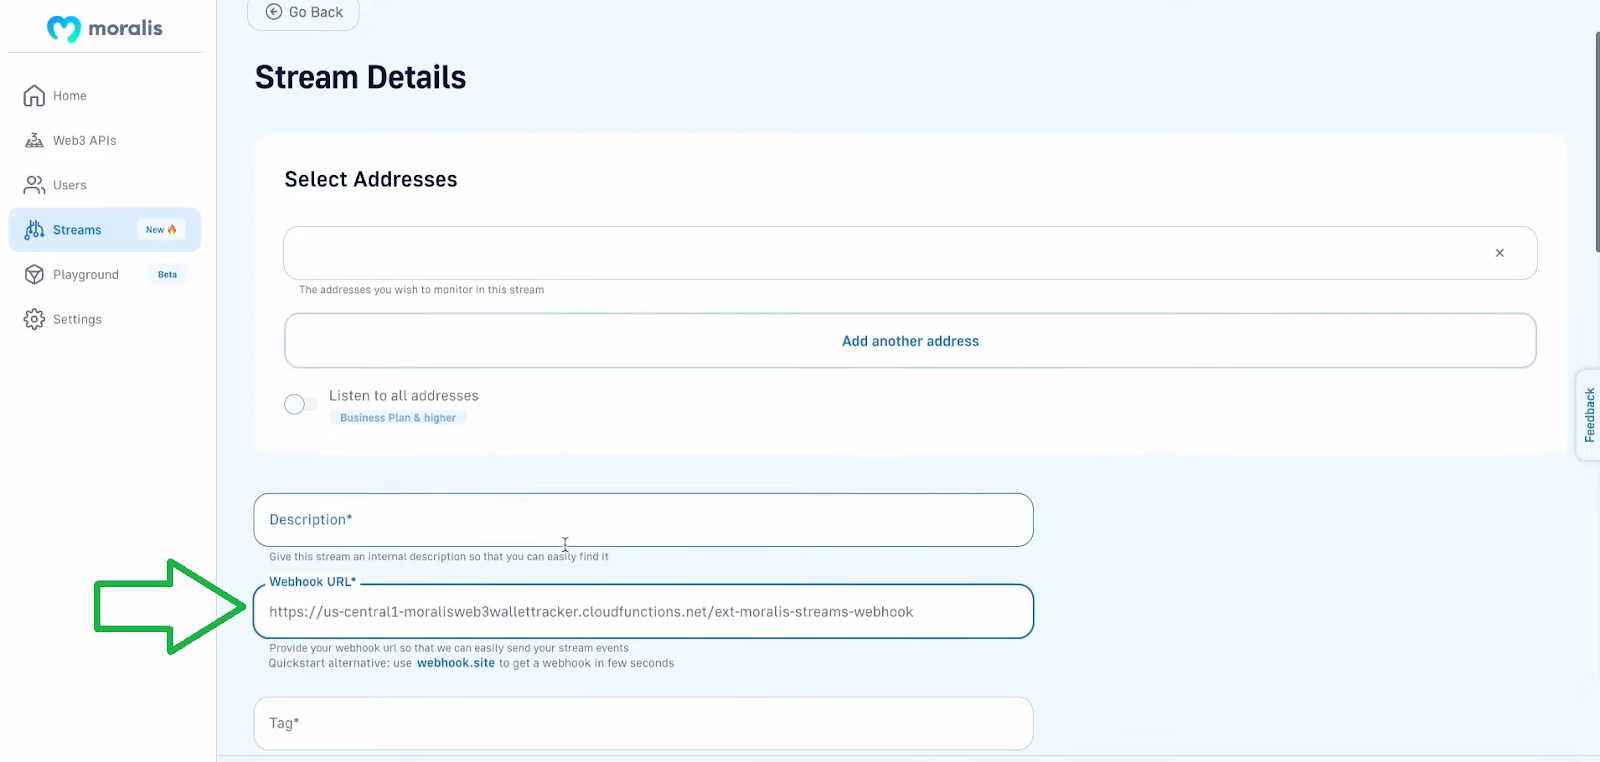
On the following two steps, click on “next” and “done” to get to the “Stream Details” page. This is where you need to paste the above-copied URL into the “Webhook URL” field:
Looking at the above screenshot, you can see that you need to enter a description and a tag for your stream. Again, feel free to follow our lead:

At the top, paste in the wallet address you want to monitor. Then, scroll down and select the desired networks. If you remember our demo, you know to focus on the Goerli testnet:

In addition, for the sake of this “how to create a Web3 wallet tracker” tutorial, let’s focus on native transactions:

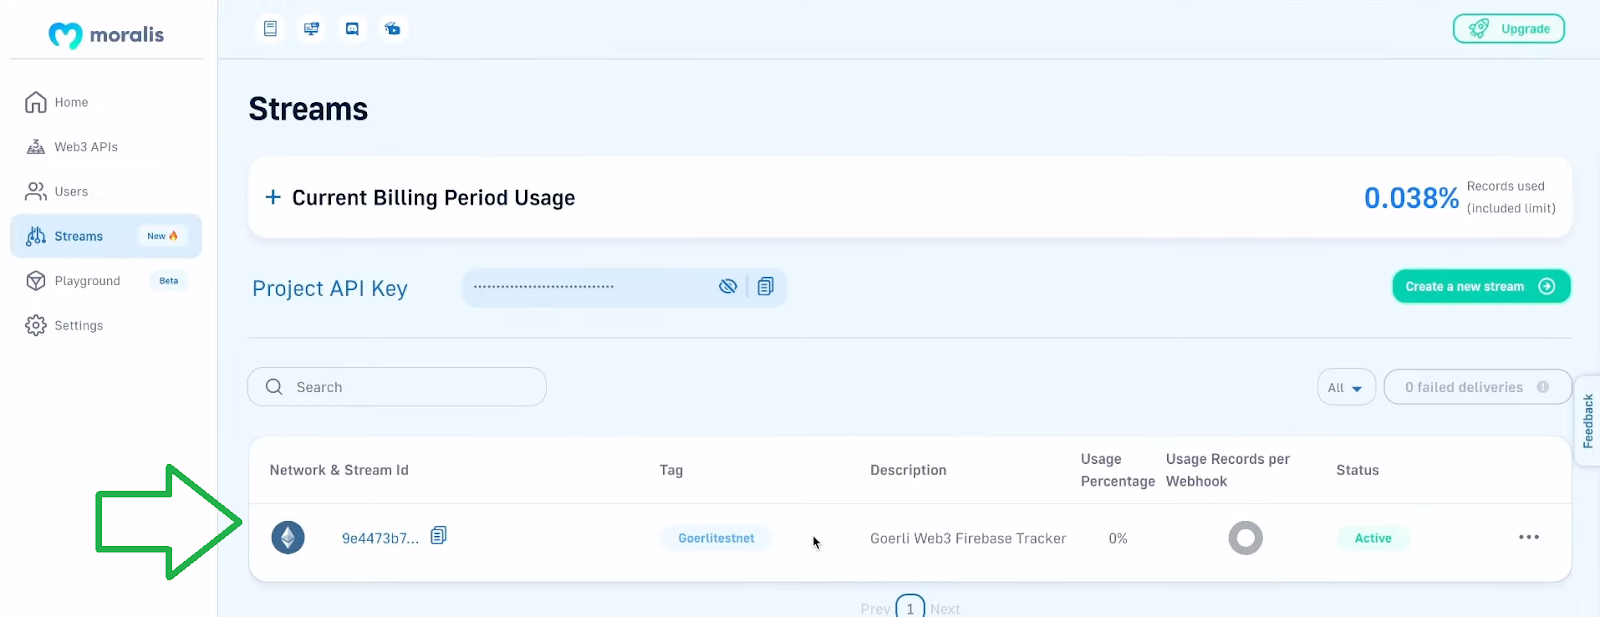
Finally, hit the “Create Stream” button in the bottom-right corner. As a result, you should see your new stream in your “Streams” panel:
Testing Your Stream
With your stream in place, you can use your wallet to execute a transaction. Make sure to use two wallets that you control and that one of them matches the address used in your stream.
Note: If you need additional guidance on how to execute a transaction with MetaMask, use the video below, starting at 11:20.
Once you’ve successfully executed your test transaction, you can return to the “Firebase Database” page and refresh it. Now, you should see the event registered in the “Data” tab:

By clicking on the “Goerlitestnet” tag, you get to explore the related document (your transaction) and see all of its details:

The above-highlighted frame marks the details you can use as you proceed to create a Web3 wallet tracker dapp.
Code Walkthrough
With the above setup completed, you have everything ready to create your tracker dapp. Since you get to use our code, this part will be pretty straightforward. After all, our code contains the “backend” and “frontend” folders with all the required scripts. Still, you can use the video below (12:14) for more detailed guidance. This is where you’ll first learn which dependencies you should install. These include “cors“, “dotenv“, “express“, and “moralis“. Hence, you need to run the following command in your “backend” folder:
npm i cors dotenv express moralis
Below are the dependencies you need to install in your “frontend” folder:
npm i firebase @firebase/firestore axios @rainbow-me/rainbowkit wagmi
Do not forget to create your “.env” file in the “backend” folder and populate it with the “MORALIS_API_KEY” variable with your Moralis Web3 API key as its value. The core of the backend functionalities is covered by the “index.js” backend script (14:21). This is also where you can see the power of Moralis’ EVM API and how the following short snippet of code does all the heavy lifting:
const response = await Moralis.EvmApi.token.getWalletTokenTransfers({ address: query.address, chain: query.chain, }); For a detailed frontend code walkthrough, use the video below, starting at 15:51. There, you’ll learn about the two core components: “getTransaction.js” and “loggedIn.js“. The former covers the “Transactions” section and the latter the “Streams” section of our tracker dapp’s frontend. Nonetheless, as far as the “loggedIn.js” script goes, make sure to use your Firebase config details (19:00).
Last but not least, here’s the video that we’ve been referencing throughout the tutorial:
Web3 Wallet Tracker – How to Create a Firebase Web3 Wallet Tracker – Summary
We covered quite a distance in today’s article. We started with some basics, where you had a chance to learn what a Web3 wallet tracker is and why to use Firebase to create such a dapp. However, the core of today’s article was the “how to create a Web3 wallet tracker” tutorial. The latter included quite a few setups. Hence, we guided you through all the steps that helped you set up your Firebase database and Moralis stream. With the setups under your belt, you had an opportunity to use our code to create a neat Web3 wallet tracker dapp.
If you enjoyed today’s tutorial, make sure to dive into the Moralis documentation. There, you’ll find many other tutorials teaching you how to make the most of Moralis’ powerful Web3 API endpoints. Also, don’t forget to use the Moralis YouTube channel and the Moralis blog to expand your blockchain development knowledge. Some of the latest articles there explore Verse – a new Metaverse programming language, blockchain storage, and how to get any token price using NextJS and NodeJS.
In addition, you might be interested in going full-time crypto sooner rather than later. In that case, you ought to enroll in Moralis Academy to become blockchain certified. By doing so, you’ll significantly improve your chances of landing your dream blockchain job. Moreover, while there are many courses waiting for you on the other side, we recommend starting with the blockchain and Bitcoin fundamentals.
Read More: moralis.io


 Bitcoin
  Ethereum
  Tether
  XRP
XRP  BNB
BNB  Solana
  USDC
USDC  Dogecoin
  Cardano
  Wrapped Bitcoin
  Hyperliquid
  Sui
Sui  Wrapped stETH
  Avalanche
  Stellar
  Bitcoin Cash
  Toncoin
  LEO Token
  Shiba Inu
  USDS
USDS  Hedera
  WETH
WETH  Litecoin
  Wrapped eETH
  Polkadot
  Binance Bridged USDT (BNB Smart Chain)
  Ethena USDe
  Pepe
Pepe  Pi Network
  WhiteBIT Coin
  Coinbase Wrapped BTC
  Aave
Aave  Bittensor
  Ethena Staked USDe
  Aptos
Aptos  OKB
OKB  NEAR Protocol
  BlackRock USD Institutional Digital Liquidity Fund
  Jito Staked SOL
  Ondo
Ondo