[ad_1]

Have you been searching for a simple solution on how to monitor all ETH transfer transactions? If so, you’ve come to the right place! Thanks to the Moralis Streams API, you can easily monitor ETH transactions, and you can do so either via Moralis’ user-friendly UI or SDK. What’s more, even when you choose the SDK path, you only need to set up a few lines of code to get the job done! For example, these are the snippets of code to use when working with JavaScript:
const newStream = await Moralis.Streams.add(options) const {id}=newStream.toJSON(); const address=”wallet_address_you_want_to_track” await Moralis.Streams.addAddress({address,id}) So, if you’ve been wondering how to monitor all ETH transfer transactions, you can see from the above example that Moralis is the best option to do so and fetch Web3 real-time data! Now, if you worked with Moralis Web3 APIs before, you already know how to implement the above lines of code. However, if this is your first rodeo with this ultimate Web3 API provider, make sure to watch the video at the top or dive into the following sections.
Overview
Moving forward, we will dive straight into an example of how to monitor all ETH transfer transactions by focusing on crypto wallet tracking. We will approach this example in two ways. First, you’ll see how to go about it using Moralis’ admin UI. Second, we’ll complete the same feat by using the JS SDK.
By taking on this example, you’ll learn how to get going with Moralis’ Streams API and how to implement the above-outlined lines of code. After all, you can find a complete code walkthrough below.
However, below today’s tutorial, you can find additional sections explaining more about how to monitor crypto transactions. Aside from focusing on particular wallets, you can also focus on a particular cryptocurrency (e.g., ETH). Essentially, you can monitor any fungible and non-fungible token smart contract and receive notifications whenever the token in question is transferred.
Tutorial: How to Monitor All ETH Transfer Transactions with the Moralis Streams API
Whether you plan on using Moralis’ admin UI or SDK, you need an active Moralis account. Thus, before moving forward, make sure to create your free Moralis account. Simply click on the link in the previous sentence or hit the “Start for Free” button on the far right-hand side of the Moralis website top menu:

Also, for the sake of this tutorial, we will focus on the Polygon testnet. However, the principles are the same if you focus on the Ethereum mainnet or any other EVM-compatible chain. With that said, if you wish to follow our lead, make sure to get some “test” MATIC by using the Polygon Mumbai faucet that awaits you on the Moralis Pure Faucets page.
Note: Feel free to focus on any other chain. However, we strongly recommend that you start by targeting testnets.
ETH Transfer Tracking with Moralis Admin UI – Getting Started
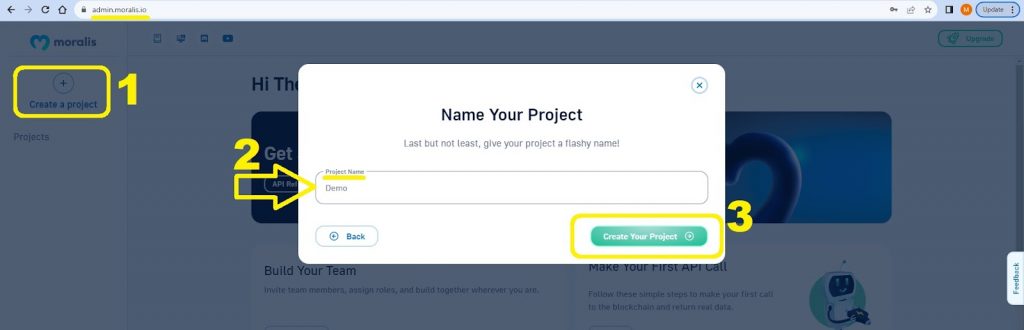
With your Moralis account up and running, you’ll be able to access your admin area. Feel free to start with the “Get Started” tutorial that awaits you on the inside. Or, simply hit the “Create a project” button and name your project:
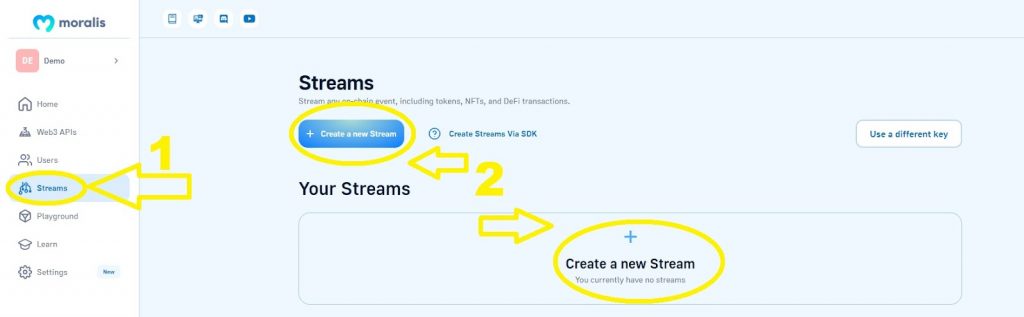
After creating your project, you can focus on the “how to monitor all ETH transfer transactions” challenge. To do so, select the Streams option from the side menu and then click on one of the two “Create a new Stream” buttons:
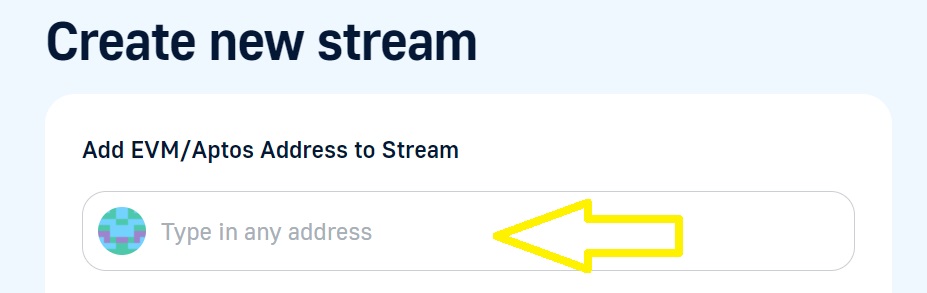
Next, you must enter an Ethereum address you wish to monitor. This can be a wallet address or a token smart contract address. For the sake of this tutorial, we’ll focus on wallet tracking. So, feel free to use any wallet address that you want.
However, for educational and testing purposes, using a wallet address you control is the best option. So, if you use MetaMask, simply copy your address.
To proceed, simply paste the address into the “Add EVM/Aptos Address to Stream” entry field:
As soon as you paste an address into the designated fields, the UI will automatically present you with stream configuration options.
Stream Setup
As indicated in the image below, you can toggle between “Demo” and “Prod”, among other options. Once you’re ready to use this feature for production purposes, you’ll want to switch to “Prod”. However, for the sake of this tutorial, stick to “Demo”:

Looking at the above screenshot, you also see the “Webhook URL”, “Description”, and “Tag” entry fields. For demonstration purposes, you don’t need to provide a webhook URL. As for the description and tag fields, you can go with the default options.
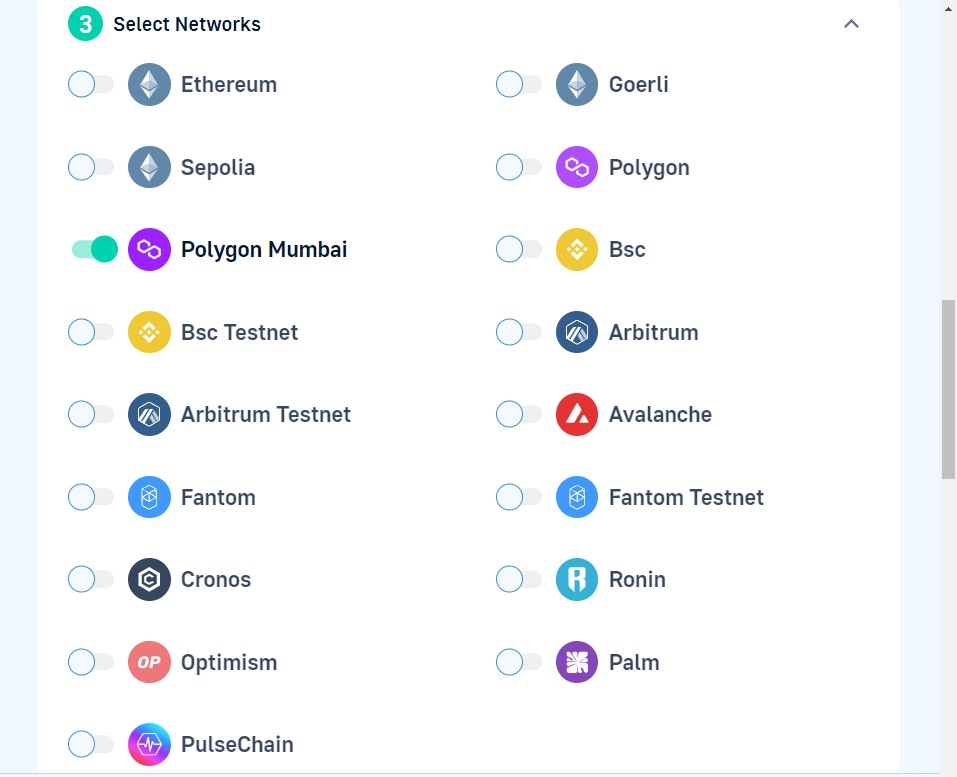
Scrolling further down, you’ll see the “Select Networks” section. This is where you can toggle the buttons next to all the networks you wish to focus on. However, as pointed out previously, for the sake of this tutorial, we’ll be focusing on Polygon’s testnet (Mumbai):
After selecting the network(s) you wish to focus on, you can move on to the fourth step of the stream setup process. Again, you have multiple options:
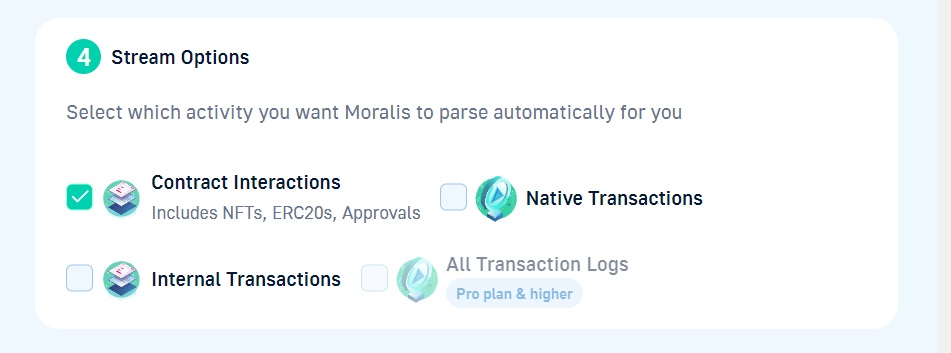
As you can see in the image above, we decided to focus on contract interactions because we will do an example ERC-20 transfer. However, if you were to tackle the “how to monitor all ETH transfer transactions” task head-on, you’d need to select Ethereum in step three and tick the “Native Transactions” box in step four.
Scrolling further down your stream setup, you’ll also see the “Advanced Options” and “Triggers” sections. The former allows you to filter your monitoring agenda further by using the smart contract’s ABI to target specific smart contract functions.
As for the Moralis triggers, you get to run read-only smart contract functions. By doing so, you get results from those functions as part of your Web3 webhooks.
View the Results – Example Transaction
Without any special tweaks, you can already see the power of your new stream. Here’s our example transaction of Chainlink (LINK) tokens on the Mumbai testnet:
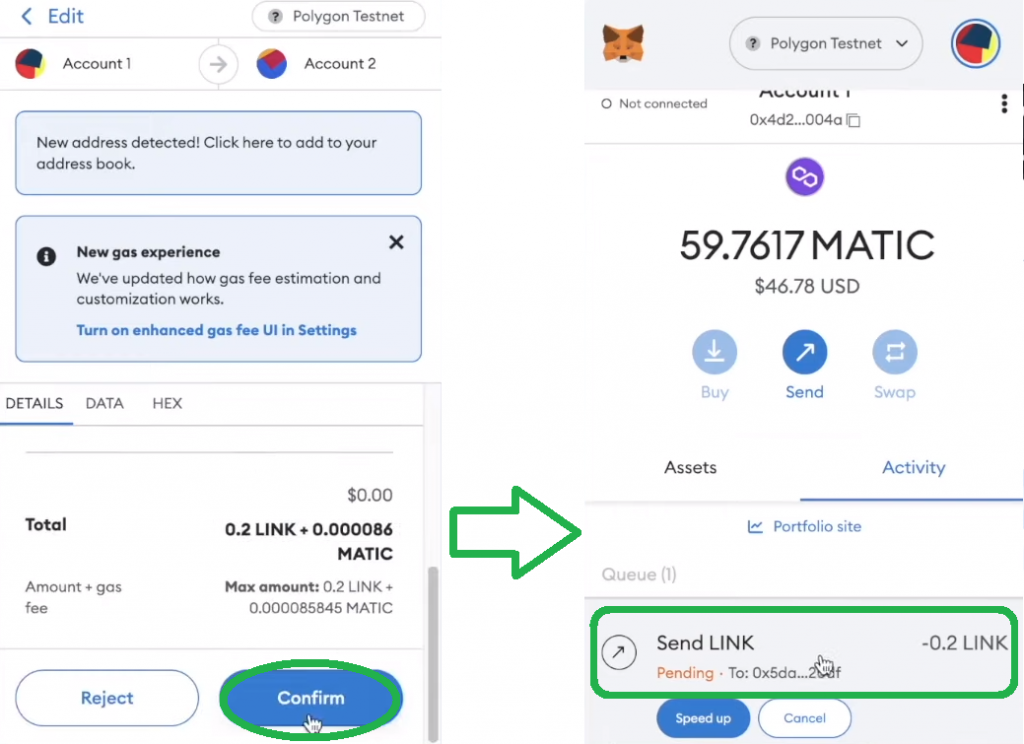
Our demo stream detects the above example transaction instantaneously:
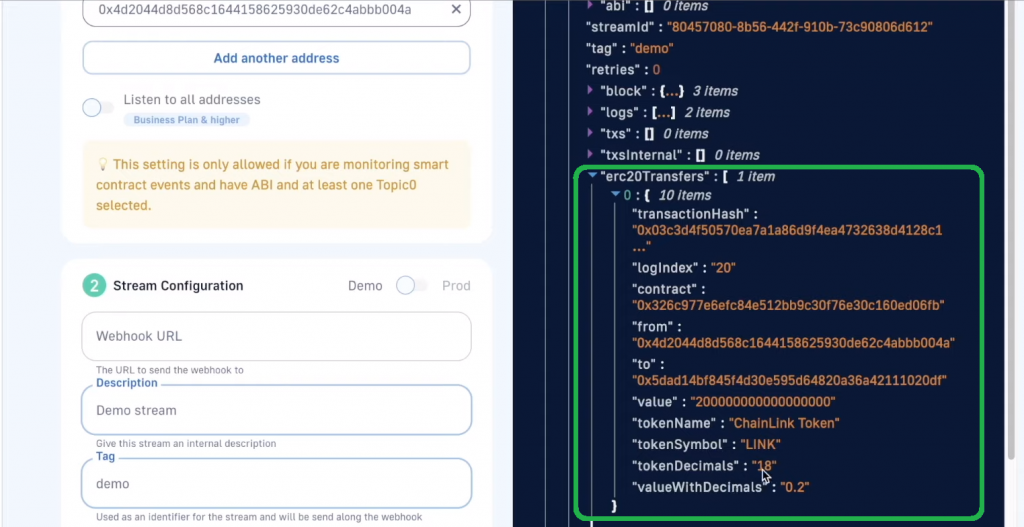
To experience the power of this amazing tool, we encourage you to run your own example transaction. Then, you’ll get to see all the relevant on-chain data that this type of monitoring offers (see the above screenshot), including the transaction hash, the smart contract involved in the event, the “from” and “to” addresses, the transferred value, and more.
Essentially, setting a Moralis stream gives you a powerful detector to spot on-chain events. And, when any of the events occur, you not only detect them, but you also get the related details. As such, you can easily utilize those details to create powerful bots, auto-messaging dapps, and much more.

How to Monitor All ETH Transfer Transactions with Moralis’ JS SDK
Although setting up on-chain monitoring via the Moralis admin area is the simplest path, when building more advanced dapps, you might prefer to set things up via Moralis’ SDK.
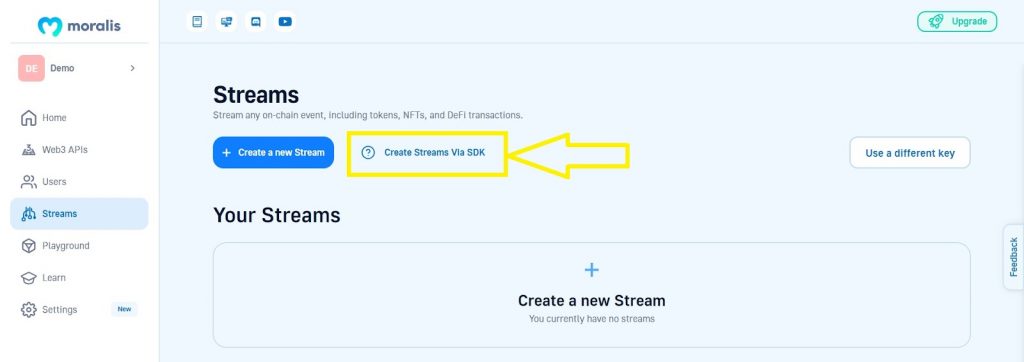
Note: If you want detailed instructions on how to use Streams via the SDK, hit the relevant button on the “Stream” page of your Moralis admin area:
So, you might be wondering how to monitor all ETH transfer transactions programmatically. First, you must decide which programming language/framework you wish to use. You have many options, though JavaScript or Python combined with NodeJS tends to be the most popular.
However, before you can focus on creating your stream via the SDK, you need to prepare a server. The latter will receive a webhook. Fortunately, you can create a simple NodeJS Express app, which will provide you with a “webhook” endpoint.
Create a Local Server
So, to that end, you can use the following lines of code – simply copy-paste them into your “index.js” file:
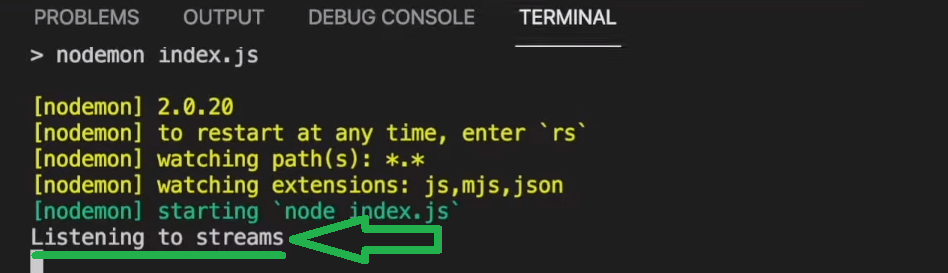
const express = require("express"); const app = express(); const port = 3000; app.use(express.json()); app.post("/webhook", async (req, res) => { const {body} = req; try { console.log(body); } catch (e) { console.log(e); return res.status(400).json(); } return res.status(200).json(); }); app.listen(port, () => { console.log(`Listening to streams`); }); Note: If you’ve never created NodeJS applications and set up Express servers, dive into our “Quickstart NodeJS” guide.
With the above script in place, simply enter and run the npm run start command using your terminal.
In response to the above command, your terminal should return the “Listening to streams” message:
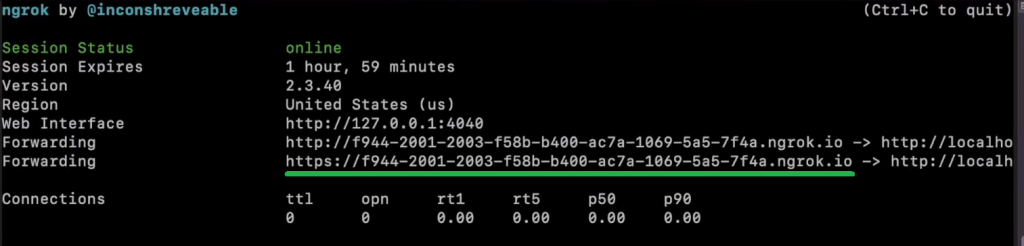
Create a Forwarding Tunnel
Next, open a new terminal and run the ngrok http 3000 command. This will create a tunnel to port 3000. In response to this command, you will get a URL address to use as a webhook URL for your stream.
With your local server and tunnel ready, you can use the lines of code outlined in the upcoming section to monitor various on-chain activities. And, of course, the “how to monitor all ETH transfer transactions” feat is also one of the options you can focus on.
Crypto Transfer Monitoring – Code Walkthrough
Start by initializing another NodeJS app. Next, create a new “index.js” file, which needs to require Moralis and dotenv:
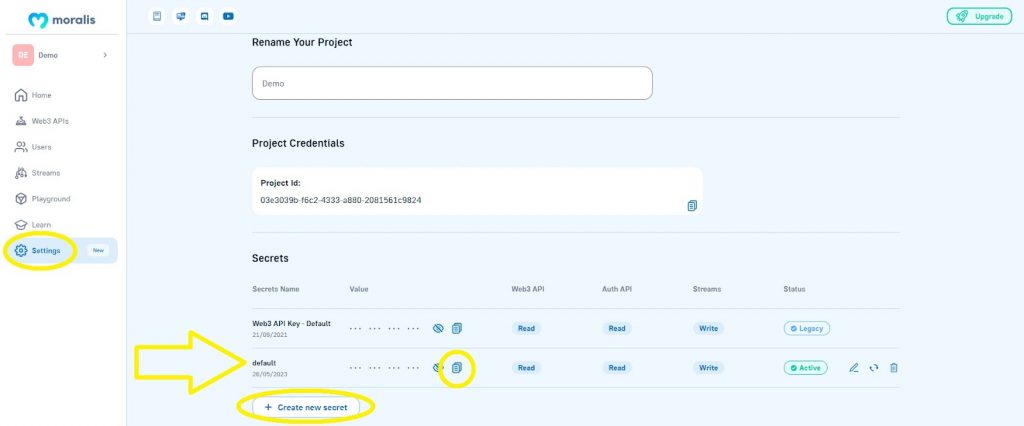
const Moralis = require("moralis").default; const { EvmChain } = require("@moralisweb3/common-evm-utils"); require("dotenv").config(); In addition, you need to create a “.env” file. Inside that file, store your Moralis Web3 API key under the MORALIS_KEY variable. To obtain the value of that variable, access your Moralis admin area, go to “Settings”, and copy the default API key or create a new one:
Now that you have your API key, you can initialize Moralis. To do so, add the following lines of code below require (“dotenv”).config();:
Moralis.start({ apiKey: process.env.MORALIS_KEY, }); Then, it’s time to focus on the stream’s options with the following lines of code:
async function streams(){ const options = { chains: [EvmChain.MUMBAI], tag: "transfers", description: "Listen to Transfers", includeContractLogs: false, includeNativeTxs: true, webhookUrl: "your webhook url" } Looking at the above code snippet, you can see that it defines a chain to focus on, a description, a tag, and a webhook URL. Those are all the same options we covered in the above section, as we used Moralis’ admin UI.
We will focus on listening to native transactions on the Mumbai testnet. So, we set includeContractLogs to false in order to not listen to ERC-20 transactions. Furthermore, we focus on native currency transfers by setting includeNativeTxs to true. Regarding the Mumbai network, the native currency is “test” MATIC.
To use the above lines of code in your “index.js” script, you just need to replace your webhook url with the previously generated ngrok URL:

As indicated in the above image, make sure to add /webhook at the end of your ngrok URL.
Create a New Stream
By covering all the above-outlined steps, you are finally ready to implement the lines of code showcased in the introduction of this article.
As such, focus on the above-defined async function streams and add the following snippets of code below the webhookUrl line:
const newStream = await Moralis.Streams.add(options) const {id} = newStream.toJSON(); const address = "wallet_address_you_want_to_track"; await Moralis.Streams.addAddress({address, id}) console.log("Fin") } streams() The Moralis.Streams.add(options) method uses the above-defined stream option to create a new stream. Next, the code uses const {id} to fetch the new stream’s ID. Plus, it defines a wallet address to monitor. This is where you need to replace wallet_address_you_want_to_track with an actual address.
The Moralis.Streams.addAddress method uses your stream’s ID to assign the wallet address to it. Finally, the code logs Fin once it completes all the previous steps.
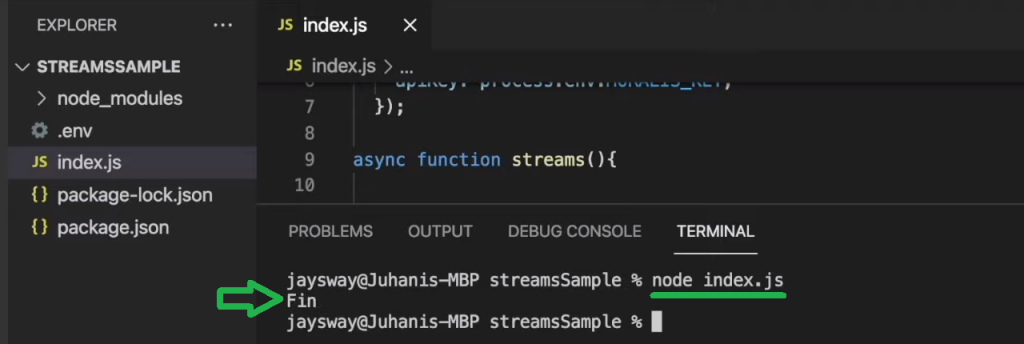
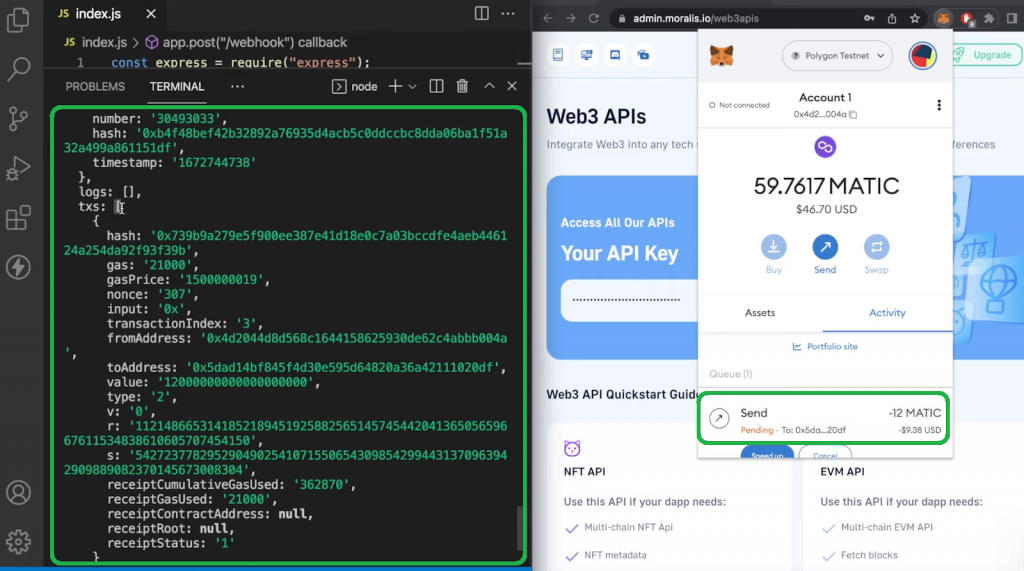
To run your script, enter node index.js. If you did everything according to the above instructions, you should see Fin in your terminal:
Native Currency Example Transaction
Before you go and execute a native currency transaction for testing purposes, open your “Express server” terminal. There, you should see an empty webhook initializing:
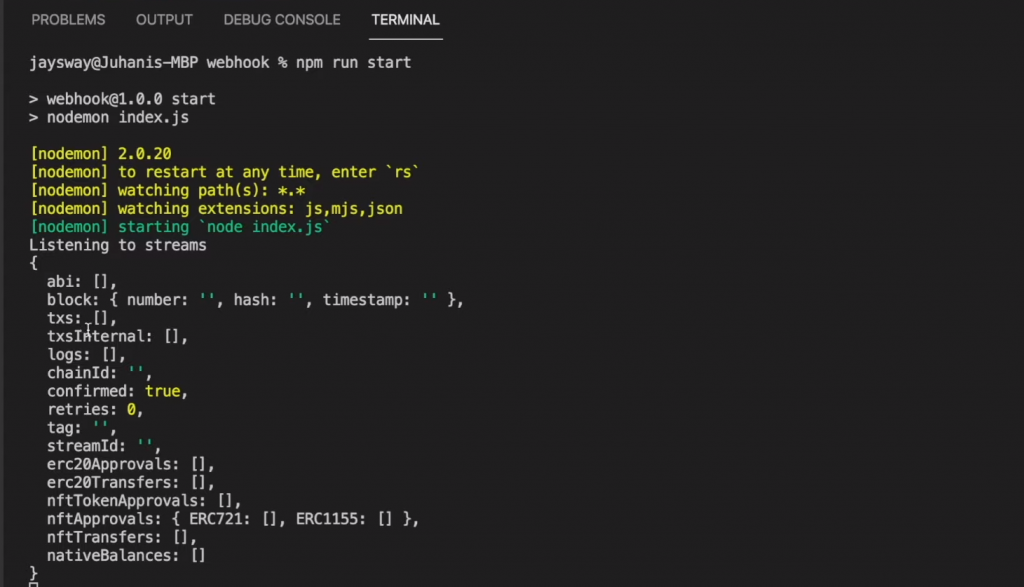
Now, use your MetaMask and transfer some “test” MATIC from or to the address you are monitoring. Once the transaction is confirmed, you’ll be able to see the details of your test transaction in your terminal:
And that is how to monitor all ETH transfer transactions using Moralis Streams via its SDK!
What is Crypto Transaction Monitoring?
Whether you decide to track specific smart contracts or wallets, it all comes down to listening to real-time, on-chain transactions. And since transactions revolve around different activities, you have many options.
For instance, in the above tutorial, we first focused on ERC-20 transfers and then on native transfers. However, these are just two popular examples of on-chain events. There are several other on-chain events you can focus on. And all sorts of dapps can greatly benefit from using this sort of monitoring.
Best Crypto Transaction Monitoring Tool
As you probably know, on-chain data (for public blockchains) is available to anyone. However, in its raw format, this data is not useful. So, devs can either waste their time and resources by parsing the data themselves, or they can use excellent tools to do the work for them.
When it comes to monitoring crypto transactions, Moralis’ Streams API is the best tool. It allows devs to detect events as they occur, and it returns parsed data related to those events. Consequently, this saves dapp developers a ton of time and allows them to focus on creating the best UX instead.
Some of the core benefits of the Streams API tool include:
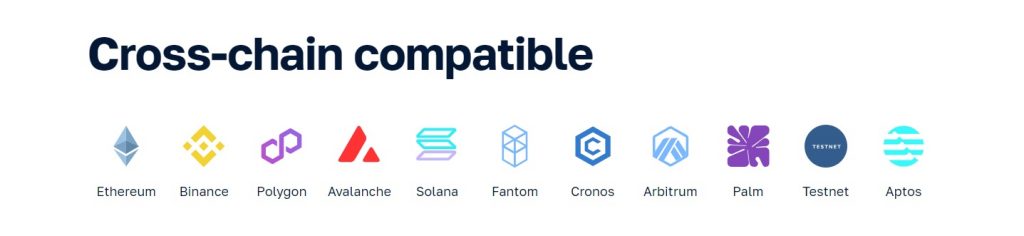
 Cross-chain interoperability
- User-friendliness (cross-platform interoperability)
- Listening to crypto wallets and smart contracts
- Speed and efficiency
- Advanced filtering options
- Accessible with a free account
What’s more, with this powerful tool in your corner, you also avoid:
 Connecting and maintaining buggy RPC nodes
- Building unnecessary abstractions
- Wasting time building complex data pipelines
There are some devs who are still using ethers.js to listen to the blockchain and, in turn, miss out on all of the above benefits. If you are one of them, make sure to check out our ethers.js vs Web3 streams comparison.
How to Monitor All ETH Transfer Transactions – Summary
In today’s article, you had a chance to take on our example tutorial. Furthermore, we demonstrated two different paths to complete the feat regarding how to monitor ETH transfer transactions, including using Moralis’ admin UI or SDK.
In the first example, we focused on monitoring ERC-20 token transactions. However, in the SDK example, we focused on native currencies, which is the option you’d need to choose when focusing on ETH transfers. In both examples, we targeted Polygon’s testnet; however, the principles are the same for all supported EVM-compatible chains, including Ethereum.
So, make sure to use the knowledge obtained in this article to start monitoring on-chain activities without breaking a sweat or the bank!
Don’t forget to move beyond the “how to monitor all ETH transfer transactions” challenge. After all, there are many other features you can incorporate into your killer dapps. Fortunately, for many Web3 features, you can avoid the trap of reinventing the wheel by using Moralis’ Web3 API fleet. The NFT API, Market Data API, Token API, Price API, and Auth API are some popular examples. Moreover, if you want to learn more about these powerful shortcuts, make sure to visit Moralis’ homepage and explore the “Products” menu option.
On the other hand, you may be new to crypto and need to learn more about dapp development first. In that case, we recommend diving into Moralis’ blog. Some of the latest topics there will help you learn about NFT marketplace development, the getLogs method, Web3 market data API, and much more. Nonetheless, you might be interested in taking a professional approach to your crypto education. In that case, consider enrolling in Moralis Academy.
[ad_2]
Read More: moralis.io


 Bitcoin
  Ethereum
  Tether
  XRP
XRP  BNB
BNB  Solana
  USDC
USDC  Dogecoin
  Cardano
  Wrapped Bitcoin
  Hyperliquid
  Wrapped stETH
  Bitcoin Cash
  Sui
Sui  LEO Token
  Stellar
  USDS
USDS  WhiteBIT Coin
  Avalanche
  Toncoin
  Binance Bridged USDT (BNB Smart Chain)
  Shiba Inu
  Litecoin
  WETH
WETH  Wrapped eETH
  Ethena USDe
  Hedera
  Polkadot
  Coinbase Wrapped BTC
  Pi Network
  Pepe
Pepe  Aave
Aave  Ethena Staked USDe
  OKB
OKB  BlackRock USD Institutional Digital Liquidity Fund
  Bittensor
  sUSDS
sUSDS  Aptos
Aptos  Jito Staked SOL
  NEAR Protocol