In this article, we’ll use NextJS and Moralis’ Web3 Auth API to integrate the WalletConnect modal and QR code. As a result of following along with the steps in this article, you can have the following authentication sequence running on your dapp:
For those already familiar with NextJS and Moralis’ API, feel free to access the documentation page to get started immediately. With that said, if you’d like a free tutorial guiding you through the process and learning how to integrate the WalletConnect QR code modal, read on!
Overview
From a user perspective, it’s extremely convenient when a website or app provides the ability to log in using a simple scan of a QR code. As such convenience attracts many users, it’s not surprising to see an increase in sites and apps integrating QR code functionality. Furthermore, this type of authentication is not just popular for traditional apps but also for decentralized applications (dapps). To add this type of Web3 authentication to your dapps, you should focus on WalletConnect. Fortunately, that’s exactly what this article focuses on. More specifically, this article explores how to integrate the WalletConnect modal and QR code!
Moving forward, you’ll have a chance to follow our lead and create a simple dapp using NextJS and Moralis. After all, it is the Moralis Web3 Auth API that enables you to integrate the WalletConnect modal into any dapp without breaking a sweat. While we will focus on using the NextJS framework herein, it’s worth pointing out that Moralis is fully cross-platform interoperable. As such, you can create dapps with the WalletConnect QR code modal using a wide range of legacy dev platforms and programming languages. Accordingly, Moralis helps bridge the development gap between Web2 and Web3. Aside from the ultimate Web3 Auth API, Moralis offers the best EVM and Solana APIs. These include the NFT API, Token API, and Streams API. What’s more, you can use these excellent tools on all leading blockchain networks.
However, before we show you how to build a simple NextJS dapp that includes the WalletConnect modal, we need to get you all up to speed. As such, we’ll first explore WalletConnect’s open-source protocol and look at what it’s used for. That said, make sure to get ready for the action-taking part of today’s article by creating your free Moralis account now.

Exploring WalletConnect’s Open-Source Protocol
You can still hear people say that WalletConnect is a crypto wallet. However, that’s not completely accurate. WalletConnect is an open-source protocol that establishes secure connections between crypto wallets and decentralized applications (dapps). This open-source protocol uses symmetric encryption via a shared key between two peers, which makes it one of the safest methods of Web3 authentication.
You can also think of WalletConnect as a decentralized Web3 messaging layer and a standard for connecting blockchain wallets to dapps. In addition, it’s worth pointing out that WalletConnect’s team strives to continuously expand this protocol’s interoperability. Hence, we can expect high quality and reliability from WalletConnect moving forward. As a dapp developer, you don’t want to overlook the critical infrastructure for Web3 wallets and dapps that WalletConnect supports. It achieves that by ensuring that the following core concepts are correctly implemented:
- Chain Agnostic – WalletConnect believes in the multi-chain future of the crypto domain. As such, the WalletConnect team focuses on supporting all the leading chains. These include Ethereum, Solana, and many others. To ensure a chain-agnostic approach, WalletConnect is committed to continually adding support for emerging reputable chains.
- Multi-Chain – WalletConnect’s users can connect any of the supported wallets to multiple chains at the same time.
- Platform Agnostic – In addition to supporting different chains, WalletConnect also supports different platforms. Hence, the WalletConnect modal serves web, desktop, mobile, and gaming dapps.
What is WalletConnect Used For?
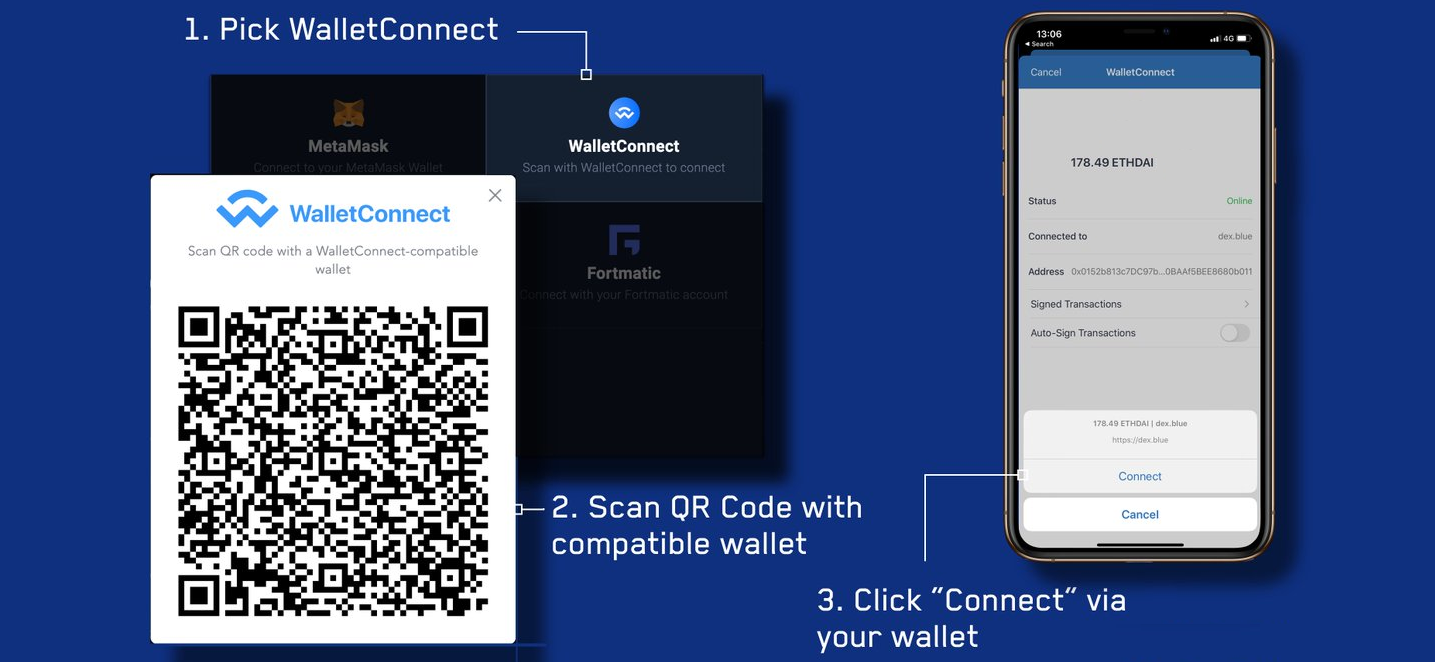
The above explanation should clarify that the WalletConnect modal establishes safe connections between Web3 wallets and dapps. As such, let’s explore what this process looks like. For starters, it’s worth pointing out that WalletConnect gives users two ways to establish the connection. On the one hand, users can do that by scanning a QR code with their mobile Web3 wallets – this is the more user-friendly method and is offered by default. On the other hand, users may also use a deep link, which is particularly handy for users that do not have mobile wallets to scan the code.
However, both methods let one peer (a dapp) send out a code or link. Then, it’s up to the other peer (a crypto wallet) to scan or approve the connection. Via this method, dapps that include the WalletConnect modal and QR code enable users to easily establish safe and reliable Web3 connections.
Furthermore, WalletConnect’s impressive range of supported wallets makes this protocol extremely practical. After all, it is almost impossible to find unsupported wallets. Moreover, the official WalletConnect website currently states that their solution works with more than 170 crypto wallets. In case you want to explore what Web3 wallets WalletConnect supports, visit WalletConnect’s official website, scroll down to the “Looking for a wallet?” section, and click on the “VIEW ALL WALLETS” button:

The above button will take you to the “Explore” page. There, you’ll be able to see all the supported wallets:

It’s worth pointing out that there are sixteen pages (fifteen full pages) with fifteen wallets per page (see the screenshot above). So, if we do simple math, it’s evident that WalletConnect already supports over 225 Web3 wallets.
WalletConnect Modal – How to Integrate the WalletConnect QR Code Modal
With the basics under your belt, it’s time to build a simple dapp with the WalletConnect QR code modal. If you remember, we’ll be using NextJS and Moralis to complete today’s feat. Hence, the power of Moralis’ Auth API makes integrating the WalletConnect modal as straightforward as it gets. Moving on, we’ll take you through all the steps you need to complete to end up with a simple dapp on your local server.

Also, we’ll provide you with all the lines of code. As such, you’ll be able to simply copy and paste the content to your instances of the required scripts. Here’s the list of the files you’ll get to create if you decide to complete today’s challenge:
- “.env.local“ – In this file, you’ll store all the local variables, including your Moralis Web3 API key.
- “_app.jsx“ – You’ll use this file to wrap your app with “WagmiConfig” and “SessionProvider”.
- “request-message.js“ – This file will serve as an endpoint for making requests to generate a unique message.
- “signin.jsx“ – You’ll use this file to create the “signin” page. As such, this file will contain the connector that will enable users to authenticate themselves with the WalletConnect QR code modal.
- “[…nextauth].js“ – This is the file that you’ll use to configure NextAuth.
- “user.jsx“ – You’ll use this file to create the “user” page that the successfully authenticated users will land on. For the sake of this tutorial, it will contain some basic user information.
However, before you get your hands dirty, we also want to ensure that you know exactly what you’ll be building. As such, let’s do a quick demo of our example dapp.
Our Example NextJS Dapp Demo
The following screenshot shows the gist of the “signing” page on the client side:
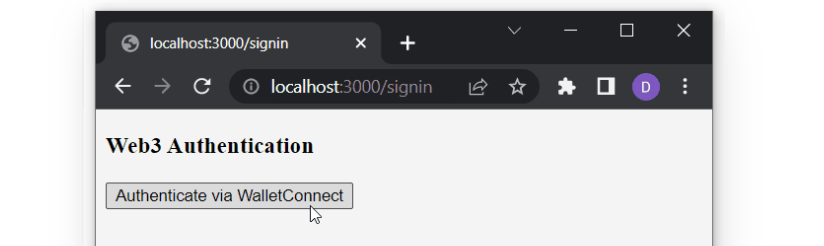
As you can see, there is the “Web3 Authentication” title and the “Authenticate via WalletConnect” button. Hence, it’s very intuitive for users to click on the button that will trigger the WalletConnect modal:

Using their mobile wallets, users get to scan the above QR code and confirm their authentication on the mobile devices:
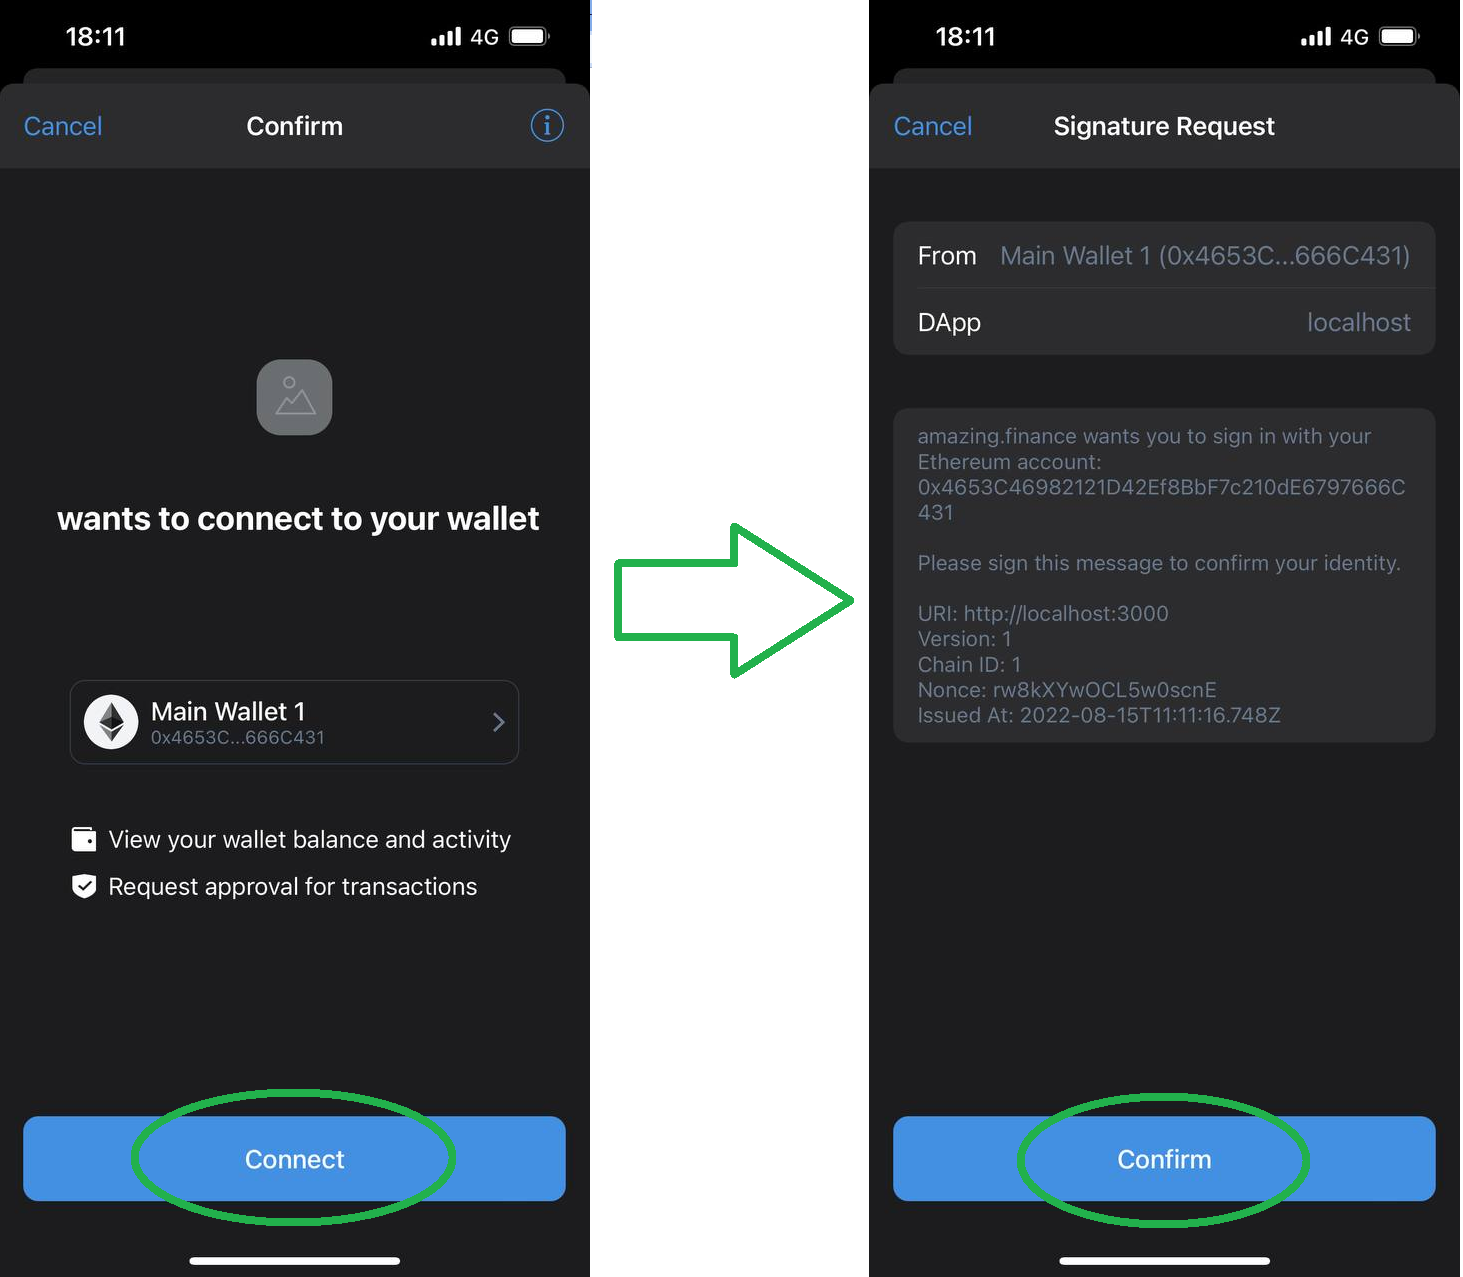
The above image shows the confirmation on Trust Wallet; however, the process is similar for other crypto wallets.
Finally, once users connect their wallet to our dapp, they land on the “user” page. The latter displays some basic data related to the connected profile:

Getting Started – Prerequisites and the Initial Setup for Your NextJS Dapp
Before completing the initial setups, make sure to get the following ready:
- Create your Moralis account.
- Install and set up Visual Studio Code (VSC).
- Create a NextJS application. Use the “Create Next App” page in the NextJS docs or complete our “Using NextJS” tutorial if you need help with that step.
With the above prerequisites under your belt, you are ready to install the required dependencies. So, you can use one of the following commands (depending on your package manager) to install Moralis, NextAuth, and Axios:
npm install moralis next-auth axios
yarn add moralis next-auth axios
pnpm add moralis next-auth axios
Moreover, you also need to install the wagmi Web3 library using one of the following commands:
npm install wagmi ethers
yarn add wagmi ethers
pnpm add wagmi ethers
Next, create a “.env.local” file in your app’s root and populate it with the required environment variables:
- “APP_DOMAIN” – An RFC 4501 DNS authority that’s requesting the signing.
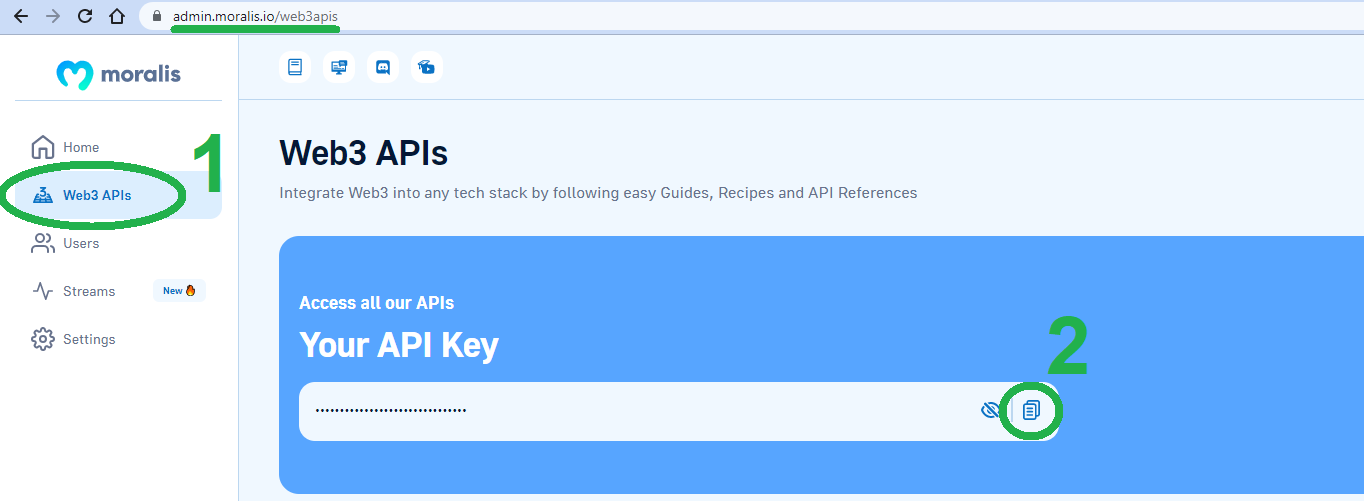
- “MORALIS_API_KEY” – Your gateway to using Moralis.You can obtain the API key inside your Moralis admin area:
- “NEXTAUTH_URL” – Your app address. In the development stage, you want to use “http://localhost:3000” or similar.
- “NEXTAUTH_SECRET” – A variable that will encrypt the JWT tokens of users. You may use any value here or generate one at “https://generate-secret.now.sh/32“.
Nonetheless, take a look at this example that will help you better understand the above environment variables:

Note: Keep in mind that you need to restart your dapp whenever you modify your “.env.local” file.
Override the NextJS “App” Component
NextJS uses the “App” component to initialize pages, which you can override to take control of the page initialization. To do this, wrap your pages with “WagmiConfig” and “SessionProvider“. Hence, create the “_app.jsx” file inside the “pages” folder. Then, use the following lines of code to populate that file:
import { createClient, configureChains, defaultChains, WagmiConfig } from 'wagmi'; import { publicProvider } from 'wagmi/providers/public'; import { SessionProvider } from 'next-auth/react'; const { provider, webSocketProvider } = configureChains(defaultChains, [publicProvider()]); const client = createClient({ provider, webSocketProvider, autoConnect: true, }); function MyApp({ Component, pageProps }) { return ( <WagmiConfig client={client}> <SessionProvider session={pageProps.session} refetchInterval={0}> <Component {...pageProps} /> </SessionProvider> </WagmiConfig> ); } export default MyApp; Create the “requestMessage” Endpoint
Start this step by creating a new API file and calling it “request-message.js”. Make sure to create that file inside the “auth” folder. The latter should be inside “pages/api”. Furthermore, this endpoint will make requests to “Moralis.Auth” to generate a unique message. Later on, you’ll need to sign that message on the client side. Below are the lines of code that you need to copy-paste into “request-message.js”:
import Moralis from 'moralis'; const config = { domain: process.env.APP_DOMAIN, statement: 'Please sign this message to confirm your identity.', uri: process.env.NEXTAUTH_URL, timeout: 60, }; export default async function handler(req, res) { const { address, chain, network } = req.body; await Moralis.start({ apiKey: process.env.MORALIS_API_KEY }); try { const message = await Moralis.Auth.requestMessage({ address, chain, network, ...config, }); res.status(200).json(message); } catch (error) { res.status(400).json({ error }); console.error(error); } } Create a Sign-In Page with the WalletConnect Modal
With the initial setup completed and the “_app.jsx” and “request-message.js” files in place, it’s time to integrate WalletConnect. Start by creating the “signin.jsx” file inside the “pages” folder. This file will serve as a new page once you populate it according to our instructions. For starters, enter the following:
function SignIn() { return ( <div> <h3>Web3 Authentication</h3> </div> ); } export default SignIn; Moving on, you need to create the “Authenticate via WalletConnect” button, as presented in the demo above. Moreover, for now, also “console.log” users’ details. You’ll achieve both of these goals by updating your “signin.jsx” file to look as follows:
import { useConnect } from 'wagmi'; import { InjectedConnector } from 'wagmi/connectors/injected'; import axios from 'axios'; function SignIn() { const { connectAsync } = useConnect(); const handleAuth = async () => { const { account, chain } = await connectAsync({ connector: new InjectedConnector() }); const userData = { address: account, chain: chain.id, network: 'evm' }; console.log(userData) }; return ( <div> <h3>Web3 Authentication</h3> <button onClick={() => handleAuth()}>Authenticate via WalletConnect</button> </div> ); } export default SignIn; Extend the “handleAuth” Functionality
With the above lines of code in place, you already have your Web3 authentication page’s appearance covered. Thus, it’s time to also add the actual Web3 functionality. So, start by extending the “handleAuth” functionality. You’ll use the latter to call the previously created “requestMessage” endpoint. As such, update the “signin.jsx” script to match the lines of code below:
import { useAccount, useConnect, useSignMessage, useDisconnect } from 'wagmi'; import { InjectedConnector } from 'wagmi/connectors/injected'; import axios from 'axios'; function SignIn() { const { connectAsync } = useConnect(); const { disconnectAsync } = useDisconnect(); const { isConnected } = useAccount(); const { signMessageAsync } = useSignMessage(); const handleAuth = async () => { // Disconnects the Web3 provider if it's already active if (isConnected) { await disconnectAsync(); } // Enabling WalletConnect const { account, chain } = await connectAsync({ connector: new WalletConnectConnector({ options: { qrcode: true, }, }), }); const userData = { address: account, chain: chain.id, network: 'evm' }; // Making a post request to our 'request-message' endpoint const { data } = await axios.post('/api/auth/request-message', userData, { headers: { 'Content-Type': 'application/json', }, }); const message = data.message; const signature = await signMessageAsync({ message }); console.log(signature) }; return ( <div> <h3>Web3 Authentication</h3> <button onClick={() => handleAuth()}>Authenticate via WalletConnect</button> </div> ); } export default SignIn; Configure NextAuth
In order to properly configure NextAuth, create a “[…nextauth].js” file. Also, make sure the file is inside the “auth” folder (path: “pages/api/auth/”). Then, add the following code to this file:
import CredentialsProvider from 'next-auth/providers/credentials'; import NextAuth from 'next-auth'; import Moralis from 'moralis'; export default NextAuth({ providers: [ CredentialsProvider({ name: 'MoralisAuth', credentials: { message: { label: 'Message', type: 'text', placeholder: '0x0', }, signature: { label: 'Signature', type: 'text', placeholder: '0x0', }, }, async authorize(credentials) { try { // "message" and "signature" are needed for authorization // We described them in "credentials" above const { message, signature } = credentials; await Moralis.start({ apiKey: process.env.MORALIS_API_KEY }); const { address, profileId } = ( await Moralis.Auth.verify({ message, signature, network: 'evm' }) ).raw; const user = { address, profileId, signature }; // Returning the user object and creating a session return user; } catch (e) { console.error(e); return null; } }, }), ], // Adding user info to the user session object callbacks: { async jwt({ token, user }) { user && (token.user = user); return token; }, async session({ session, token }) { session.user = token.user; return session; }, }, }); Secure Authentication with WalletConnect
As for the final tweak to the “signin.jsx” file, you need to equip it with NextAuth authentication. In addition, you’ll also import “WalletConnectConnector” from wagmi and “useRouter” from Next. Furthermore, the lines of code below will also properly expand the “SignIn” function:
import { signIn } from 'next-auth/react'; import { useAccount, useConnect, useSignMessage, useDisconnect } from 'wagmi'; import { useRouter } from 'next/router'; import axios from 'axios'; import { WalletConnectConnector } from 'wagmi/connectors/walletConnect'; function SignIn() { const { connectAsync } = useConnect(); const { disconnectAsync } = useDisconnect(); const { isConnected } = useAccount(); const { signMessageAsync } = useSignMessage(); const { push } = useRouter(); const handleAuth = async () => { if (isConnected) { await disconnectAsync(); } // Added WalletConnectConnector const { account, chain } = await connectAsync({ connector: new WalletConnectConnector({ options: { qrcode: true, }, }), }); const userData = { address: account, chain: chain.id, network: 'evm' }; const { data } = await axios.post('/api/auth/request-message', userData, { headers: { 'Content-Type': 'application/json', }, }); const message = data.message; const signature = await signMessageAsync({ message }); // Redirect user after success authentication to '/user' page const { url } = await signIn('credentials', { message, signature, redirect: false, callbackUrl: '/user' }); /** * instead of using signIn(..., redirect: "/user") * we get the url from callback and push it to the router to avoid page refreshing */ push(url); }; return ( <div> <h3>Web3 Authentication</h3> <button onClick={() => handleAuth()}>Authenticate via WalletConnect</button> </div> ); } export default SignIn; Add the User Page
In the above step, you’ve completed your “signin” page. However, if you remember the above demo, our example dapp also has the “user” page. Thus, revisit the “pages” folder and create a new file – “user.jsx”. Use the following lines of code to ensure that this page displays some basic user info and offers the “Sign out” button:
import { getSession, signOut } from 'next-auth/react'; // Gets a prop from getServerSideProps function User({ user }) { return ( <div> <h4>User session:</h4> <pre>{JSON.stringify(user, null, 2)}</pre> <button onClick={() => signOut({ redirect: '/signin' })}>Sign out</button> </div> ); } export async function getServerSideProps(context) { const session = await getSession(context); // Redirect if not authenticated if (!session) { return { redirect: { destination: '/signin', permanent: false, }, }; } return { props: { user: session.user }, }; } export default User; The “user” page was the final piece of today’s puzzle. As such, you’ve now successfully created a simple NextJS dapp with the WalletConnect QR code modal. Since you were able to simply copy our code, everything should be in order. However, we still encourage you to test your dapp.
Test the WalletConnect QR Code Modal
Presuming that you used the “3000” port (as instructed) for your “NEXTAUTH_URL” variable, use your browser to go to “http://localhost:3000/signin“. By doing so, you’ll land on the “signin” page of your dapp, where you can test the authentication process. Basically, you need to complete all the steps presented in the demo above. So, start by clicking on “Authenticate via WalletConnect”:

Nonetheless, you should land on the “user” page (“http://localhost:3000/user”) if the WalletConnect QR code modal is functioning properly. However, if you cannot authenticate yourself, the above code will redirect you back to the “signing” page. If that happens, make sure to re-examine the above steps.
How to Integrate the WalletConnect Modal and QR Code – Summary
You now know that WalletConnect is an open-source protocol designed to establish safe connections between Web3 wallets and dapps. In this article, you also learned that it supports over 225 wallets across multiple chains. Furthermore, you had a chance to follow our lead and create your own NextJS dapp with the WalletConnect modal. To make the process as frictionless as possible, we provided you with all the scripts you needed to finish this challenge. As a result, you created the following six files, which contain all the required lines of code:
- “.env.local“
- “_app.jsx“
- “request-message.js“
- “signin.jsx“
- “[…nextauth].js“
- “user.jsx“
Moving forward, we encourage you to work on today’s example dapp by adding additional Web3 functionalities. That way, you’ll get better acquainted with the power of Moralis’ Web3 API and, in turn, build up the confidence to tackle other projects. As part of the learning process, we recommend you explore other how-to guides and tutorials in the Moralis documentation. Also, make sure to use the Moralis YouTube channel and the Moralis blog to expand your blockchain development horizons. For instance, in some of our latest articles, we focus on a Web3 JS tutorial for blockchain developers, building a Unity Web3 multiplayer game, explaining Dogechain, the Aptos and Sui chains, the ultimate blockchain tech stack, and more.
On the other hand, you might be eager to go full-time crypto as soon as possible. If that’s the case, you should enroll in Moralis Academy and become blockchain certified. This will significantly improve your chances of landing your dream crypto job. There are many courses available; however, we recommend starting with blockchain and Bitcoin fundamentals.
Read More: moralis.io


 Bitcoin
  Ethereum
  Tether
  XRP
XRP  BNB
BNB  Solana
  USDC
USDC  Dogecoin
  Cardano
  Wrapped Bitcoin
  LEO Token
  Toncoin
  USDS
USDS  Stellar
  Wrapped stETH
  Avalanche
  Sui
Sui  Shiba Inu
  Hedera
  Litecoin
  Polkadot
  MANTRA
  Bitcoin Cash
  Ethena USDe
  WETH
WETH  Binance Bridged USDT (BNB Smart Chain)
  Pi Network
  Wrapped eETH
  WhiteBIT Coin
  Hyperliquid
  OKB
OKB  Pepe
Pepe  sUSDS
sUSDS  NEAR Protocol
  Aptos
Aptos  Gate
Gate  Coinbase Wrapped BTC
  Ondo
Ondo