Using the enterprise-grade EVM API from Moralis, developers can easily call a smart contract function from JavaScript. Simply install Moralis’ SDK and call the ”runContractFunction” endpoint! Furthermore, by defining specific parameters in the code snippet below, including the contract address, function name, ABI, etc., you can run any EVM ”read-only” contract function with a few lines of code:
const response = await Moralis.EvmApi.utils.runContractFunction({ address, functionName, abi, }); If you want more information on how this works, check the documentation page to run a contract function or follow along in this tutorial as we apply this in practice! That said, no matter which path you decide to follow, you need to have a Moralis account. So, create one for free now and unlock the power of blockchain!

Overview
Smart contracts are at the core of blockchain development and are essential components of the Web3 ecosystem. In the case of Ethereum, smart contracts consist of two elements, one of which is smart contract functions. Such a function is a piece of code used multiple times to perform given tasks. Consequently, in Web3 development, it is highly beneficial for a developer to understand how to run Web3 contract methods. If you want to learn how to do so, join us in this tutorial as we show you how to call a smart contract function from JavaScript using Moralis!
Before we show you how to call a smart contract function from JavaScript, the article will briefly cover the intricacies of both contracts and functions. So, if you are already familiar with these concepts, feel free to skip straight into the central part of the tutorial.
To call smart contract functions seamlessly, we will be using Moralis’ Ethereum Web3 API. However, this is only one of the prominent blockchain development tools offered by Moralis. As such, if you are truly serious about becoming a blockchain developer, you should explore some of Moralis’ other interfaces. An example is the Streams API, enabling you to quickly set up Web3 webhooks to stream on-chain data directly into the backend of Web3 projects!
So, if you want to access these tools and fully leverage the power of blockchain technology, sign up with Moralis now entirely for free!
Exploring Contracts and Functions – How to Call Smart Contract Function from JavaScript
Before exploring how to call a smart contract function with JavaScript, the article will briefly dive into the intricacies of contracts and functions. If you are already familiar with these two concepts, feel free to skip straight into the ”How to Call Smart Contract Function from JavaScript” tutorial. Otherwise, join us in the following sections, where we start by answering the question, ”what are smart contracts?”.
What are Smart Contracts?
Smart contracts – also generally referred to as ”Web3 contracts” – are at the backbone of the Web3 ecosystem and are essentially codified agreements between two or more parties over the internet. Consequently, smart contracts have the same fundamental purposes as traditional contracts. However, there is a crucial difference between smart contracts and traditional ones that is quite important to take note of. The code on the blockchain regulates the ”terms and conditions” rather than a third-party actor.

To narrow the scope slightly, let us focus more specifically on Ethereum smart contracts, as this is the most popular network for blockchain development. These smart contracts are programs running on the Ethereum blockchain. Furthermore, they consist of two core components: code and data. The code is a collection of functions, and the data is the contract’s state.
A common metaphor for describing the functionality of a smart contract is a digital vending machine. Like traditional vending machines, smart contracts produce guaranteed outputs based on given inputs. Accordingly, you can provide contracts with cryptocurrency, and they run code in return.
Nevertheless, that briefly covers smart contracts. For a more profound breakdown, check out our article on Web3 contracts! Now, let’s get more specific and explore one of their core components: smart contract functions!
What are Smart Contract Functions?
As we briefly mentioned in the initial section, functions are one of two core components of Ethereum smart contracts. So, what exactly are smart contract functions? A smart contract function is a piece of reusable code that can be called from outside or within a particular smart contract that accomplishes a specific task. Creating functions provides several benefits, such as eliminating the need to write code multiple times and reducing the chance of mistakes occurring.

Additionally, there are two types of smart contract functions:
- Functions that generate on-chain transactions.
- Functions that are ”read-only” and, therefore, do not result in blockchain transactions.
In this tutorial, we will focus on the former. Specifically, in the next section, we will show you how to use Moralis to call a ”read-only” smart contract function from JavaScript. If this sounds exciting, stay stuck in as we cover the process from start to finish!
How to Call Smart Contract Function from JavaScript
The following tutorial sections illustrate how you can call a smart contract function from JavaScript. To make this as accessible as possible as you follow our lead, we’ll utilize Moralis’ EVM API and the ”runContractFunction” endpoint. Through this endpoint, you can call any ”read-only” smart contract function from JavaScript with only a few lines of code!
To demonstrate how this works, we will show you how to call the ”getPrice()” function of the “Cool Cats” NFT contract. Calling this function returns the minting price of the tokens, which you can use as you see fit in your development endeavors. Here is a quick overview of the parts we cover in this article:
- Set Up a NodeJS Project
- Add the Code to the ”index.js” File
- Run the Program
By covering the sections above, you will learn not only how to call ”getPrice()” but any ”read-only” smart contract function. So, if this sounds exciting, join us in this tutorial as we kick things off by showing you how to set up a NodeJS project!
However, perhaps you prefer watching YouTube videos to educate yourself. If so, you can also check out the Moralis YouTube clip below. In this video, you can find a comprehensive breakdown of the entire process, along with additional examples of other smart contract function calls:
Set Up a NodeJS Project
In this initial section of the tutorial on how to call a smart contract function from JavaScript, we will show you how to set up a NodeJS project. As such, to begin with, if you have not already, make sure to install the latest version of NodeJS. You can download and install it using the following link: “https://nodejs.org/en/”.
From there, open your integrated development environment (IDE) and create a new project folder. We are using Visual Studio Code (VSC) throughout the article. As such, if you opt for another environment, note that there might occasionally be slight differences in the process. Nevertheless, once you have opened your IDE, go ahead and launch a new terminal. If you are using VSC, click on the ”Terminal” tab at the top and then hit ”New Terminal”:
From there, you can initialize a new NodeJS project by running the command below in the project’s root folder:
npm init -y
With the project initialized, you also need to install the required dependencies. To do so, run this command in the terminal:
npm i moralis dotenv
That covers the initial setup process of the NodeJS project. However, from here, you also need to add three new files ”.env”, ”abi.json”, and ”index.js”. As such, in the following sub-section, we will show you how to create them and take a closer look at what content you must add to each.
Add ”.env”, abi.json”, and ”index.js”
The first file you need to create is ”.env”, which will be used to safely store your Web3 API key. As such, open the file and create a new ”MORALIS_KEY” environment variable. It should look something like this:
MORALIS_KEY = “JnJnO…”
However, as you might have concluded already, you need to replace ”JnJnO…” with your actual key. To get the key, you need to have an active Moralis account. So either log in or sign up with Moralis for free right now. From there, log in to the admin panel, go to the ”Web3 APIs” tab, copy the key, and input it into the ”.env” file:

Now that you have added your Moralis API key, the next step is to create the ”abi.json” file. For this file, you will want to add the ABI of the contract you are interested in. To get the contract ABI, we will use the Etherscan blockchain explorer. Specifically, we’ll use the Cool Cats NFT contract to demonstrate how this works.
Nevertheless, open Etherscan and navigate to the contract you are interested in. In our case, it looks something like this:
From there, scroll down and click on the ”Contract” tab:
You can then scroll down even further, and you should find the contract ABI almost at the bottom:
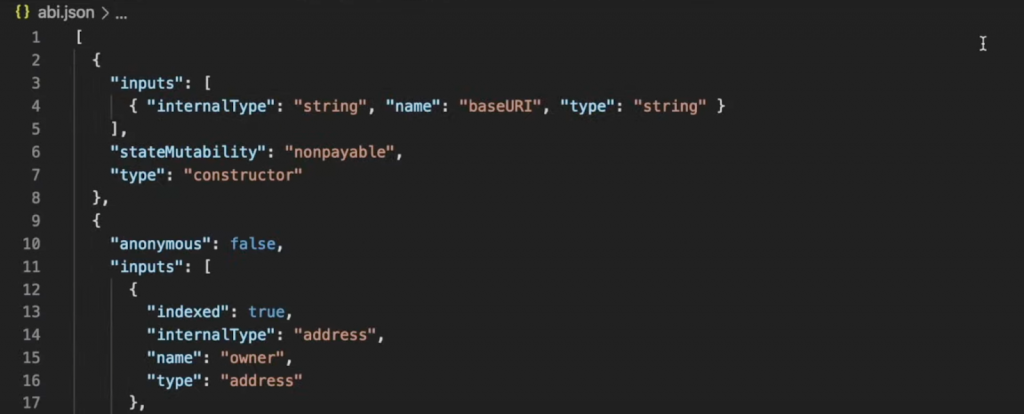
Copy this code and input it into the ”abi.json” file. It should now look something like this:

Finally, the last file you need to add is ”index.js”. This will be the file to which we add the logic used to call a smart contract function from JavaScript. Consequently, this ”index.js” requires extra attention, which is why we dedicate the following section to breaking down the code!
Add the Code to the ”index.js” File
Now that you have set up the NodeJS project and created the required files, it is time to add the code used to call a smart contract function from JavaScript. So, to begin with, open ”index.js” and add the following code snippet at the top of the file:
const Moralis = require("moralis").default; require("dotenv").config(); const ABI = require("./abi.json"); The above code imports Moralis, provides access to the contents of the ”.env” file, and stores the contract ABI in the ”ABI” variable. From there, you need to initialize Moralis and pass the Web3 API key you specified earlier as a parameter. To do so, add the following code below the ”ABI” variable:
Moralis.start({ apiKey: process.env.MORALIS_KEY }) Next, with Moralis initialized, create a new asynchronous function. This function will use Moralis’ EVM API to call the ”runContractFunction” endpoint with a few parameters. In this case, since we want to call the ”getPrice()” function, you only need to add the ”address”, ”functionName”, and ”abi” as parameters:
.then(async()=>{ const response = await Moralis.EvmApi.utils.runContractFunction({ address:"0x1A92f7381B9F03921564a437210bB9396471050C", functionName:"getPrice", abi: ABI }) Finally, to top things off, we console-log the response by adding the following code at the bottom of the ”index.js” file:
console.log(response.raw)
All in all, your file should now look something like this:
const Moralis = require("moralis").default; require("dotenv").config(); const ABI = require("./abi.json"); Moralis.start({ apiKey: process.env.MORALIS_KEY }).then(async()=>{ const response = await Moralis.EvmApi.utils.runContractFunction({ address:"0x1A92f7381B9F03921564a437210bB9396471050C", functionName:"getPrice", abi: ABI }) console.log(response.raw) }) So, by running the ”index.js” file, the program should return the mint price of the Cool Cats NFTs. Nevertheless, let us briefly show you how to run the program and review the results in the next section!
Run the Program
Finally, now that you have added the code used to call a smart contract function, all that remains is running the program. To do so, open a new terminal and simply run the following command:
node index.js
This executes the code, and you should receive a response similar to the one shown below:

The response is ”20000000000000000”, which is the number ”2” followed by sixteen zeros. As such, this is the mint price without considering the decimals. The actual price is 0.2 ETH.
Congratulations! That’s it for this tutorial! If you have followed along this far, you now know how to call a smart contract function from JavaScript. What’s more, even though we showed you how to call the ”getPrice()” function, in particular, you can apply the same fundamental principles to call other ”read-only” functions of any EVM-based contract!
If you want to check out what other smart contract functions are available, you can closely examine the ”abi.json” file or browse Etherscan. For Etherscan, you can click on the ”Contract” tab and then hit ”Read Contract” to find all functions available. For instance, here is what it looks like for the Cool Cats contract:
What’s more, if you want further information on how to call a smart contract function with JavaScript, check out the EVM API documentation or the documentation page to run a contract function.
Summary – How to Call Smart Contract Function From JavaScript
In this article, we taught you how to call a smart contract function from JavaScript using Moralis. More specifically, we used the ”runContractFunction” endpoint to call the ”getPrice()” function of the Cool Cats contract. Consequently, if you have followed along this far, you can use the same fundamental principles to call any smart contract function in the future!
If you found this tutorial informative, make sure to check out additional Moralis-based content here at the Web3 blog. For instance, explore the best Ethereum API in 2023 or learn the differences between ethers.js vs Web3 streams!
Nevertheless, no matter what blockchain endeavor you embark on in the future, sign up with Moralis now, as this Web3 provider facilitates a more seamless developer experience for everyone!
Read More: moralis.io


 Compound
  Wormhole
  Sun Token
  Staked HYPE
  Movement
  Popcat
  Coinbase Wrapped Staked ETH
  Ether.fi Staked BTC
  Mog Coin
  Amp
Amp  Gnosis
  Akash Network
  Livepeer
  Swell Ethereum
  Polygon Bridged WBTC (Polygon POS)
  Trust Wallet
  JUST
JUST  Polygon
  Olympus
  Terra Luna Classic
  Polygon PoS Bridged WETH (Polygon POS)
  Legacy Frax Dollar
  Wrapped AVAX
  Binance-Peg BUSD
  Plume
Plume  Global Dollar
  Axelar
  Ripple USD
  MANTRA
  SuperVerse
  Safe
Safe  Bybit Staked SOL
  Turbo
Turbo  1inch
1inch  Berachain
  Creditcoin
  Cheems Token
  cat in a dogs world
  Aave USDC (Sonic)
  Quorium
  BTSE Token
  Dash
Dash  aBTC
aBTC  Kusama
  cWBTC
cWBTC  Decred
  ai16z
ai16z