Although outlined code snippets are great when developing, having access to a proper ethers.js tutorial that instructs novice developers and serves as a reminder for experienced ones can take any development project to the next level. Moving forward, we will not only outline code snippets but also provide step-by-step instructions on how to get started with ethers.js, and we’ll do so with the help of a simple ethers.js example. That said, aside from exploring ethers.js examples, you can also use Web3.js as an alternative. However, in the last two years (or so), most dapp (decentralized application) developers have been more inclined toward ethers.js. Why? For example, it’s easier to listen to the blockchain with ethers.js, which we’ll look closer at in this tutorial!
We will first ensure you can answer the “what is ethers.js?” question. This is where you’ll also learn about the core features of this practical JS tool. Then, we’ll examine the main benefits of using ethers.js. With the basics under our belt, we’ll take you through our ethers.js tutorial. By following our lead, you’ll be able to create your ethers.js example script and learn how to use ethers.js.
However, you should keep in mind that there’s an even smoother solution for listening to on-chain events – Moralis’ Streams API. Thus, we’ll redo the same ethers.js example but use the Streams API instead. We’ll also point out some key advantages of this next-level solution. Nonetheless, you’ll even learn how to use a neat UI to go beyond ethers.js examples. As such, create your free Moralis account, which is all you need to start using Moralis Streams.

Exploring Ethers.js – What is it?
Just like Web3.js, ethers.js is a Web3 JavaScript library. Since its release in 2016, this tool for blockchain interaction has experienced impressive adoption. Everyone who has ever used this JS library can thank Richard Moore, the man behind ethers.js. It is safe to say that ethers.js is the most popular open-source Ethereum JS library. It features millions of downloads and has surpassed Web3.js in daily downloads by more than 60% in 2022
For more information, read our Web3.js vs ethers.js comparison.
If you know a thing or two about any conventional programming library, you won’t be surprised to hear that ethers.js consists of a collection of prewritten code snippets. The latter can be used to perform many recurring functions and, thus, avoid reinventing the wheel. Of course, ethers.js’ functionalities focus on Web3 via Ethereum (ETH) and other EVM-compatible blockchains. As such, this ETH JS library enables you to communicate easily and interact with decentralized networks. Over time, ethers.js has expanded and become quite a general-purpose library for Web3 development. Furthermore, it’s been successful at fulfilling its goals of being a complete and compact solution for developers looking to interact with the Ethereum chain.
Because this JS library offers many features, this results in countless ethers.j examples. However, when listening to blockchain events, ethers.js’ option to connect to Ethereum nodes using JSON-RPC, Etherscan, MetaMask, Infura, Alchemy, or Cloudflare is the key. However, this also means you have to worry about one of these node providers. We’ll explain how to avoid that later on, but for now, let’s focus on ethers.js features.
Main Features of Ethers.js
Aside from enabling you to connect to Ethereum node providers, ethers.js maintains many other features, which enables you to cover the following aspects:
- Create JavaScript objects from any contract ABI, including ABIv2 and ethers’ Human-Readable ABI, with meta classes.
- Keep your private keys in your client safe.
- Import and export JSON wallets (Geth and Parity).
- Use ENS names as first-class citizens anywhere an Ethereum address can be used.
- Import and export BIP 39 mnemonic phrases (twelve-word backup phrases) and HD wallets in several languages.
Benefits of Using Ethers.js
Ethers.js features a small bundle size, extensive and straightforward documentation, and a user-friendly API structure. Furthermore, it is intuitive and straightforward to use. Also, aside from JavaScript, ethers.js supports TypeScript (TS). All these benefits, combined with the above-listed features, make ethers.js a highly attractive library for many Web3 developers.
Let’s look at a sum of ethers.js’ main benefits:
- Minimal size – ethers.js is tiny, only 88 KB compressed and 284 KB uncompressed.
- Includes extensive documentation.
- Comes with a large collection of maintained test cases.
- Ethers.js includes definition files and complete TS sources – it is fully TypeScript-ready.
- Comes with an open-source MIT license that includes all dependencies.
Aside from these ethers.js-specific benefits, learning how to use ethers.js brings some universal advantages. After all, blockchain is here to stay and poised to radically change how the world operates. Thus, you may use this ethers.js tutorial, knowing that it’s helping you learn to become part of that solution.
Moreover, some of the most common ethers.js examples revolve around creating whale alerts, building automated bots, monitoring NFT collections, Web3 game notifications, etc. Ultimately, when listening to on-chain events either with ethers.js or other reliable tools, your main objective is to execute actions automatically as a response to specific on-chain events occurring. So, your goal must be to choose a tool that will enable you to do that effectively and efficiently.
Tutorial on How to Use Ethers.js – Get Started with an Ethers.js Example
It’s time we show you how to use ether.js by tackling our ethers.js tutorial. To make things as convenient for you as possible, you can use our ethers.js example script (“index.js”) found below. However, let’s still guide you through the code. So, in the top line, you must first ensure that your NodeJS file uses ethers.js. Then, you must import the application binary interface (ABI), which is specific to every smart contract. That said, the “getTransfer” async function deserves your main attention. After all, the latter takes care of listening to the blockchain.
Using our ethers.js example script, you’ll focus on the USDC contract address. Of course, you could convert it to other ethers.js examples by using other contract addresses. Furthermore, the “getTransfer” function below relies on the ethers.js library’s “WebSocketProvider” endpoint. By using this endpoint, you can define the node provider you want to use. To make that work, you must also obtain that provider’s key, which is an important aspect of how to use ethers.js. The example code below focuses on Alchemy. However, you should use a node provider that supports the chain(s) you want to focus on.
Aside from a contract address and provider, the “getTransfer” function also accepts an ABI. Last but not least, you also need to set up a “transfer” listener. The latter will also console-log the relevant on-chain details.
Exploring Our Ethers.js Tutorial Script
Below is our example script that is the core of today’s ethers.js tutorial. So, make sure to copy the entire script and test it:
const ethers = require("ethers"); const ABI = require("./abi.json"); require("dotenv").config(); async function getTransfer(){ const usdcAddress = "0xA0b86991c6218b36c1d19D4a2e9Eb0cE3606eB48"; ///USDC Contract const provider = new ethers.providers.WebSocketProvider( `wss://eth-mainnet.g.alchemy.com/v2/${process.env.ALCHEMY_KEY}` ); const contract = new ethers.Contract(usdcAddress, ABI, provider); contract.on("Transfer", (from, to, value, event)=>{ let transferEvent ={ from: from, to: to, value: value, eventData: event, } console.log(JSON.stringify(transferEvent, null, 4)) }) } getTransfer() Once you have the above lines of code in place, you can run the script using the following command:
node index.js
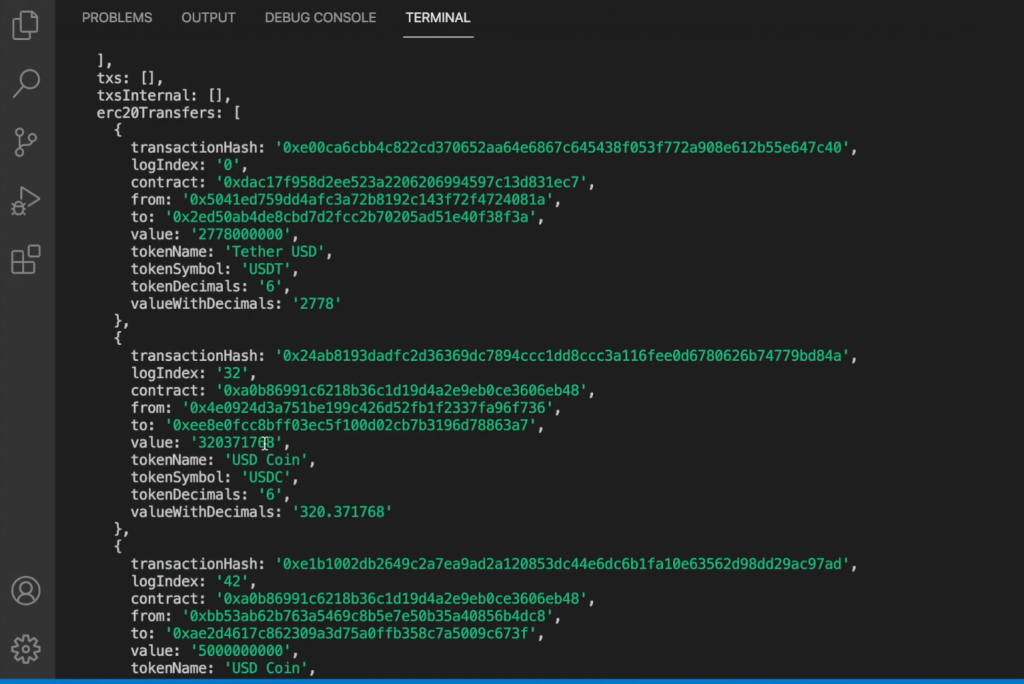
In response, you should see the results in your terminal:
There are countless ethers.js examples that we could focus on; however, the above ethers.js tutorial provides you with more than enough to get going. Moreover, looking at the results of the above script, you can see that ethers.js provides you with quite a lot of details. Unfortunately, however, these details come in the form of un-parsed data. This is one of the main reasons why instead of learning how to use ethers.js, many devs focus on utilizing Moralis’ Streams API.
Use a Better Ethers.js Example
Above, you were able to see ethers.js in action, and if you took our example script for a spin, you even saw firsthand that ethers.js obtains real-time events. Consequently, it would be wrong to call this ETH JS library anything less than a very decent open-source solution for listening to the blockchain. Yet, ethers.js comes with some limitations. Trying to overcome these limitations as you go about developing your dapps can be quite costly. Hence, the above ethers.js tutorial wouldn’t be complete without pointing out the main ethers.js’ limitations:
- Cannot provide you with 100% reliability
- You can’t filter on-chain events from the gate
- Inability to take into account multiple addresses
- You can’t listen to wallet addresses
On the other hand, the Moralis Streams API covers all those aspects. This makes it the ultimate solution for streaming blockchain data. That said, you can find a more detailed ethers.js vs Web3 streams comparison on our blog; however, the following image shows the gist of it:
With that said, let’s tackle the above ethers.js tutorial with Moralis Streams.
Streams API – More Powerful Than Any Ethers.js Examples
The goal of this subsection is to obtain the same on-chain data as above – any USDC transfer on Ethereum. However, instead of using ether.js, Moralis’ Streams API will be our tool. If you want to follow our lead, create another “index.js” file and make sure to import Moralis and its utils at the top:
const Moralis = require("moralis").default; const Chains = require("@moralisweb3/common-evm-utils"); const EvmChain = Chains.EvmChain; const ABI = require("./abi.json"); require("dotenv").config(); const options = { chains: [EvmChain.ETHEREUM], description: "USDC Transfers 100k", tag: "usdcTransfers100k", includeContractLogs: true, abi: ABI, topic0: ["Transfer(address,address,uint256)"], webhookUrl: "https://22be-2001-2003-f58b-b400-f167-f427-d7a8-f84e.ngrok.io/webhook", advancedOptions: [ { topic0: "Transfer(address,address,uint256)", filter: { gt : ["value", "100000"+"".padEnd(6,"0")] } } ] }; Moralis.start({ apiKey: process.env.MORALIS_KEY , }).then(async () => { const stream = await Moralis.Streams.add(options); const { id } = stream.toJSON(); await Moralis.Streams.addAddress({ id: id, address: ["0xA0b86991c6218b36c1d19D4a2e9Eb0cE3606eB48"] }) }); Looking at the lines of code above, you can see that the script focuses on the same ABI and the same contract address. The script also covers the options that the Streams API provides. This is also where we used “ETHEREUM” to focus on that chain. However, since Moralis is all about cross-chain interoperability, we could easily target any other chain or multiple chains simultaneously.
Furthermore, the above script also initiates Moralis using your Moralis Web3 API key. Fortunately, anyone with a free Moralis account gets to obtain that key in two steps:
Among the bottom lines of the above code, you can see the “addAddress” endpoint. The latter enables you to add multiple addresses and listen to them simultaneously. To see that option in action, make sure to use the video below. This is also the place to learn how to create and manage streams using a neat UI.
Ultimately, when using Moralis’ Streams API, we receive parsed data. Also, not only do we receive transactions hashes and from and to addresses, but we also receive transfer values:

The video tutorial below also demonstrated how to use the filtering feature of this powerful “ethers.js 2.0” tool.
Ethers.js Tutorial – How to Get Started Using a Simple Ethers.js Example – Summary
In today’s article, you had an opportunity to learn all you need to know about ethers.js – the leading ETH JavaScript library. As such, you now know the core features and main benefits of using this library. You also had a chance to follow our ethers.js tutorial to take this JS library for a spin. Also, you learned that despite ethers.js’s great power, it has several limitations. However, you also learned that you could bridge these limitations using Moralis’ Streams API. In fact, you were able to follow our lead and redo the ethers.js tutorial but using Moralis Streams instead. Last but not least, following a detailed video tutorial, you had an opportunity to see how filtering works, how you can listen to multiple addresses, and how to use the Moralis Streams UI.
Following the trends and devs’ preferences, it’s safe to say that the Streams API is the tool of the future. Thus, make sure to learn how to work with it properly by visiting the Streams API documentation page. This is also the place to find quick-start tutorials and many examples. By exploring other pages of the Moralis docs, you can master all of Moralis’ tools. By doing so, you’ll be a confident dapp developer with your legacy skills.
Furthermore, remember to explore other blockchain development topics covered on the Moralis YouTube channel and the Moralis blog. Some of the latest articles explain how to get all tokens owned by a wallet, what ERC 1155 NFTs are, and what the Sepolia testnet is. In addition, if you’d like to understand Web3 storage, make sure to read our articles explaining how Web3 data storage works, what web3.storage is, how to use metadata for NFT storage, using IPFS for NFT metadata, and why developers should opt for the market’s leading Web3 provider when wanting to upload files to IPFS. You can also take a more professional approach to your crypto education – enroll in Moralis Academy and master blockchain and Bitcoin fundamentals.
Read More: moralis.io


 Compound
  Wormhole
  Sun Token
  Staked HYPE
  Movement
  Popcat
  Coinbase Wrapped Staked ETH
  Ether.fi Staked BTC
  Mog Coin
  Amp
Amp  Gnosis
  Akash Network
  Livepeer
  Swell Ethereum
  Polygon Bridged WBTC (Polygon POS)
  Trust Wallet
  JUST
JUST  Polygon
  Olympus
  Terra Luna Classic
  Polygon PoS Bridged WETH (Polygon POS)
  Legacy Frax Dollar
  Wrapped AVAX
  Binance-Peg BUSD
  Plume
Plume  Global Dollar
  Axelar
  Ripple USD
  MANTRA
  SuperVerse
  Safe
Safe  Bybit Staked SOL
  Turbo
Turbo  1inch
1inch  Berachain
  Creditcoin
  Cheems Token
  cat in a dogs world
  Aave USDC (Sonic)
  Quorium
  BTSE Token
  Dash
Dash  aBTC
aBTC  Kusama
  cWBTC
cWBTC  Decred
  ai16z
ai16z