
[ad_1]
In this article, we will develop a dapp (decentralized application) with a token swap component. To complete this task, you’ll use your JavaScript skills to build a NodeJS backend and a ReactJS frontend. To cover the DeFi blockchain development aspects, the following Web3 tools will get you to the finish line without breaking a sweat:
- The Moralis Web3 API to fetch on-chain data.
- The 1inch aggregator to implement the exchange features.
- Axios to bridge the data from the backend to the frontend.
- The wagmi library to implement Web3 authentication.
- MetaMask to connect to your DEX and test its functionalities.
Also, thanks to the Moralis Token API, you can fetch real-time token prices using the following lines of code:
const responseOne = await Moralis.EvmApi.token.getTokenPrice({ address: query.addressOne }) const responseTwo = await Moralis.EvmApi.token.getTokenPrice({ address: query.addressTwo }) As far as the blockchain development for DeFi features goes, these 1inch aggregator API endpoints will do the trick:
const allowance = await axios.get(`https://api.1inch.io/v5.0/1/approve/allowance?tokenAddress=${tokenOne.address}&walletAddress=${address}`) const approve = await axios.get(`https://api.1inch.io/v5.0/1/approve/transaction?tokenAddress=${tokenOne.address}`) const tx = await axios.get(`https://api.1inch.io/v5.0/1/swap?fromTokenAddress=${tokenOne.address}&toTokenAddress=${tokenTwo.address}&amount=${tokenOneAmount.padEnd(tokenOne.decimals+tokenOneAmount.length, '0')}&fromAddress=${address}&slippage=${slippage}`) To implement the above code snippets, create your free Moralis account and follow our lead!

Overview
In the first part of today’s article, you have a chance to follow our lead and dive into DeFi blockchain development by creating your own token swap dapp. Now, if you decide to do so, you’ll learn to set up your project, build your DeFi dapp’s header, create a token swap page, implement the backend DeFi functionality, and ensure your dapp interacts with the 1inch aggregator.
Below the tutorial, you can learn more about the theoretical aspects of blockchain development for DeFi projects.
DeFi Blockchain Development Tutorial: Build a DEX
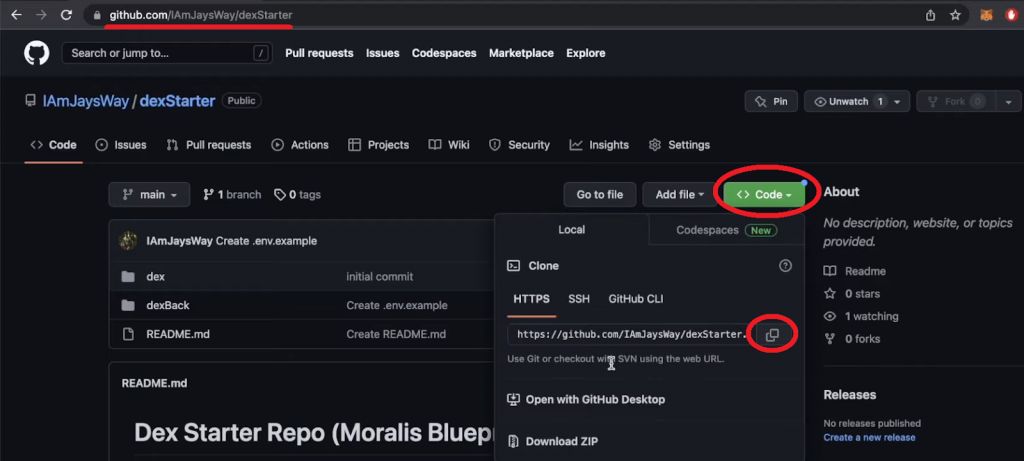
Decentralized exchanges (DEXs) are special types of dapps that bring DeFi to life. While DEXs can have many features, they all have a token swap. As such, this is the component of blockchain development for DeFi platforms we will focus on herein. As the screenshot indicates, you don’t have to start from zero. Instead, visit our GitHub repo page and clone the “dexStarter” code:
DeFi Project Setup
By using our starter project, you don’t need to deal with CSS styling; instead, you can devote your full attention to the Web3 aspect of DeFi blockchain development.
So, open a new project in Visual Studio Code (VSC) and use your terminal to run the following command:
git clone https://github.com/IAmJaysWay/dexStarter
Then, navigate into the “dexStarter” directory. There, you’ll find the “dex” and “dexBack” folders. The former contains the template scripts for your dapp’s frontend, while the latter focuses on the backend portion of the project. Essentially, you are starting with a simple ReactJS app for the frontend and a simple NodeJS app for the backend. However, in order to make these work, don’t forget to install the required dependencies. Start with your frontend (“cd” into “dex“) and run the following command:
npm install
After installing the dependencies, you can start your React app with the command below:
npm run start
Then you can see the initial version of your DEX’s frontend by visiting “localhost:3000“:

Header of the Token Swap Dapp
Open the “App.js” script that awaits you in the “dex/src” directory. Next, import the “Header” component at the top of the script:
import Header from "./components/Header";
Then, add the “Header” component to the “App” function:
function App() { return ( <div className="App"> <Header /> </div> ) } Next, access the “Header.js” script from “dex/src/components”. At the top of the file, import a logo and a chain icon image:
import Logo from "../moralis-logo.svg"; import Eth from "../eth.svg";
Using the following “Header” function, you get to ensure that the script actually displays the logo, the chain icon, page options, and the “Connect” button:
function Header(props) { const {address, isConnected, connect} = props; return ( <header> <div className="leftH"> <img src={Logo} alt="logo" className="logo" /> <div className="headerItem">Swap</div> <div className="headerItem">Tokens</div> </div> <div className="rightH"> <div className="headerItem"> <img src={Eth} alt="eth" className="eth" /> Ethereum </div> <div className="connectButton" onClick={connect}> {isConnected ? (address.slice(0,4) +"..." +address.slice(38)) : "Connect"} </div> </div> </header> ); } After tweaking “App.js” and “Header.js” as per the above instruction, you may return to “localhost:3000” to view the progress:

The next step is to assign proper routes to the “Swap” and “Tokens” options. To do so, reopen the “App.js” script and import the following lines of code:
import Swap from "./components/Swap"; import Tokens from "./components/Tokens"; import { Routes, Route } from "react-router-dom"; Then, tweak the “Header” div as follows:
<Header connect={connect} isConnected={isConnected} address={address} /> <div className="mainWindow"> <Routes> <Route path="/" element={<Swap isConnected={isConnected} address={address} />} /> <Route path="/tokens" element={<Tokens />} /> </Routes> </div> Next, return to the “Header.js” script to import “Link”:
import { Link } from "react-router-dom"; Finally, wrap the “Swap” and “Tokens” divs with the links to the corresponding endpoint – the root endpoint for the “Swap” page and the “tokens” endpoint for the “Tokens” page:
<Link to="/" className="link"> <div className="headerItem">Swap</div> </Link> <Link to="/tokens" className="link"> <div className="headerItem">Tokens</div> </Link>
With the above tweaks in place, you can again explore the progress of your frontend:
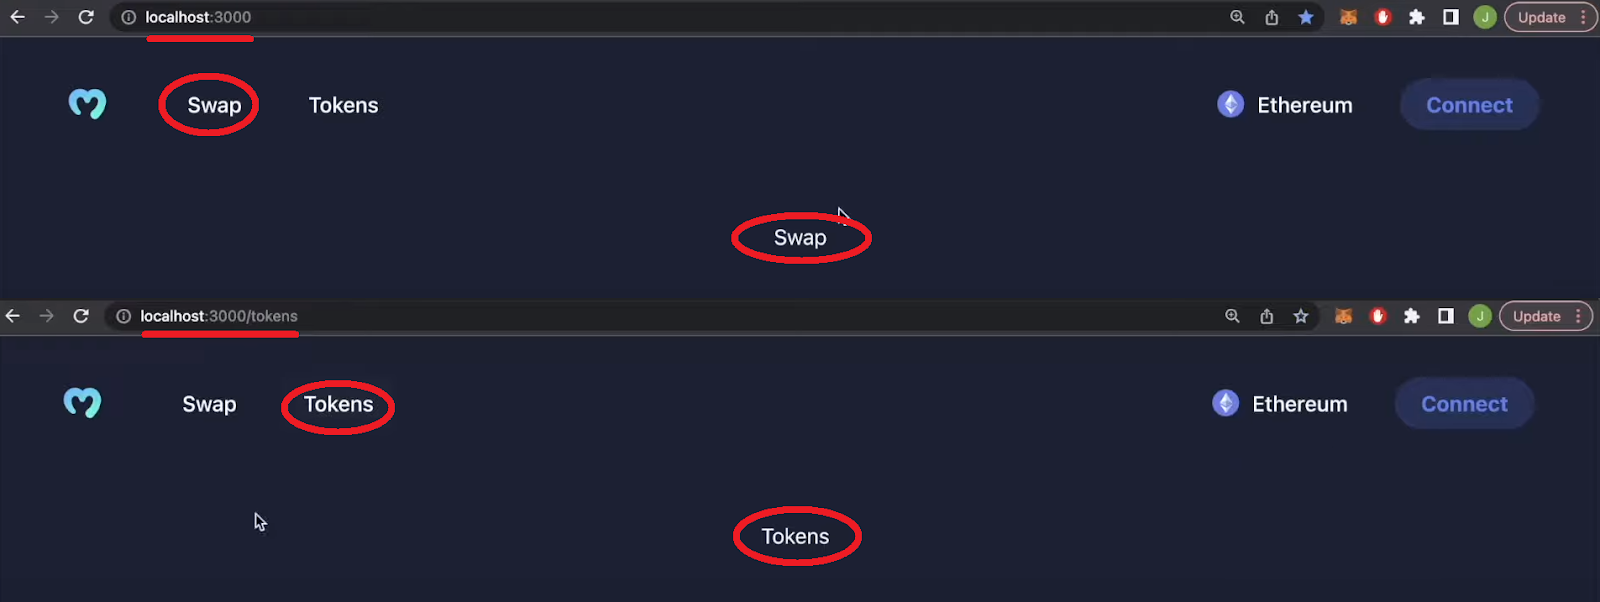
The Token Swap Page
Continue this DeFi blockchain development tutorial by opening the “Swap.js” script. There, import the following Ant Design UI framework components:
import React, { useState, useEffect } from "react"; import { Input, Popover, Radio, Modal, message } from "antd"; import { ArrowDownOutlined, DownOutlined, SettingOutlined, } from "@ant-design/icons"; Next, tweak the “Swap” function by adding the “Slippage Tolerance” and “tradeBox” divs. Thanks to Ant Design, you can easily implement a slippage settings feature:
function Swap() { const [slippage, setSlippage] = useState(2.5); function handleSlippageChange(e) { setSlippage(e.target.value); } const settings = ( <> <div>Slippage Tolerance</div> <div> <Radio.Group value={slippage} onChange={handleSlippageChange}> <Radio.Button value={0.5}>0.5%</Radio.Button> <Radio.Button value={2.5}>2.5%</Radio.Button> <Radio.Button value={5}>5.0%</Radio.Button> </Radio.Group> </div> </> ); return ( <div className="tradeBox"> <div className="tradeBoxHeader"> <h4>Swap</h4> <Popover content={settings} title="Settings" trigger="click" placement="bottomRight" > <SettingOutlined className="cog" /> </Popover> </div> </div> </> ); } This is what the above additions to the “Swap.js” script look like from the UI perspective:
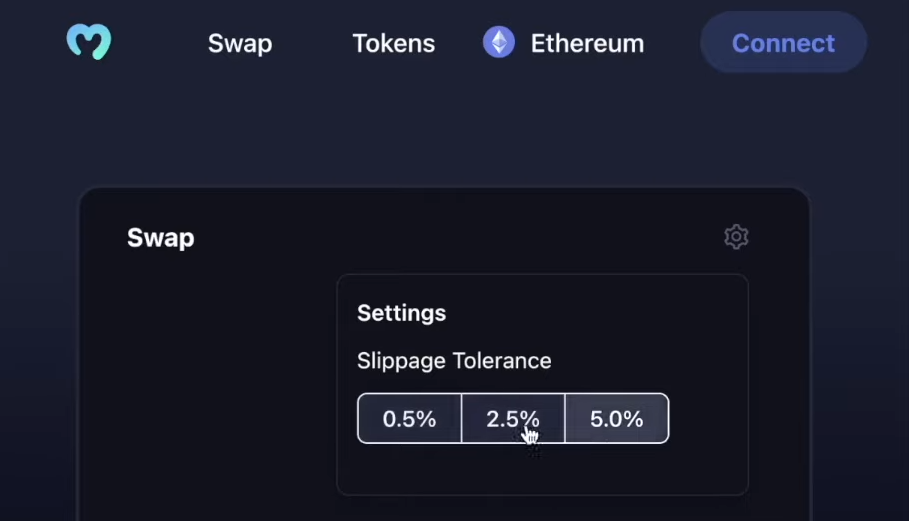
Adding DEX Functionality: Token Input Fields
As far as the blockchain development for DeFi swaps goes, you need to create the input fields where users can enter the number of tokens they want to exchange. To add these options, tweak your “tradeBox” div by adding the “inputs” div:
<div className="inputs"> <Input placeholder="0" value={tokenOneAmount} onChange={changeAmount} disabled={!prices} /> <Input placeholder="0" value={tokenTwoAmount} disabled={true} /> <div className="switchButton" onClick={switchTokens}> <ArrowDownOutlined className="switchArrow" /> </div> <div className="assetOne" onClick={() => openModal(1)}> <img src={tokenOne.img} alt="assetOneLogo" className="assetLogo" /> {tokenOne.ticker} <DownOutlined /> </div> <div className="assetTwo" onClick={() => openModal(2)}> <img src={tokenTwo.img} alt="assetOneLogo" className="assetLogo" /> {tokenTwo.ticker} <DownOutlined /> </div> </div> To make the above lines of code work, you also need to add the following state variables below the “Slippage” state variable:
const [tokenOneAmount, setTokenOneAmount] = useState(null); const [tokenTwoAmount, setTokenTwoAmount] = useState(null); const [tokenOne, setTokenOne] = useState(tokenList[0]); const [tokenTwo, setTokenTwo] = useState(tokenList[1]); const [isOpen, setIsOpen] = useState(false); const [changeToken, setChangeToken] = useState(1);
You also need proper functions to handle the “from/to” switching of the tokens and changing the values in the entry fields. Thus, implement the functions below underneath the existing “handleSlippageChange” function:
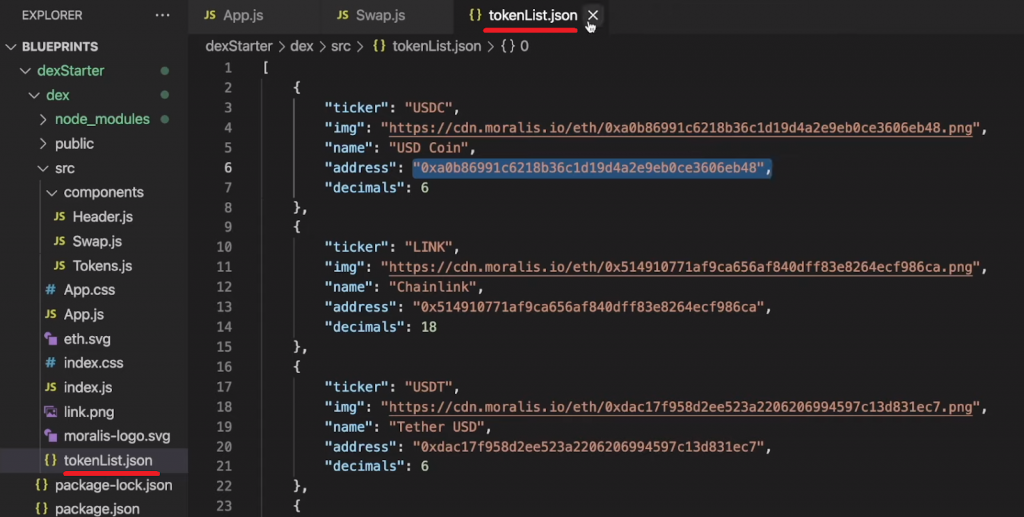
function changeAmount(e) { setTokenOneAmount(e.target.value); if(e.target.value && prices){ setTokenTwoAmount((e.target.value * prices.ratio).toFixed(2)) }else{ setTokenTwoAmount(null); } } function switchTokens() { setPrices(null); setTokenOneAmount(null); setTokenTwoAmount(null); const one = tokenOne; const two = tokenTwo; setTokenOne(two); setTokenTwo(one); fetchPrices(two.address, one.address); } A DEX swap also needs to offer a proper selection of tokens. Hence, you need an appropriate list of tokens that includes their details, such as token tickers, icons, names, addresses, and decimals. For that purpose, we created the “tokenList.json” file that awaits you inside the “dex/src” folder:
To import the above list, refocus on the “Swap.js” script and add the following line below the existing imports:
import tokenList from "../tokenList.json";
Adding DEX Functionality: Token Selection Modals
Start by adding the following snippets of code to your “tradeBox” div (at the top of “return“):
return ( <> {contextHolder} <Modal open={isOpen} footer={null} onCancel={() => setIsOpen(false)} title="Select a token" > <div className="modalContent"> {tokenList?.map((e, i) => { return ( <div className="tokenChoice" key={i} onClick={() => modifyToken(i)} > <img src={e.img} alt={e.ticker} className="tokenLogo" /> <div className="tokenChoiceNames"> <div className="tokenName">{e.name}</div> <div className="tokenTicker">{e.ticker}</div> </div> </div> ); })} </div> </Modal> Next, add the following “openModal” and “modifyToken” functions under the existing functions:
function openModal(asset) { setChangeToken(asset); setIsOpen(true); } function modifyToken(i){ setPrices(null); setTokenOneAmount(null); setTokenTwoAmount(null); if (changeToken === 1) { setTokenOne(tokenList[i]); fetchPrices(tokenList[i].address, tokenTwo.address) } else { setTokenTwo(tokenList[i]); fetchPrices(tokenOne.address, tokenList[i].address) } setIsOpen(false); } Finally, your token swap box also needs the “Swap” button. For that, add the following line under the “inputs” div:
<div className="swapButton" disabled={!tokenOneAmount || !isConnected} onClick={fetchDexSwap}>Swap</div> By implementing all of the above tweaks, your frontend now looks like a proper DEX swap and awaits the backend functionalities:

Blockchain Development for DeFi Swap: Set Up a DEX Backend
If you remember the first snippet of code from the intro, you know it utilizes the Moralis “getTokenPrice” API endpoint. To make it work, however, you must get your Moralis Web3 API key. Fortunately, this is a simple two-click process once you log in to your Moralis account:
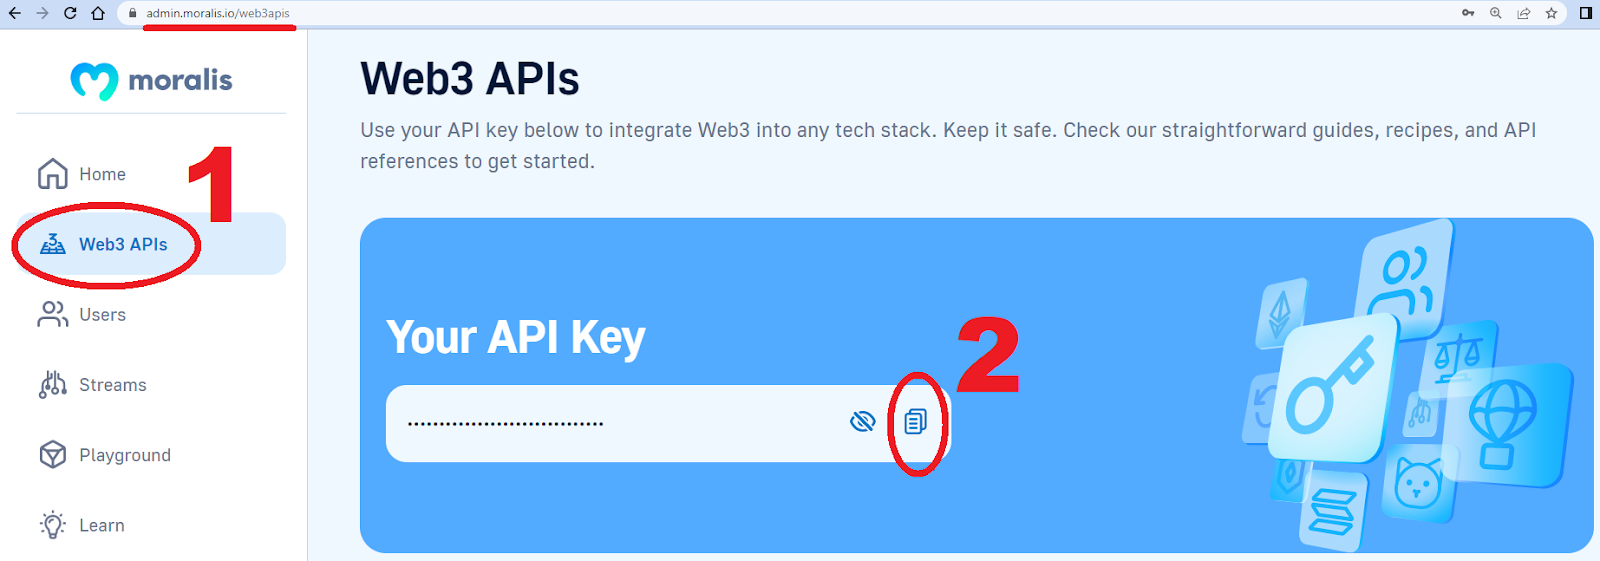
Inside the “dexBack” folder, you’ll find the “.env.example” file. Open that file and replace “GET YOURS FROM moralis.io” with the above-obtained API key. Also, rename “.env.example” to “.env”. Then, open a new terminal for your backend and “cd” into the “dexBack” folder. Once in that folder, install the backend dependencies by entering the following command:
npm install
To fetch token prices, you need to tweak the backend “index.js” script. So, open that script and implement the “Moralis.EvmApi.token.getTokenPrice” method for both tokens of the selected trading pair. Essentially, you need to update the “app.get” function as follows:
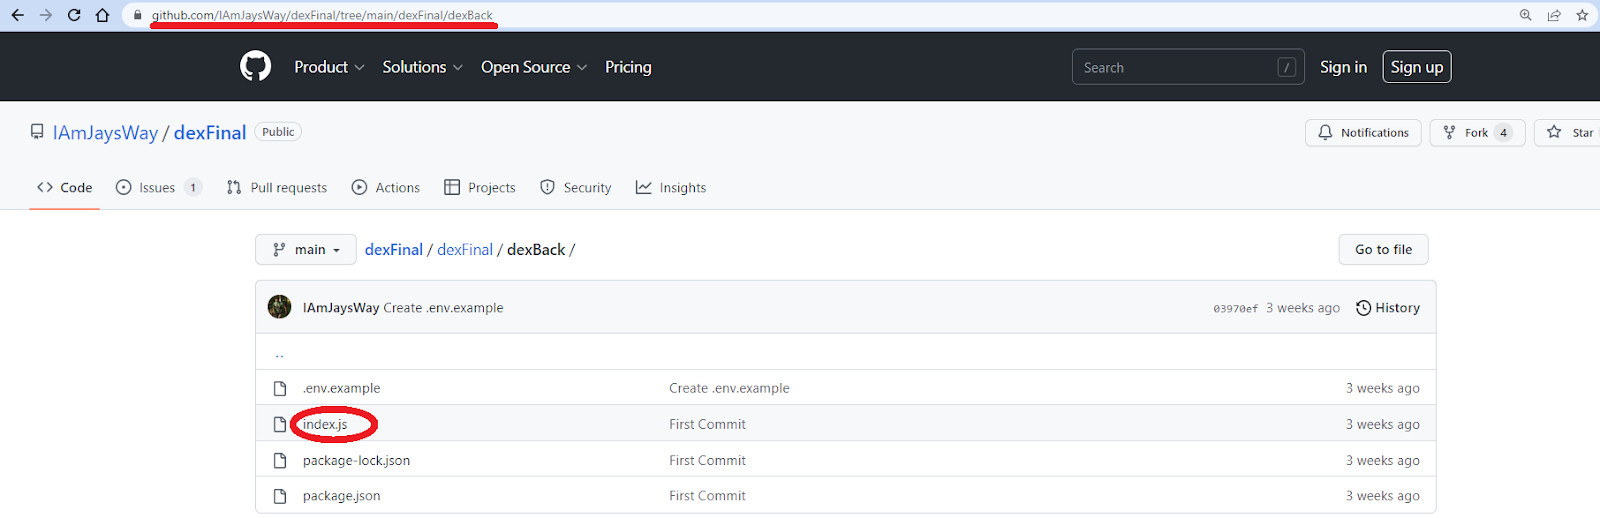
app.get("/tokenPrice", async (req, res) => { const {query} = req; const responseOne = await Moralis.EvmApi.token.getTokenPrice({ address: query.addressOne }) const responseTwo = await Moralis.EvmApi.token.getTokenPrice({ address: query.addressTwo }) const usdPrices = { tokenOne: responseOne.raw.usdPrice, tokenTwo: responseTwo.raw.usdPrice, ratio: responseOne.raw.usdPrice/responseTwo.raw.usdPrice } return res.status(200).json(usdPrices); }); Note: The final “index.js” backend file is available on GitHub in “dexBack” of the “dexFinal” repo:
Get Token Prices from the Backend to the Frontend
In this section of today’s “DeFi blockchain development” tutorial, you’ll learn to get the token prices from the above-presented backend to the previously-constructed “Swap” page. So, return to the “Swap.js” script and import “axios” (below the existing imports):
import axios from "axios";
Then, go to the part of “swap.js” where other state variables are located and add the following:
const [prices, setPrices] = useState(null);
Next, add the “fetchPrices” async function below the “modifyToken” function:
async function fetchPrices(one, two){ const res = await axios.get(`http://localhost:3001/tokenPrice`, { params: {addressOne: one, addressTwo: two} }) setPrices(res.data) } You must also add the following “useEffect” below the above function:
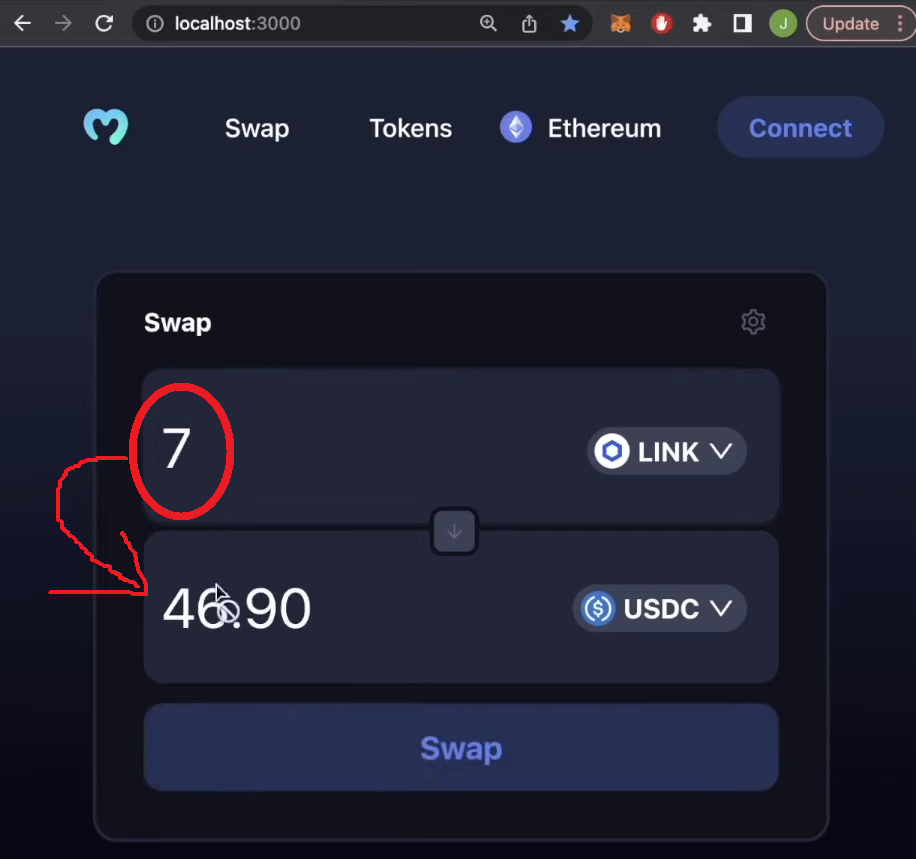
useEffect(()=>{ fetchPrices(tokenList[0].address, tokenList[1].address) }, []) With the above function and “useEffect” in place, your “Swap” box UI will have the capacity to use token prices and their ratios to automatically populate the amount of the other token:
Implement Web3 Authentication
Now it’s time to add some functionality to the “Connect” button in your header. Thanks to the wagmi library, adding Web3 login functionality is pretty straightforward. Start by opening your frontend “index.js” file from the “dex/src” folder. Once inside the script, import the following wagmi components and a public provider under the existing imports:
import { configureChains, mainnet, WagmiConfig, createClient } from "wagmi"; import { publicProvider } from "wagmi/providers/public"; Next, configure the chains and create a client by adding this code snippet below the above imports:
const { provider, webSocketProvider } = configureChains( [mainnet], [publicProvider()] ); const client = createClient({ autoConnect: true, provider, webSocketProvider, }); You also need to wrap your app with “WagmiConfig”:
<React.StrictMode> <WagmiConfig client={client}> <BrowserRouter> <App /> </BrowserRouter> </WagmiConfig> </React.StrictMode> Moving forward, reopen “App.js” and import the MetaMask connector and wagmi components:
import { useConnect, useAccount } from "wagmi"; import { MetaMaskConnector } from "wagmi/connectors/metaMask"; Then, focus on the “App” function and add the following lines of code above “return“:
const { address, isConnected } = useAccount(); const { connect } = useConnect({ connector: new MetaMaskConnector(), }); Note: For a more detailed code walkthrough regarding the “Connect” button functionality, refer to the video at the top of the article (57:25).
With the updated frontend “index.js” and “App.js” scripts, the “Connect” button triggers your MetaMask extension:

Implement the 1inch Aggregator
DeFi tools like the 1inch aggregator are extremely powerful as they enable you to utilize decentralized solutions. Without those tools, you’d need to create and deploy your own smart contracts to achieve the same results. With that said, in this final step of this DeFi blockchain development feat, you must implement the 1inch aggregator.

To make 1inch work for you, you need to add the 1inch API endpoints from the introduction and some assisting lines of code to the “Swap.js” script. The following five steps will take you to the finish line:
- Below the existing imports, import wagmi hooks:
import { useSendTransaction, useWaitForTransaction } from "wagmi"; - Add “props” to the “Swap” function:
function Swap(props) { const { address, isConnected } = props; - You also need additional state variables to store transaction details and wait for transactions to go through:
const [txDetails, setTxDetails] = useState({ to:null, data: null, value: null, }); const {data, sendTransaction} = useSendTransaction({ request: { from: address, to: String(txDetails.to), data: String(txDetails.data), value: String(txDetails.value), } }) const { isLoading, isSuccess } = useWaitForTransaction({ hash: data?.hash, }) - Add the “fetchDexSwap” async function with all the required 1inch API endpoints under the “fetchPrices” function:
async function fetchDexSwap(){ const allowance = await axios.get(`https://api.1inch.io/v5.0/1/approve/allowance?tokenAddress=${tokenOne.address}&walletAddress=${address}`) if(allowance.data.allowance === "0"){ const approve = await axios.get(`https://api.1inch.io/v5.0/1/approve/transaction?tokenAddress=${tokenOne.address}`) setTxDetails(approve.data); console.log("not approved") return } const tx = await axios.get(`https://api.1inch.io/v5.0/1/swap?fromTokenAddress=${tokenOne.address}&toTokenAddress=${tokenTwo.address}&amount=${tokenOneAmount.padEnd(tokenOne.decimals+tokenOneAmount.length, '0')}&fromAddress=${address}&slippage=${slippage}`) let decimals = Number(`1E${tokenTwo.decimals}`) setTokenTwoAmount((Number(tx.data.toTokenAmount)/decimals).toFixed(2)); setTxDetails(tx.data.tx); } Note: If you are interested in learning where we obtained the above 1inch API links, use the video at the top of the article, starting at 1:09:10.
- Last but not least, to cover transaction details and pending transactions, add the following “useEffect” functions below the existing “useEffect” lines:
useEffect(()=>{ if(txDetails.to && isConnected){ sendTransaction(); } }, [txDetails]) useEffect(()=>{ messageApi.destroy(); if(isLoading){ messageApi.open({ type: 'loading', content: 'Transaction is Pending...', duration: 0, }) } },[isLoading]) useEffect(()=>{ messageApi.destroy(); if(isSuccess){ messageApi.open({ type: 'success', content: 'Transaction Successful', duration: 1.5, }) }else if(txDetails.to){ messageApi.open({ type: 'error', content: 'Transaction Failed', duration: 1.50, }) } },[isSuccess]) Note: You can find all final scripts on our “dexFinal” GitHub repo page.

Blockchain Development for DeFi Projects
Understanding the theoretical aspects of DeFi and blockchain development is not essential to build a DeFi dapp. After all, if you’ve followed along in our tutorial above, you discovered that you could build a DEX swap with your JavaScript proficiency. However, covering the following basics can be quite useful, and it will help you tackle future DeFi blockchain development projects with more confidence.
What is Blockchain Development?
Blockchain development is the process of developing blockchain networks or other layers of the Web3 tech stack. So, the development of any Web3 tools, platforms, smart contracts, and all dapps matches this description. Essentially, if a project incorporates blockchain tech in some way, it falls under the scope of blockchain development.
What is Decentralized Finance (DeFi)?
DeFi, short for decentralized finance, refers to a financial system built on public blockchains without a central authority and no intermediaries. These properties ensure transparency and support peer-to-peer (P2P) trading, borrowing, lending, and other financial services.
The ultimate goal of DeFi platforms is to allow users to engage in all financial activities that traditional markets offer but without any intermediaries. One of the key distinctions of DeFi services is the fact that users (peers) get to participate on both ends of the financial services. As such, DeFi is poised to eliminate the need for traditional financial institutions.
DeFi and Blockchain Development
With blockchain tech at its core, DeFi is just one of many blockchain utilities/categories. Similar to blockchain development in general, blockchain development for DeFi purposes can target different layers. There are various DeFi protocols that upper layers, such as DeFi dapps, can utilize. So, instead of reinventing the wheel and writing your own smart contracts to handle DeFi functionality, you can use those protocols just like we used the 1inch aggregator in today’s tutorial. Of course, you can also build from scratch.

How to Get Started in DeFi Blockchain Development
There are many ways to get started in DeFi blockchain development; however, the above tutorial is undoubtedly one of the most frictionless paths. After all, it enables you to use your legacy dev skill and cover the blockchain-related backed aspect using Moralis, wagmi, and the 1inch aggregator.
Moralis enables you to create all sorts of dapps using a wide range of Web3 APIs that help you utilize tested, reliable, and fast Web3 infrastructure. With the Moralis Web3 Data API, you can fetch all sorts of on-chain data, including Ethereum logs and events. Plus, Moralis includes a powerful DeFi API, which comes in the form of the following two endpoints:
- Get DEX token pair reserves:
const response = await Moralis.EvmApi.defi.getPairReserves({ pairAddress, chain, }); - Get DEX token pair addresses:
const response = await Moralis.EvmApi.defi.getPairAddress({ token0Address, token1Address, chain, }); In addition, you can use the Moralis Streams API to listen to any smart contract and wallet address and use on-chain events as triggers for your DeFi dapps. Moreover, thanks to Moralis’ cross-chain interoperability, you target all the leading blockchains.

Note: Learn all you need to know about the Moralis products in the Moralis Web3 documentation.
With that in mind, Moralis, in combination with existing leading DeFi protocols, provides the best way to start creating incredible DeFi dapps the easy way! Of course, once you decide to expand your dapps’ functionalities, you’ll also want to learn the basics of smart contract development. However, even when it comes to that, you don’t have to start from scratch. Instead, you can use verified smart contract templates offered by OpenZeppelin.
What Programming Language is Used for DeFi?
At this point, you know that DeFi is an extensive branch of blockchain applications. Since there are many ways to develop DeFi protocols and dapps, devs can use many programming languages. For instance, if you take the path of the least resistance and build a DeFi dapp using the above tutorial, JavaScript does the trick. However, Moralis supports other leading programming languages, so you could also use Python, Go, PHP, etc.
On the other hand, when it comes to writing smart contracts controlling on-chain DeFi activities, the language depends on the chain you focus on. So, if you decide to focus on Ethereum and other EVM-compatible chains, Solidity is the top choice. However, if you’d like to create new DeFi functionalities on top of Solana or Aptos, the Rust and Move programming languages would be the go-to options.
Even though there is no single programming language for DeFi, JavaScript (frontend and backend) and Solidity (smart contracts) will give you the most bang for the buck!
DeFi Blockchain Development – How to Develop DeFi Projects – Summary
In today’s article, you had a chance to take on our DeFi blockchain development tutorial and create your own DEX swap dapp. Using our template scripts, the power of Moralis, wagmi, and the 1inch aggregator, you were able to get to the finish line without breaking a sweat. You also had an opportunity to learn what blockchain development and DeFi are and how they fit together. Nonetheless, you also learned how to get started in DeFi blockchain development and what programming languages you’ll need on the way.
If you wish to explore other blockchain development topics, make sure to use the Moralis blog. For instance, this is the place to learn all you need to know about a crypto faucet, Web3 ChatGPT, Alchemy NFT API, IPFS Ethereum, Solana blockchain app development, how to create ERC20 token, and much more. To spark some creativity, use our video tutorials that await you on the Moralis YouTube channel. Also, if you want to become blockchain-certified, enroll in Moralis Academy.
[ad_2]
Read More: moralis.io


 Bitcoin
  Ethereum
  Tether
  XRP
XRP  BNB
BNB  Solana
  USDC
USDC  Dogecoin
  Cardano
  Wrapped Bitcoin
  Hyperliquid
  Wrapped stETH
  Sui
Sui  Bitcoin Cash
  LEO Token
  Stellar
  Avalanche
  Toncoin
  WhiteBIT Coin
  USDS
USDS  Shiba Inu
  WETH
WETH  Wrapped eETH
  Litecoin
  Binance Bridged USDT (BNB Smart Chain)
  Hedera
  Ethena USDe
  Polkadot
  Coinbase Wrapped BTC
  Pepe
Pepe  Pi Network
  Aave
Aave  Bittensor
  Ethena Staked USDe
  BlackRock USD Institutional Digital Liquidity Fund
  OKB
OKB  Aptos
Aptos  NEAR Protocol
  Jito Staked SOL
  sUSDS
sUSDS