An on-chain wallet tracker is a tool that allows you to monitor the activity of any crypto address in real-time. However, from a conventional perspective, continuously monitoring wallets and blockchain networks for relevant events has been quite cumbersome. Fortunately, thanks to the Moralis Streams API, this is no longer the case!
With the Streams API, you can effortlessly set up streams to monitor any address on any network, allowing you to create your own on-chain wallet tracker in a heartbeat. To highlight the accessibility of this tool, here’s an example of how to set up a stream monitoring a wallet’s native on-chain transactions on the Sepolia testnet:
async function streams(){ const options = { chains: [EvmChain.SEPOLIA], tag: "transfers", description: "Listen to Transfers", includeContractLogs: false, includeNativeTxs: true, webhookUrl: "replace_me" } const newStream = await Moralis.Streams.add(options) const {id} = newStream.toJSON(); const address = "0xa50981073aB67555c14F4640CEeB5D3efC5c7af2"; await Moralis.Streams.addAddress({address, id}) } streams() For a more detailed breakdown of how this works and how you can use the Streams API to build an on-chain wallet tracker, join us in this tutorial or check out the Moralis YouTube video below!
Also, to use the Streams API, you must have a Moralis account. Fortunately, you can sign up with Moralis entirely for free, and you’ll get immediate access to all our industry-leading development tools!
Overview
In today’s article, we’ll start by explaining the ins and outs of on-chain wallet trackers. From there, we’ll jump straight into our on-chain wallet tracker tutorial and show you how to monitor a wallet in five straightforward steps using Moralis’ Streams API:
- Create a Moralis Account
- Spin Up a Server
- Set Up a Moralis Stream
- Run the Script
- Receive Alerts
Lastly, to top things off, we’ll dive deeper into Moralis and explore other tools beyond the Streams API, including the best API for crypto prices, our free NFT API, and many others! Nevertheless, without further delay, let’s start by answering the question, “What is an on-chain wallet tracker?”.
What is an On-Chain Wallet Tracker?
On-chain wallet trackers are tools that help users track the activity of particular wallets. What’s more, the best wallet trackers usually provide alert features, immediately notifying users of important on-chain events as soon as they happen so they don’t miss a beat!
There are various types of on-chain wallet trackers, such as a token portfolio tracker, and most of them have their own set of unique features. Moreover, some only provide basic information, such as the transaction amount, while others give users more detailed data, including all involved addresses, block information, logs, and much more.
All in all, the core functionality of an on-chain wallet tracker is to provide a transparent and real-time view of wallet activity!

So, how does this work?
An on-chain wallet tracker continuously monitors relevant addresses and blockchain networks. As soon as they detect relevant on-chain activity, they notify users, giving them updates in real-time. However, setting up this system is easier said than done, so prominent wallet trackers leverage Web3 APIs to simplify the workflow!
But what is the best API for building an on-chain wallet tracker? And how does it work? For the answers to these questions, join us in the next section as we show you the easiest way to monitor any wallet address using Moralis’ Streams API!
On-Chain Wallet Tracker Tutorial: How to Monitor Any Address in 5 Steps
The easiest way to monitor any crypto address and build an on-chain wallet tracker is to use Moralis’ Streams API. With the Streams API, you can seamlessly set up alerts to get notified about Web3 events automatically. Furthermore, this interface supports over 44 million addresses and contracts across all major blockchain networks, including Ethereum, Polygon, BNB Smart Chain (BSC), and many others!

So, how does the Streams API work?
With the Streams API, you can seamlessly set up your own customized streams to get real-time, on-chain events sent immediately to your project’s backend via Web3 webhooks!
But to better explain how this works, we’ll simply show you how to monitor a wallet address in five straightforward steps:
- Create a Moralis Account
- Spin Up a Server
- Set Up a Moralis Stream
- Run the Script
- Receive Alerts
Now, before we can jump into the initial step of this tutorial, you need to deal with a few prerequisites!
Prerequisites
While the Moralis SDK and Streams API support multiple programming languages, this tutorial will show you how to set up a Moralis stream using JavaScript. We’ll also use ngrok to get a webhook URL. Consequently, before you continue, make sure you have the following ready:
- Node.js v.14+
- NPM/Yarn
- Ngrok
Step 1: Create a Moralis Account
To use the Streams API, you must have a Moralis API key. And to get an API key, you need to sign up with Moralis. As such, if you haven’t already, click on the ”Start for Free” button at the top right to set up an account:

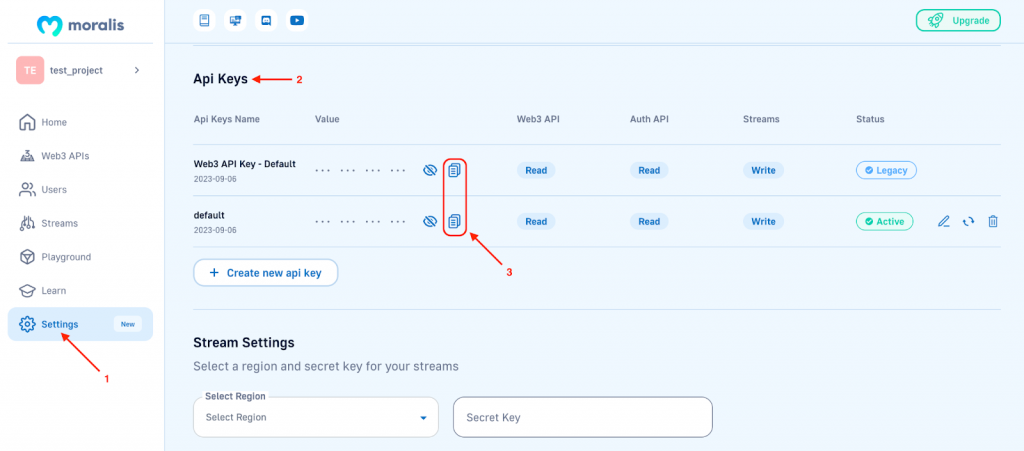
With an account at hand, head on over to the ”Settings” tab, scroll down to the ”API Keys” section, and copy your API key:

Keep the key for now, as you’ll need it in the third step of this tutorial!
Step 2: Spin Up a Server
For the second step, you need to set up a server that will receive the Moralis webhooks from the Streams API. And for this, we’ll be using a simple Node.js Express app!
So, to kickstart the second step of this tutorial, start by setting up a new project in your integrated development environment (IDE) and installing Express. From there, create a new ”index.js” file in the project’s root folder and add the following code:
const express = require("express"); const app = express(); const port = 3000; app.use(express.json()); app.post("/webhook", async (req, res) => { const {body} = req; try { console.log(body); } catch (e) { console.log(e); return res.status(400).json(); } return res.status(200).json(); }); app.listen(port, () => { console.log(`Listening to streams`); }); In the code, we define a single endpoint called /webhook, to which Moralis can post the streams. Here, we parse the body that Moralis sends and log the response in the console:
app.post("/webhook", async (req, res) => { const {body} = req; try { console.log(body); } catch (e) { console.log(e); return res.status(400).json(); } return res.status(200).json(); }); Next, you can now spin up the server by running the following command in the project’s root folder:
node index.js
In response, you should now see ”Listening to streams” logged in your console:

From here, open a new terminal and run the command below to use ngrok to open a new tunnel to ”port 3000”, where our server is currently running:
ngrok http http://localhost:3000
Executing this command will show you something that looks like this, where you can go ahead and copy your webhook URL:

Save the URL for now, as you’ll need it in the next step!
Step 3: Set Up a Moralis Stream
With a server up and running, you’re now ready to create a Moralis stream. To do so, open a new window in your IDE and create a project folder. From there, go ahead and set up a new ”.env” file and add your Moralis API key as an environment variable. It should look something like this:
MORALIS_KEY=’YOUR_API_KEY’
Next, create a new ”index.js” file and add the following code:
const Moralis = require("moralis").default; const { EvmChain } = require("@moralisweb3/common-evm-utils"); require("dotenv").config(); Moralis.start({ apiKey: process.env.MORALIS_KEY, }); async function streams(){ const options = { chains: [EvmChain.SEPOLIA], tag: "transfers", description: "Listen to Transfers", includeContractLogs: false, includeNativeTxs: true, webhookUrl: "replace_me" } const newStream = await Moralis.Streams.add(options) const {id} = newStream.toJSON(); const address = "0xa50981073aB67555c14F4640CEeB5D3efC5c7af2"; await Moralis.Streams.addAddress({address, id}) console.log("Stream successfully created") } streams() In the initial part of the code, we start by importing Moralis and our environment variable:
const Moralis = require("moralis").default; const { EvmChain } = require("@moralisweb3/common-evm-utils"); require("dotenv").config(); From there, we initialize the Moralis SDK using our API key:
Moralis.start({ apiKey: process.env.MORALIS_KEY, }); We then set up a streams() function where we create an options object. Here, we specify a few parameters, including chains, description, tag, what events to listen for, and our webhook URL:
async function streams(){ const options = { chains: [EvmChain.SEPOLIA], tag: "transfers", description: "Listen to Transfers", includeContractLogs: false, includeNativeTxs: true, webhookUrl: "replace_me" } //… } Remember to replace replace_me above with the webhook URL you copied in the previous step. And don’t forget to append it with /webhook at the end.
Next, we create a new Moralis stream by calling the Streams.add() method while passing our options object as a parameter:
const newStream = await Moralis.Streams.add(options)
From here, we then fetch the id of the stream and create an address const to which we add the address we want to listen to:
const {id} = newStream.toJSON(); const address = "0xa50981073aB67555c14F4640CEeB5D3efC5c7af2"; Lastly, we add the address to our newly created stream using the address and id constants:
await Moralis.Streams.addAddress({address, id}) And that’s it; we are now ready to run the script to create the stream!
Note: the Streams API supports all major EVM chains. So, if you want to monitor addresses on other networks besides Sepolia, you simply need to configure the chain parameter of the options object above.
Step 4: Run the Script
Before running the script, you need to install a couple of dependencies. As such, run the following command in your project’s root folder:
npm install moralis @moralisweb3/common-evm-utils dotenv
Once they have been installed, run this command to execute the code:
node index.js
If everything worked as intended, you should receive a message stating ”Stream successfully created” in your console:

You should also get an empty webhook sent to your server:
{ abi: [], block: { number: '', hash: '', timestamp: '' }, txs: [], txsInternal: [], logs: [], chainId: '', confirmed: true, retries: 0, tag: '', streamId: '', erc20Approvals: [], erc20Transfers: [], nftTokenApprovals: [], nftApprovals: { ERC721: [], ERC1155: [] }, nftTransfers: [], nativeBalances: [] } And that’s it; you have now successfully set up your own stream using Moralis’ Streams API!
In the next section, we’ll show you how it works and what the response might look like!
Step 5: Receive Alerts
With your stream up and running, you’ll receive webhooks whenever on-chain events occur based on your specifications. As such, for the stream created in this tutorial, you’ll get a real-time response whenever the specified wallet sends a native transaction on the Sepolia testnet, and it will look something like this:
{ confirmed: true, chainId: '0xaa36a7', abi: [], streamId: 'a6c08210-c7dc-416c-a140-4746478530ce', tag: 'transfers', retries: 0, block: { number: '4692430', hash: '0x31754432aa984e524472abb52c05f3175471ae2cb209a751f31e75a9dfab6a94', timestamp: '1699967412' }, logs: [], txs: [ { hash: '0x2fc3678670ee9895dc5dfc5f189f9839ab5c7351905b6d2b419518a5334450a2', gas: '21000', gasPrice: '1639464455', nonce: '9', input: '0x', transactionIndex: '78', fromAddress: '0xa50981073ab67555c14f4640ceeb5d3efc5c7af2', toAddress: '0xb76f252c8477818799e244ff68dee3b1e6b0ace5', value: '100000000000000', type: '2', //… receiptCumulativeGasUsed: '25084154', receiptGasUsed: '21000', receiptContractAddress: null, receiptRoot: null, receiptStatus: '1' } ], //… } This response contains a transaction hash, to and from addresses, the value of the transaction, and much more. With this information, you can seamlessly create an on-chain wallet tracker that alerts your users in real-time whenever something important happens!
To learn more about this amazing tool and how to customize your streams further, check out the official Streams API documentation page!
Beyond the Streams API and Building an On-Chain Wallet Tracker – Exploring Moralis Further
Moralis is an industry-leading Web3 API provider, and our suite of premier development tools allows you to build decentralized applications (dapps) both faster and smarter. Consequently, when leveraging Moralis, you can save a lot of development time and resources!

Our comprehensive suite of Web3 APIs consists of many interfaces you can combine with the Streams API to build sophisticated projects. And down below, you can find three prominent examples:
- NFT API: The NFT API is the industry’s premier tool for NFT data. With this interface, you can seamlessly fetch NFT balances, transactions, pricing data, and much more with only single lines of code.
- Token API: With the Token API, you can effortlessly get and integrate token prices, wallet balances, transfers, and much more into your dapps. Consequently, when working with the Token API, it has never been easier to build everything from decentralized exchanges to Web3 wallets.
- Wallet API: The Wallet API is another great tool you can combine with the Streams API to build a powerful on-chain wallet tracker. This tool supports over 500 million addresses across all major EVM chains, allowing you to seamlessly get native balances, NFTs, transfers, profile data, and more from any address.
Also, all Moralis APIs are fully cross-chain compatible. Consequently, when working with our tools, you can build Web3 projects on multiple blockchains, including Ethereum, BNB Smart Chain, Polygon, Chiliz, Gnosis, and many other networks!
If you want to explore all our interfaces, check out the Web3 API page!
Summary: How to Create an On-Chain Wallet Tracker
In today’s article, we kicked things off by exploring the ins and outs of on-chain wallet trackers. In doing so, we learned that they are crypto monitoring tools allowing users to monitor the activity of a crypto address. However, we also learned that monitoring blockchain networks and addresses is hard without proper tools, which is why we introduced you to Moralis’ Streams API!
From there, we dove straight into our crypto wallet tracking tutorial and showed you how to monitor a wallet in five steps using the Streams API:
- Create a Moralis Account
- Spin Up a Server
- Set Up a Moralis Stream
- Run the Script
- Receive Alerts
Consequently, if you have followed along this far, you now know how to monitor any address on any blockchain network with Moralis. With your newly acquired skills, you can seamlessly build a real-time, on-chain wallet tracker application in a heartbeat!
By combining the Streams API with our other industry-leading interfaces, you can seamlessly build more sophisticated projects. Some prominent examples include the NFT API, Token API, Wallet API, and many others.
If you liked this tutorial on how to build an on-chain wallet tracker, consider checking out more Web3 content. For instance, learn all you need to know about meta transactions or check out our Base faucet guide! Also, don’t forget to join Moralis today. You can create your account entirely for free, and you’ll gain immediate access to our industry-leading development tools!
Read More: moralis.io


 Bitcoin
  Ethereum
  Tether
  XRP
XRP  Solana
  USDC
USDC  Dogecoin
  Cardano
  TRON
TRON  Lido Staked Ether
  Wrapped Bitcoin
  Sui
Sui  Chainlink
  Wrapped stETH
  Avalanche
  Stellar
  Shiba Inu
  Hedera
  Hyperliquid
  LEO Token
  Toncoin
  Bitcoin Cash
  Litecoin
  Polkadot
  USDS
USDS  WETH
WETH  Monero
  Pi Network
  Wrapped eETH
  Pepe
Pepe  Bitget Token
  Binance Bridged USDT (BNB Smart Chain)
  Ethena USDe
  Coinbase Wrapped BTC
  WhiteBIT Coin
  Uniswap
  Bittensor
  NEAR Protocol
  Dai
Dai  Aptos
Aptos  Aave
Aave  OKB
OKB  Ondo
Ondo  Jito Staked SOL
  Ethereum Classic
  Internet Computer
  Tokenize Xchange
  Cronos