If you’re an aspiring Aptos developer wanting to know how to mint NFTs on Aptos, then you’re in luck! This Aptos NFT tutorial will teach you how to create and mint event ticket NFTs with the Aptos CLI, and the following command is the trigger completing the “how to mint NFTs on Aptos” feat:
aptos move publish --named-addresses mint_nft=<default-account-address>
Before running the above command, you must complete the required prerequisites and proper setup. We will cover that in our Aptos NFT tutorial below, and we’ll also show you how you can use the Moralis Web3 API to fetch parsed on-chain data from the Aptos chain. Now, for the Aptos testnet, the following snippet of code queries all the details of the transaction in question:
fetch('https://testnet-aptos-api.moralis.io/transactions/by_hash/:txn_hash', options) So, if you wish to learn how to mint NFTs on Aptos and fetch their transaction details with Moralis by properly utilizing and implementing the above command and code snippet, follow our lead in the Aptos NFT tutorial section below! To get started, you need a Moralis Web3 API key, which you can get with a free Moralis account!
Overview
The first part of today’s article is all about demonstrating how to mint NFTs on Aptos and using Moralis to easily fetch all transaction details. This is where we’ll guide you through the processes of minting a base token for event ticket NFTs using the Aptos CLI. You’ll also learn how to complete the initial setup steps. In addition, you’ll see how to obtain the Moralis Web3 API key, which is your gateway to querying Aptos (and other leading blockchains) with single lines of code.
In the second part of today’s article, we’ll cover the theoretical aspects of today’s topic. This is where you get to learn what Aptos is, what NFTs are, and why to use Aptos for NFTs. Nonetheless, you can dig into the “Building NFT Projects on Aptos” section to learn more about the power of Moralis and how it can help you launch unique NFT dapps.

Aptos NFT Tutorial – How to Mint NFTs on Aptos
As pointed out above, we’ll focus on showing you how to mint NFTs on Aptos using Aptos CLI. With that said, make sure you install the Aptos CLI by downloading the core files for the operating system you are using:
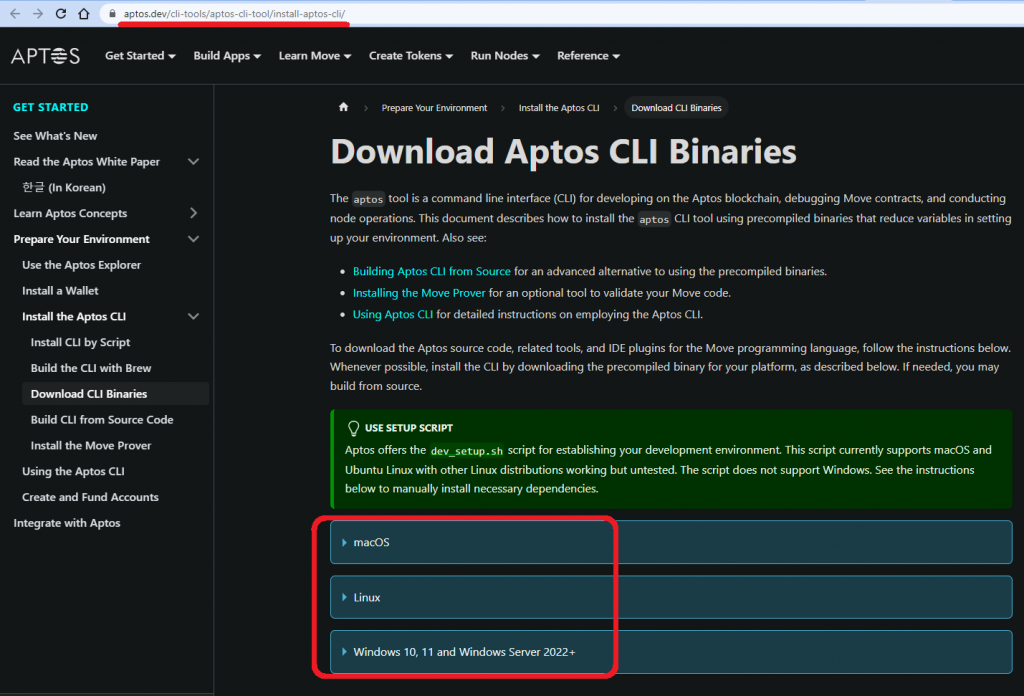
Once you’ve set up your environment and your project folder, clone “aptos-core” using the following command:
git clone https://github.com/aptos-labs/aptos-core.git
Then, when you’ve cloned “aptos-core“, run this command:
aptos init
After entering the above command, your terminal will ask you to choose the Aptos network type. When creating NFTs for production purposes, you’ll want to select the “mainnet” option. However, for the sake of this Aptos NFT tutorial, go with the “testnet” option. So, simply enter “testnet” into your terminal. Then, hit “enter” again to generate your private key. Here’s a screenshot of our terminal after successfully executing all of the aforementioned commands:
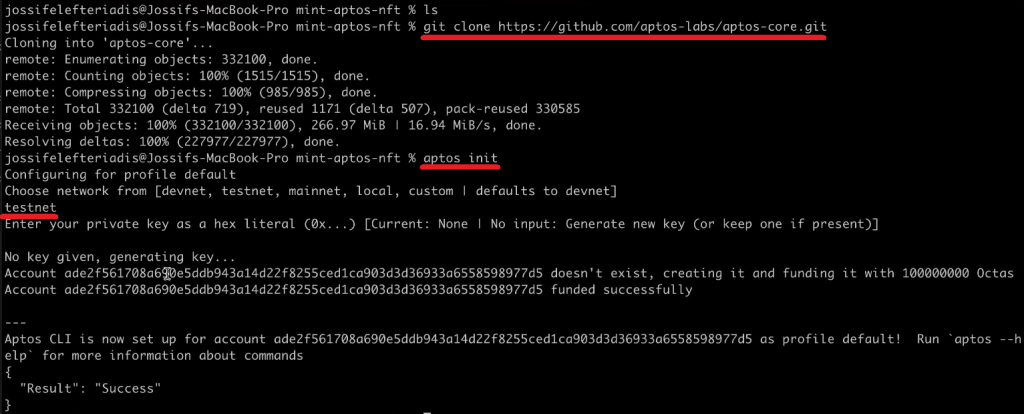
With the Aptos CLI setup based on your generated private key, you can publish the module. To do this, you must first navigate to the appropriate folder in your “aptos-core” source. So, “cd” into “aptos-core“. Next, use the following command to access the correct directory:
cd aptos-move/move-examples/mint_nft/1-Create-NFT
Again, feel free to use our terminal’s screenshot for additional assistance:
Mint NFTs on Aptos
Once inside the “1-Create-NFT” directory, it’s time to run the “mint_nft” function, which will mint your base NFT token. For that purpose, you need to use the command below. Make sure you replace “<default-account-address>” with your above-generated private key:
aptos move publish --named-addresses mint_nft=<default-account-address>
After running the above command for your private key, you’ll receive a response in the following format:

Finally, you’ll be asked if you want to submit a transaction for a given range of octas (an octa is a minimal unit of the Aptos APT token) at a gas unit price of a specific amount of octas.
Note: One octa is equal to 0.00000001 of the Aptos coin (APT).
To proceed, you must confirm by entering “yes” or “y” into your terminal. This will finally mint your base NFT token and provide you with the minting transaction hash. Here’s our example:

Now that you know how to mint NFTs on the Aptos testnet, it’s time you learn how to explore your transaction hash. One option is to use the chain explorer for Aptos. So, go to “explore.aptoslabs.com” and first select the “testnet” network from the drop-down menu in the top-right corner:

After switching to the “testnet”, you can explore your transaction hash. As such, paste your transaction hash into the search field and click on the option that appears below:
Finally, you’ll be able to see all the details of your minting transaction:
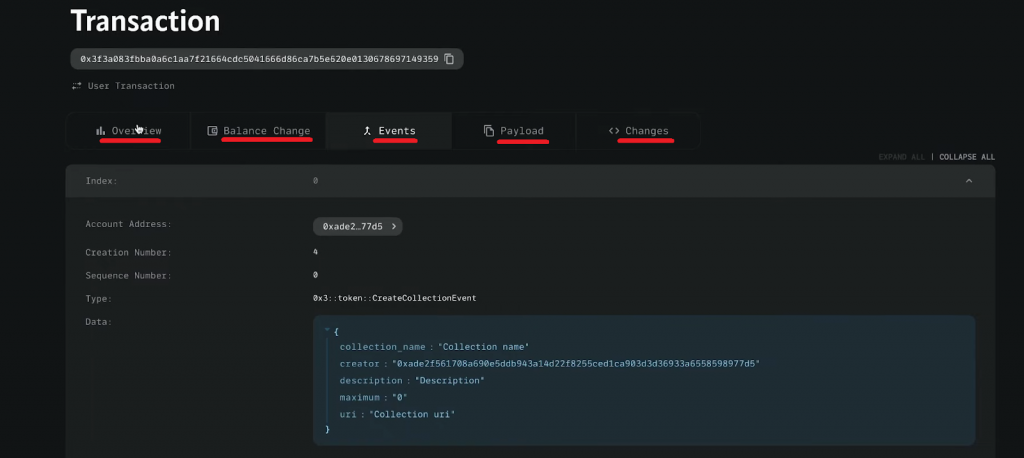
Looking at the above screenshot, you can see that via Aptos’ chain explorer, you can view all the details, including your NFT collection name. While using the explorer is a neat way to explore transaction hashes, you need a better, automated method of fetching those details when you decide to present them inside a dapp (decentralized application). This is where the Moralis Web3 Data API enters the scene.
Fetching Parsed On-Chain Data from Aptos with Moralis
When it comes to utilizing the Web3 Data API, the Moralis API reference pages provide you with all the snippets of code you need for different frameworks/programming languages. For the sake of this tutorial, we’ll focus on using NodeJS:
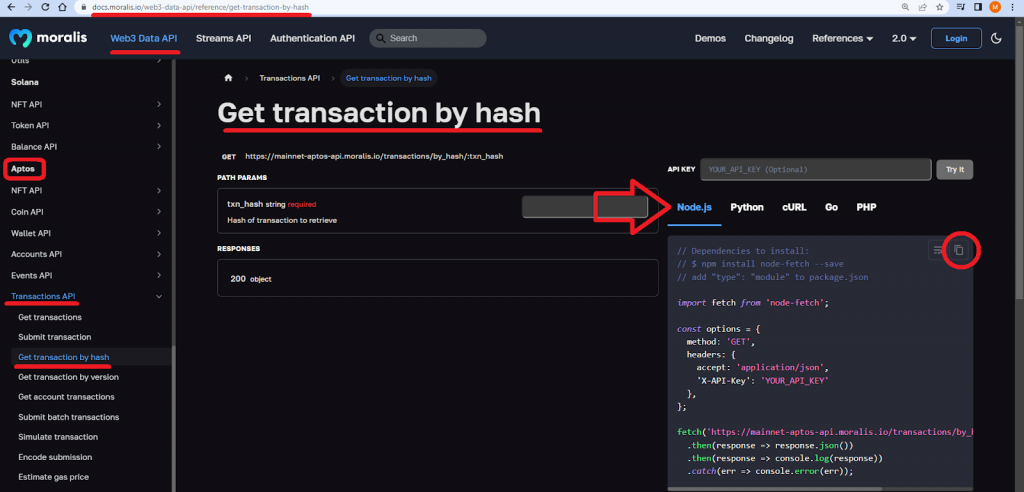
To demonstrate the power of the above Moralis Aptos API endpoint (“Get transaction by hash“), let’s create a simple NodeJS project.
Note: If you need help with setting up your NodeJS app, use our “Quickstart NodeJS” guide that awaits you in the “Getting Started” section of the Web3 Data API docs:
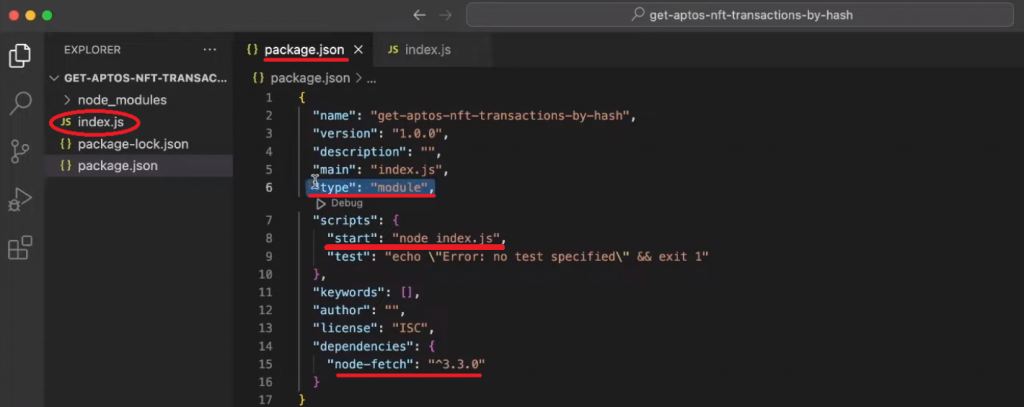
Once you’ve properly initialized your NodeJS app, you’ll have a “package.json” and a “package-lock.json” files in your project folder. You also need to install the “node-fetch” module. Plus, inside the “package.json” file, you need to add the following:
“type”: “module”,
Plus, the “start” script inside “scripts”:
"start": "node index.js",
Then, create an “index.js” script where you’ll implement the snippet of code from the intro. Here’s a screenshot that will help you ensure you are all caught up:
Next, open the “index.js” script and paste in the following lines of code:
import fetch from "node-fetch"; const options = { method: "GET", headers: { accept: "application/json", "X-API-Key": "YOUR-API-KEY-HERE", }, }; fetch("https://testnet-aptos-api.moralis.io/transactions/by_hash/YOUR_TX_HASH", options) .then((response) => response.json()) .then((response) => console.log(response)) .catch((err) => console.error(err)); To make the above script work, you need to do the following:
- Replace “YOUR-API-KEY-HERE” with your Moralis Web3 API key.
- Use your NFT minting transaction hash instead of “YOUR_TX_HASH”.
When it comes to your transaction hash, you already know where to get it. To get your Web3 API key, check the following section.
Obtain Your Moralis Web3 API Key
Regarding your Web3 API key, you need to copy it from the “Web3 APIs” page inside your Moralis admin area. To access that page, you need an active Moralis account. So, in case you haven’t done so yet, create your Moralis account now. Then, obtain your Web3 key with these two clicks:
With both your transaction hash and API key in place, you can run your NodeJS dapp by entering “npm run” into your terminal.
Note: Make sure you “cd” into your project folder before running the above command.
In response to the “npm run” command, your terminal will provide you with all the details that you were able to explore using the Aptos explorer:
This means that these details are at your disposal and that you can neatly incorporate them into all sorts of Aptos dapps.
If you enjoyed this tutorial on how to mint NFTs on Aptos but would like to catch up with the basics, make sure to explore the sections below.
Exploring Aptos and NFTs
As mentioned in the overview of today’s article, you can learn what Aptos and NFTs are herein. Once you know the basics, you’ll be able to understand why using Aptos for NFTs might be the way to go for your project.
What is Aptos?
Aptos is a non-EVM-compatible layer-one (L1) blockchain that was launched in October 2022. Per the Aptos whitepaper, the chain has been in the making for more than three years, with more than 350 developers across the globe involved in the project. Aptos also includes some novel innovations in the form of a unique consensus twist, systems security, smart contract design, performance, and decentralization. This programmable blockchain also uses its own programming language called “Move”.
Aptos’ co-founders – Mo Shaikh and Avery Ching – have high hopes for this L1. They aim to bring fair access to decentralization to everyone through a safe, upgradeable, and scalable blockchain network. In an attempt to bring this vision to life, the co-founders launched the Aptos Foundation and Aptos Labs. The former focuses on the growth of the network, while the latter commits to developing products and applications on Aptos.
Following the meaning of “aptos”, which in the Ohlone language means “the people”, Aptos brands itself with the “Aptos is designed for people” tagline.
If you wish to dive deeper into Aptos, make sure to check out our article answering the “what is the Aptos blockchain?” question in more detail.
What are NFTs?
NFTs, or non-fungible tokens, are special crypto assets. Unlike fungible tokens, NFTs are unique, and no two NFTs, even if they represent the same files (e.g., images), are alike. This property makes NFTs great for countless use cases that require uniqueness both in the digital and real world. So far, NFTs have been mainly used for entertainment purposes, representing digital art, collectibles, and profile pictures. However, several other NFT utility instances already range across all sorts of industries. These mainly focus on ownership proofs, certificates, and ticketing.
Why Use Aptos for NFTs?
So far, the ERC-721 and ERC-1155 Ethereum NFT standards dominate the NFT space. After all, Ethereum and other EVM-compatible chains still cover the majority of on-chain projects. However, Aptos NFTs could easily follow suit regarding growth and recognition as many of Solana’s SPL NFTs did in the last bull run. After all, people like new, exciting projects, especially on new chains. This novelty wave may already be a good enough reason to use Aptos for NFTs.
Another reason why you might want to focus on creating NFTs on this new blockchain network is Aptos’ token module. The latter encapsulates rich, flexible assets and collectibles that are discrete (non-decimal). Just like the ERC-1155 standard, the Aptos token standard supports fungible, semi-fungible, and non-fungible tokens. This standard has its own “AptosToken” package, allowing rapid iteration. Plus, you can mint Aptos NFTs very simply using the Aptos CLI (as demonstrated in the above Aptos NFT tutorial). You can also mint Aptos NFTs with the SDKs or using the Aptos NFT minting tool. To determine if you want to use Aptos for NFTs, make sure to explore the “Create Tokens on Aptos” section in the Aptos docs. This will also help you determine how to mint NFTs on Aptos to best meet your project’s goals.
Building NFT Projects on Aptos
When it comes to NFTs on Aptos, you have two options. You can create your own NFTs or focus on existing ones. If you choose the latter, you can skip the minting process and focus on building a neat, user-friendly dapp that utilizes existing NFTs. Moreover, a great example of this could be an NFT art gallery, a portfolio tracker, or even a Web3 game. In fact, even if you decide to create your own Aptos NFTs, you’ll most likely still want to build your own dapps around them and offer your users the best experience.
When it comes to building dapps, there’s no better tool than Moralis. It enables you to use legacy dev skills to join the Web3 revolution. A great example would be the Moralis Web3 Python SDK and JS SDK. Moralis is also cross-chain interoperable, so you can target all the leading programmable blockchains, including Aptos.
When it comes to using Moralis to build NFT projects, the Moralis NFT API plays a key role. Now, we can’t list all of them, but some of the endpoints the NFT API offers enable you to get NFTs by:
- IDs
- Collection
- Collections by IDs
- Collections by creator
- Creators
- Owners by tokens
- Owners by and of collection
- Wallet addresses
- Transfers by token IDs
- Transfers by collection, creators, and wallets
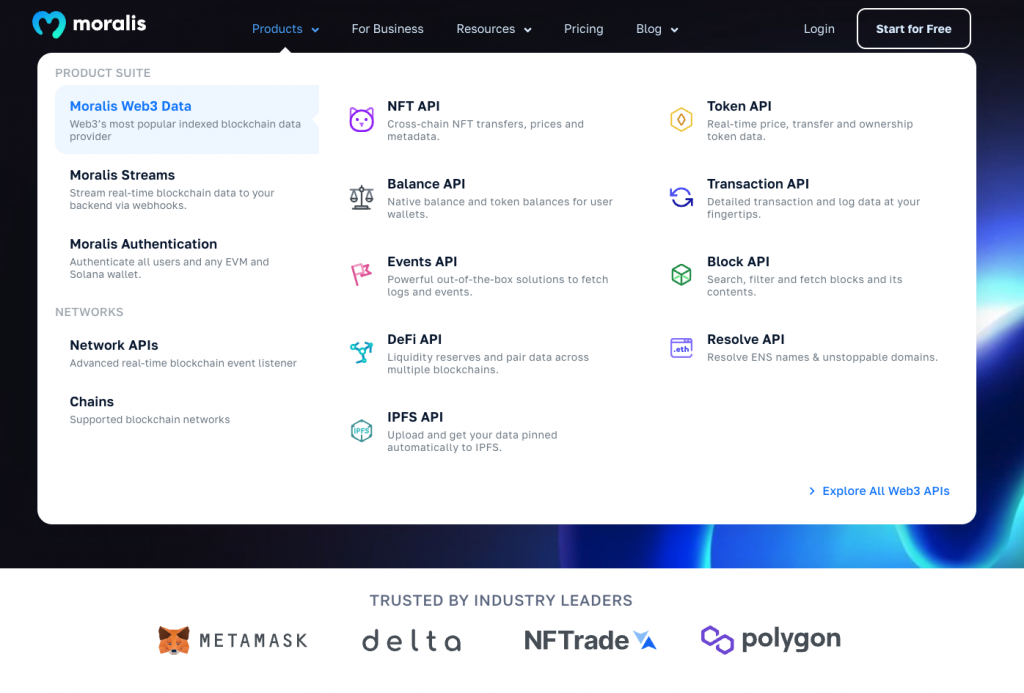
There are more powerful APIs from Moralis that can help you take your Aptos dapps to the next level:
Aptos NFT Tutorial – How to Mint NFTs on Aptos – Summary
We covered quite a distance in today’s article. First, we demonstrated how to mint NFTs on Aptos using the Aptos CLI. We mainly focused on minting NFTs that would serve as event tickets. We also showed how to fetch parsed on-chain data by hash using one of the Moralis Aptos API endpoints. You also had a chance to learn what Aptos and NFTs are and why it might be smart to learn how to create Aptos NFT projects. Furthermore, if you decide on that path, you now know that the Moralis Web3 APIs are game-changers. With this toolset in your corner, you can build all sorts of dapps the easy way.
Make sure to dive into the Moralis documentation pages and learn how to make the most of this Web3 API powerhouse. Also, for additional guidance, education, and inspiration, use the Moralis Web3 YouTube channel and the Moralis blog. Among many topics, you can find out why the Alchemy NFT API is not the optimal tool. Plus, you can explore how to mint NFT from contract. Moralis also offers other practical resources, such as Moralis Academy and Pure Faucets. The latter provides vetted crypto faucet options, such as a Goerli faucet, Aptos testnet faucet, BNB faucet, and many others.
Read More: moralis.io



 Bitcoin
  Ethereum
  Tether
  XRP
XRP  Solana
  USDC
USDC  Dogecoin
  TRON
TRON  Cardano
  Lido Staked Ether
  Wrapped Bitcoin
  Hyperliquid
  Wrapped stETH
  Sui
Sui  Chainlink
  Avalanche
  Stellar
  LEO Token
  Bitcoin Cash
  Toncoin
  Shiba Inu
  Hedera
  USDS
USDS  WETH
WETH  Litecoin
  Wrapped eETH
  Monero
  Polkadot
  Binance Bridged USDT (BNB Smart Chain)
  Ethena USDe
  Bitget Token
  Pepe
Pepe  Pi Network
  Coinbase Wrapped BTC
  WhiteBIT Coin
  Aave
Aave  Uniswap
  Dai
Dai  Bittensor
  Ethena Staked USDe
  Aptos
Aptos  NEAR Protocol
  Cronos
  OKB
OKB  BlackRock USD Institutional Digital Liquidity Fund
  Internet Computer
  Jito Staked SOL
  Ethereum Classic
  Ondo
Ondo