
Devs wanting to launch dapps on the Fantom network should always put their dapps through crucial testing phases on the Fantom testnet prior to mainnet launch. During these phases, executing test transactions are of utmost importance to ensure everything works correctly. To do so, developers must obtain free testnet FTM via a reliable FTM faucet. If you’d like to utilize a reliable faucet to get testnet FTM, here’s how:
- Add the Fantom testnet to your MetaMask wallet:

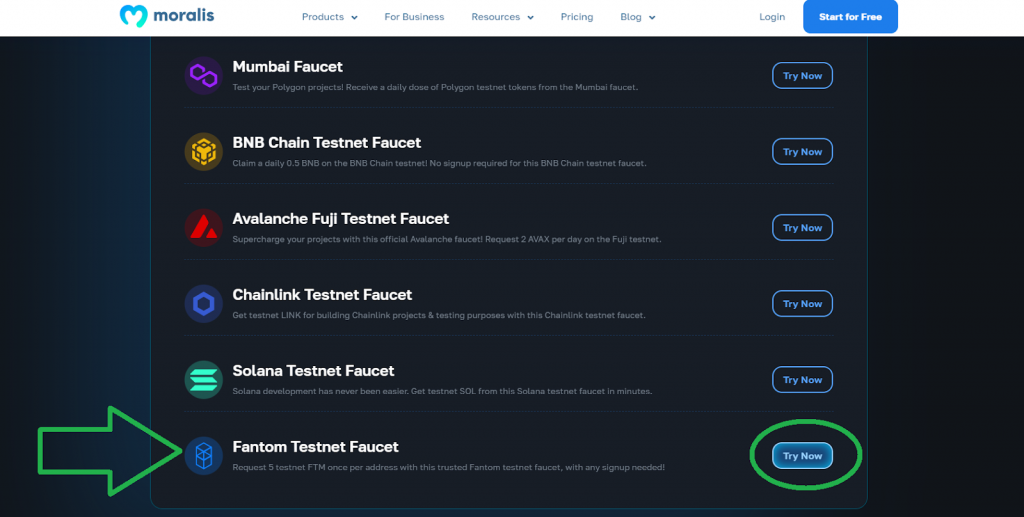
- Get testnet funds by visiting Moralis’ Pure Faucets page. From the faucet list, click on the “Try Now” button next to “Fantom Testnet Faucet”:

- On the Fantom faucet page, checkmark the “I’m not a robot” box, paste in your wallet address, and hit the “request Testnet FTM” button:
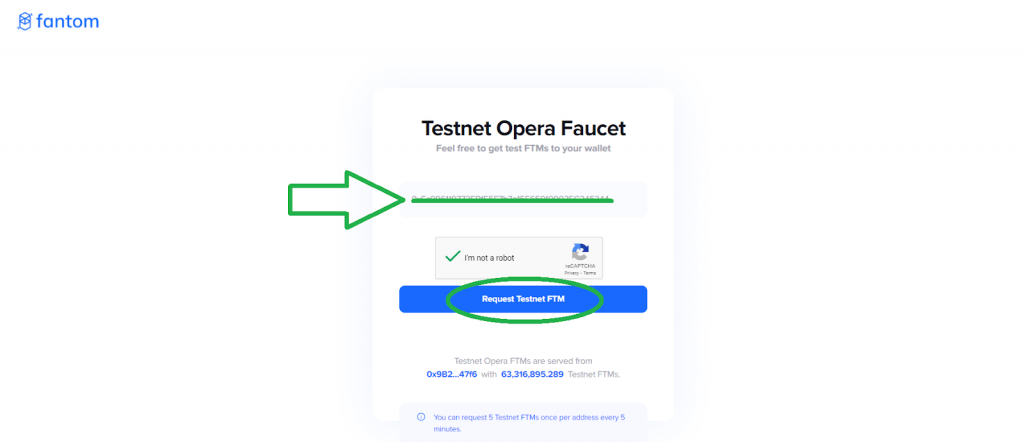
With these tokens in your wallet, you can start testing your Fantom dapp. During this process, tools such as MetaMask, Remix, and FtmScan will simplify things. Then, once you’re ready to go live with your dapp, use Moralis to target the Fantom mainnet:
- In your script, change the default chain from “ETHEREUM” to “FANTOM“:
Moralis.start({ apiKey: 'YOUR_API_KEY', defaultEvmApiChain: EvmChain.FANTOM }) - Fetch your Web3 API key from your Moralis admin area and use it to replace “YOUR_API_KEY”:
- Create your free Moralis account.
- Select the “Web3 APIs” option and copy your API key:
As you can see, using an FTM faucet is pretty simple. However, to get to the point where you actually need testnet FTM, you must first build something worth testing. Therefore, create your free Moralis account and start BUIDLing!
Overview
In today’s article, we’ll show you how to obtain free funds to cover transactions on the Fantom testnet. That said, the core of this guide will be a deeper dive into the above-presented steps to integrate the Fantom testnet and get testnet FTM.
If you need additional context, make sure to focus on the second half of the article where we explore Fantom and its testnet. This is the place to get the basics under your belt by learning what an FTM faucet and testnet FTM are. At the bottom of today’s article, you can also learn more about Moralis’ Pure Faucets and the Moralis API fleet. The latter is your ticket to building dapps the easy way. All you need is a free Moralis account!

Integrate the Fantom Testnet and Get Testnet FTM from an FTM Faucet
Since MetaMask remains the leading Web3 wallet and the must-have tool for Web3 development, we will focus on showing you how to integrate the Fantom testnet into MetaMask. So, make sure you have your MetaMask browser extension with at least one account ready.
Open your MetaMask and click on the drop-down menu called “Networks”:
As you can see in the above screenshot, our example wallet already has several networks. However, by default, MetaMask only supports Ethereum. Thus, other chains must be added via the “Add network” button. After hitting that button, you will land on the following screen:
Looking at the above image, you can see that MetaMask offers us the Fantom mainnet (“Fantom Opera”) option. To add that network, we only need to click on the “Add” button next to it. However, to add the Fantom Opera testnet, we need to use the “Add a network manually” button. If you click on this button, you’ll land on a page asking for network details:
As the above screenshot indicates, you must provide the network name, new RPC URL, chain ID, currency symbol, and block explorer URL. You can find the details for the Fantom Opera testnet below:
- Network Name: Fantom testnet
- New RPC URL: https://rpc.testnet.fantom.network/
- Chain ID: 0xfa2 or 4002
- Symbol: FTM
- Block Explorer URL: https://testnet.ftmscan.com/
Here are the details for the Fantom Opera mainnet in case you need to add it manually as well:
- Network Name: Fantom Opera
- New RPC URL: https://rpcapi.fantom.network/ or https://rpc.ftm.tools/
- Chain ID: 250
- Symbol: FTM
- Block Explorer URL: https://ftmscan.com/
Integrate Fantom Opera Testnet and Mainnet with Just a Few Clicks
Another way to add both Fantom networks with just a couple of clicks is possible if you visit FtmScan. Once on this blockchain explorer page, make sure to select the “FTM Testnet” option in the top-right corner:
Then, focus on the page’s footer, where you’ll see the “Add Fantom Network” button with the MetaMask logo. Once you click on that button, your MetaMask extension will pop up, asking for your approval:
After clicking on the “Approve” button, MetaMask will also ask you if you want to switch to the newly added network:
To add the Fantom mainnet with FtmScam, you just need to switch to “FTM Mainnet” and repeat the same steps outlined above. Finally, you can now switch between these two networks inside your MetaMask:
Now that you have the FTM testnet in your MetaMask, you’ll be able to view the balance of testnet FTMs once you get them from the FTM faucet. As such, let us show you the details behind that task.
How to Use the Best FTM Faucet
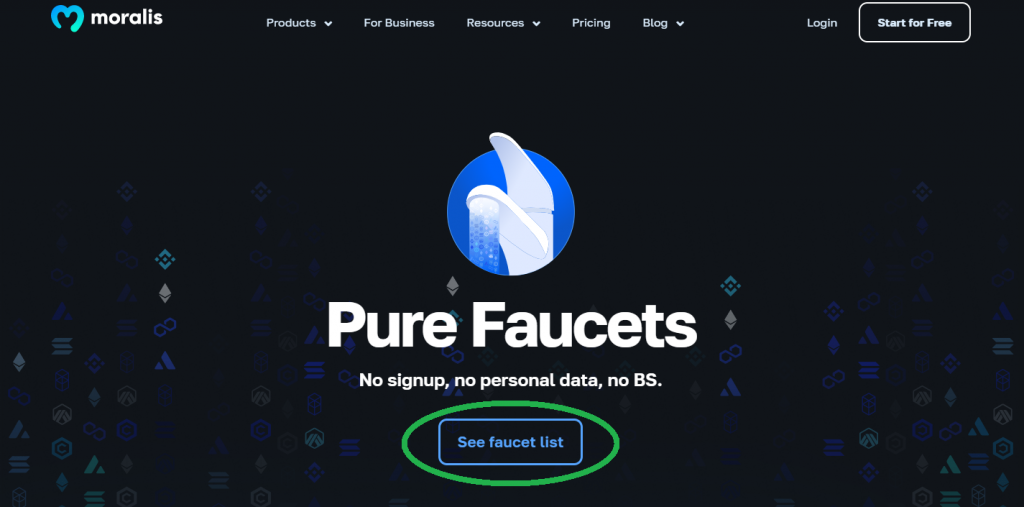
Start by visiting the Pure Faucets page via the “Get testnet funds” link at the outset of the article. Once on that page, use the “See faucet list” button or simply scroll down until you see the list of reliable faucets:
From the list of faucets, click on the “Try Now” button next to “Fantom Testnet Faucet”:
By clicking on the above button, you’ll land on the “Testnet Opera Faucet” page. There, input your wallet address, which you can copy from your MetaMask:
With your address in place, checkmark the “I’m not a robot” box and click on the “Request Testnet FTM” button:
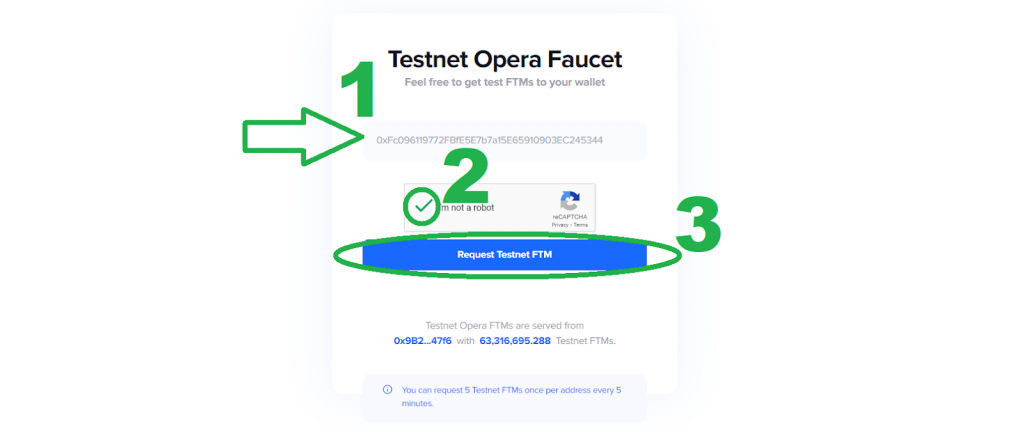
After requesting five testnet FTM tokens, you’ll be able to see them in your wallet in a matter of seconds:
Note: The above-presented FTM faucet allows you to request five testnet FTMs once per address every five minutes.
Using Testnet FTM
You can start executing test transactions with the testing funds in your possession. For example, you can use two of your accounts to make transfers between them and see if your dapp accurately registers them. Also, make sure to make use of FtmScan (the testnet option), which also enables you to interact with smart contracts already live on the FTM testnet:
To do this, you need to visit a contract’s page and navigate to its “Contract” section:
As you can see in the above screenshot, once on the “Contract” tab, you can choose between the “Read Contract” and “Write Contract” options. If you select the “Read Contract” option, you’ll be able to run “read-only” functions, which do not change the state of the blockchain and, therefore, don’t require on-chain transactions. However, to execute “write” functions, you need to connect your MetaMask and use your testing funds to cover the transaction fees.
Of course, you can also deploy your own smart contracts to the Fantom testnet. In that case, you’ll most likely want to use Remix, which is an online Ethereum Virtual Machine (EVM) IDE. There, you can easily write, compile, deploy, and verify smart contracts. To do this on the FTM testnet, you need to select the “Injected Provider – MetaMask” option while having your MetaMask connected to this network:
Beyond Testing – Going Live on the Fantom Mainnet
After testing your dapp on the Fantom testnet, you’ll be ready to deploy your decentralized applications (dapps) on the Fantom mainnet. This is where steps four and five from the introduction of today’s article come into play. With Moralis on your side, you’ll be able to interact with the Fantom mainnet in various ways. One option is to set Fantom as the default chain (as presented in the intro):
import Moralis from 'moralis'; import { EvmChain } from '@moralisweb3/common-evm-utils'; Moralis.start({ apiKey: 'YOUR_API_KEY', defaultEvmApiChain: EvmChain.FANTOM }) Of course, you don’t need to set Fantom as the default chain if you don’t want to. After all, using “EvmChain.FANTOM” or the Fantom chain ID is all you need to focus on this chain exclusively or in combination with other leading EVM-compatible chains.
When working with Moralis’ API reference pages, you’ll be able to select the Fantom chain from the “chains” list:
When using the Moralis Streams API via the admin panel, you only need to toggle the button in front of “Fantom”:
Note: Keep in mind that the funds that the FTM faucet provides only work on the FTM testnet. To get mainnet FTM, you need to use a reliable crypto exchange.
Exploring Fantom and Its Testnet
Along with BNB Chain, Avalanche, and Polygon, Fantom is one of the most popular EVM-compatible blockchains. Fantom is a high-performance, scalable, and secure smart contract platform. Its mainnet, Fantom Opera, is built on Lachesis, which is Fantom’s consensus mechanism. Thanks to Lachesis, Fantom delivers fast transaction speeds, low transaction costs, and deterministic finality. Moreover, it does so while remaining permissionless, decentralized, and open-source.
With growing popularity, Fantom is constantly gaining recognition among Web3 developers. Thus, there is also an ever-increasing use of Fantom’s testnet and the FTM faucet. After all, developers want to test their smart contracts and dapps before launching them on the mainnet.
What is a Fantom Testnet Faucet?
A Fantom testnet faucet is a crypto faucet that provides devs with free cryptocurrency native to the testnet. As you were able to see in the above guide, a reliable FTM faucet comes in the form of a simple web application. The latter requires users to paste their wallet address and request a certain amount of testnet FTM.
To avoid bot exploitations, most crypto faucets use some sort of “human check” method. Most faucets also tend to have some limitations to how much a specific wallet address can request in a certain time frame. All in all, a Fantom testnet faucet is key to covering transaction costs on the FTM testnet.
Testnet FTM – What is it?
Testnet FTM is the cryptocurrency that an FTM faucet provides. Also known as “test” FTM or “play” FTM, it is the Fantom testnet’s native currency. Furthermore, testnet FTM mimics the properties of Fantom’s native mainnet FTM. After all, testnets normally aim to resemble their mainnets as closely as possible. Accordingly, they need to implement similar functionalities that enable valid testing of mainnet updates, smart contracts, and dapps.
Easiest Way to Get Testnet Funds
You probably know that there are several other reputable programmable blockchains, with Ethereum leading the pack. What applies to Fantom development applies to all of them – devs need testnets to test updates or smart contracts and dapps before deploying them to mainnets. This means developers need reliable and user-friendly ways to get testnet funds. However, if you’ve been around the crypto block for a while, you know that there are a lot of shady faucets out there. As Web3 developers, we don’t want the related hassles to get testnet funds many dishonest faucet providers force on you. Thus, we decided to create a list of vetted crypto faucets: Pure Faucets.
Our goal is to provide all the leading testnet faucets in one place. We already have an Ethereum faucet that lets you get Goerli ETH and use a reliable Sepolia testnet faucet. There is also a Solana testnet faucet, Chainlink testnet faucet, Polygon Mumbai faucet, FTM faucet, and more.
Pure Faucets is just one of many useful resources you can find from Moralis. For instance, Moralis provides a reliable gwei to ETH converter. However, the true power lies in Moralis’ Web3 APIs, which support all the leading blockchains and legacy programming languages. A great example is our Solana Python API.
Here’s an overview of Moralis’ Web3 APIs:
With the ultimate Web3 Data, Streams, and Auth APIs, you can create all sorts of dapps without breaking a sweat. However, Moralis particularly specializes in providing single-line-of-code solutions for Web3 wallets and crypto portfolio trackers.
Fantom Testnet Faucet – How to Get Testnet FTM from an FTM Faucet – Summary
In today’s article, you had a chance to learn how to use the best FTM faucet. As such, you now know how to add the FTM testnet to MetaMask and get testnet FTM with the help of Pure Faucets. You also learned how to interact with the Fantom mainnet once you’re ready to go live with your dapps. In addition, we also explained what an FTM faucet is and what testnet FTM is. Last but not least, you discovered how Moralis can help you take dapp development to the next level, especially if your team is building the next big Web3 wallet or portfolio tracker.
With the knowledge obtained herein, you can start targeting the Fantom network. If you do so with Moralis, you’ll be able to easily switch to or add any other chain, thanks to Moralis’ cross-chain interoperability. So, use the Moralis docs, YouTube channel, and blog for additional guidance. With those outlets in your corner, you can easily create an ERC721 token, implement crypto wallet tracking, use a Web3 get block function, explore the leading Web3 libraries, complete the “create ERC20 token” challenge, and much more. Essentially, these free resources empower you to become a Web3 developer.
On the other hand, you can also take a more professional approach to your blockchain development education by enrolling in Moralis Academy. If you choose this path, crypto experts will first help you master blockchain and Bitcoin fundamentals. Then, you’ll be ready to take on more advanced topics.
Read More: moralis.io



 Bitcoin
  Ethereum
  Tether
  Solana
  XRP
XRP  Dogecoin
  USDC
USDC  Cardano
  Lido Staked Ether
  Avalanche
  TRON
TRON  Toncoin
  Stellar
  Shiba Inu
  Wrapped stETH
  Wrapped Bitcoin
  Polkadot
  Chainlink
  Bitcoin Cash
  WETH
WETH  Sui
Sui  Pepe
Pepe  NEAR Protocol
  LEO Token
  Litecoin
  Uniswap
  Aptos
Aptos  Wrapped eETH
  Hedera
  Internet Computer
  USDS
USDS  Cronos
  Ethereum Classic
  POL (ex-MATIC)
  Bittensor
  Render
  Artificial Superintelligence Alliance
  Ethena USDe
  Algorand
  Arbitrum
  Filecoin
  Bonk
Bonk  Celestia
  Stacks
  Dai
Dai  Cosmos Hub
  WhiteBIT Coin