With the enterprise-grade Token API from Moralis, you can get token metadata quickly and easily. In fact, with the following code snippets utilizing two different endpoints, you can get token metadata by symbol and contract address:
- Get token metadata by symbol:
const response = await Moralis.EvmApi.token.getTokenMetadataBySymbol({ symbols, chain, }); - Get token metadata by contract address:
const response = await Moralis.EvmApi.token.getTokenMetadata({ addresses, chain, }); If you’re an experienced developer, odds are you already know how to implement the code snippets above. If so, sign up for a free Moralis account and start using all of the API’s functionalities immediately!
However, if you’d like to know how to use the code above, read on as we show you step-by-step how to implement the snippets and get token metadata! Moreover, before moving further in this article, you need to have an active Moralis account to complete the article’s tutorial. Thus, create your free Moralis account now!
Overview
As you may know, there are different types of crypto tokens – fungible tokens (FTs), non-fungible tokens (NFTs), and semi-fungible tokens (SFTs). All these tokens play a wide range of roles in the Web3 space. Furthermore, there are countless possibilities in which you can build dapps (decentralized applications) incorporating these tokens. Moreover, to utilize any crypto token to the fullest, you need to know how to get token metadata. Thus, you should master the above-presented methods. Nonetheless, while we’ll focus on fungible tokens (ERC-20) in today’s tutorial, Moralis also provides you with the ultimate NFT API. The latter is the go-to tool when building dapps featuring NFT functionality, such as getting all NFT transfers, NFT metadata, NFT collection data, etc. Even if you’ve been wondering how to get all transfers of an NFT, this is the tool you need.

It’s worth pointing out that both the Token API and NFT API are part of the best EVM API. This means that aside from targeting the Ethereum network, with this toolbox, you can effortlessly query all supported EVM-compatible chains.
Moving forward, we’ll first cover the basics of the “token metadata” topic. This is where you’ll have an opportunity to learn what token metadata is, what different types of token metadata there are, and what token metadata standards entail. You’ll also learn what makes Moralis the best Web3 provider to get token metadata. Finally, we’ll invite you to take on today’s tutorial to implement the above-presented snippets of code. However, in case you already know the theory behind tokens and their metadata, feel free to roll up your sleeves and jump straight to the “tutorial” section.
Exploring Token Metadata
Without knowing what token metadata is, it’s hard to utilize it. As such, let’s first ensure you can answer the “what is token metadata?” question confidently. Token metadata refers to data that focuses on what FTs, NFTs, or SFTs represent. Moreover, since we’ll focus on FTs herein, let’s take a closer look at fungible token metadata.
You may already know that crypto tokens are minted and governed by smart contracts. These pieces of on-chain software define automated actions that will take place when specific predefined conditioners are met. Furthermore, the contracts mint FTs based on specific details, which consist of mandatory and optional data. When it comes to ERC-20 contracts, the contract address and the total supply of tokens are the only two essential details. However, the token name, symbol, and decimal numbers are the optimal pieces of information. These optional details represent fungible token metadata.
In addition, fungible tokens’ logos or thumbnails are also often categorized as part of metadata. However, technically, FT metadata and an FT logo are two separate things. If nothing, you can store the former on the blockchain, but you can’t with the latter. Still, when you use high-quality Web3 API endpoints to get token metadata, you’ll also get the tokens logo (if available).
Different Types of Token Metadata
By now, you know that there are three primary types of tokens: FTs, NFTs, and SFTs. As such, there are also three different types of token metadata. Since we’ve already explained FT metadata above, we won’t go into further details regarding these tokens. Moreover, SFTs share the same metadata frameworks as NFTs via the ERC-1155 (a.k.a. ERC 1155) standard (more on that below). As such, let’s look at NFT metadata more closely.
Unlike FTs, non-fungible tokens come with NFT-representing files, which are too large to be stored on the blockchain. Instead, devs use token metadata to accommodate links to these NFT files. Although these files are significantly smaller in size, it’s still not optimal both from an economical and technical perspective to store NFT metadata files on the blockchain. Thus, both NFT metadata (typically JSON files) and NFT-representing files should ideally be stored using a reliable decentralized storage solution (e.g., IPFS). Moreover, aside from other essential details, only the link to NFT metadata (URI) is stored on the blockchain.
Furthermore, the details included in NFT metadata vary depending on the token standard. As a minimum, token metadata includes a name and a symbol. Nonetheless, just like with FTs, Moralis is the tool to use when your goal is to get token metadata by contract address for NFTs.
Token Metadata Standards and What They Entail
Before you learn to get token metadata, you need to keep in mind that there are many different token standards for different programmable blockchains. For instance, SPL token standard governs FTs and NFTs on the Solana network. On the other hand, various ERC standards run the show on Ethereum and other EVM-compatible chains. Particularly, ERC-20, ERC-721, and ERC-1155 are the three standards covering the majority of tokens. What’s noteworthy is that all older FTs and NFTs are governed by ERC-20 and ERC-721. However, since the birth of ERC-1155, devs have tended to use this universal standard for production purposes. After all, this standard covers both FTs and NFTs. It also introduced semi-fungible tokens. Still, for simple fungible tokens, ERC-20 is a better fit. Also, you’d probably prefer to use ERC-721 for a simple NFT. Yet, if you’re interested in creating tokens with expensive use cases, ERC-1155 is the go-to standard.
Note: For more details about this universal standard, use the “ERC 1155” link above.
So, what details does this standard’s metadata include? Aside from file title and type, ERC-1155 token metadata comes with the following objects:
- Name
- Decimals
- Description
- Image/File
- Properties – Using this optional object, token developers get to add unique properties, also known as NFT attributes/traits, without affecting the top-level metadata structure.
Note: If you want to explore a generic ERC-1155 metadata JSON file, make sure to read our ultimate guide to token metadata.
The Best Web3 Provider to Get Token Metadata
If you covered the above sections, you already know that Moralis is the best tool to get token metadata by contract address, symbol (FTs), or token ID (NFTs). You’ve also learned that this is possible thanks to the ultimate Token API and NFT API. However, you may not be aware that this ultimate Web3 API provider, Moralis, also offers the best Web3 Auth API, Solana API, and Streams API. The latter enables you to listen to all leading blockchain networks, including the Sepolia testnet.
Moralis is also all about cross-chain interoperability. This means you get to use these advancing tools with all leading chains. Plus, this future-proofs your work as you are never stuck to any particular chain.

Additionally, Moralis is fully cross-platform interoperable, meaning you can use your favorite programming language, framework, or dev platform to join the Web3 revolution. All in all, Moralis empowers you to build dapps faster and smarter with APIs that bridge the development gap between Web2 and Web3. Are you ready to take this incredible tool for a spin?
Tutorial: How to Get Token Metadata Using NextJS and NodeJS
The purpose of the sections above was to get you all up to speed and ready to tackle today’s tutorials. Both of the upcoming sub-tutorials follow the same concepts – they use NodeJS for the backend and NextJS for the frontend. In both instances, you’ll have an opportunity to build a dapp that fetches token metadata. However, we’ll first show you how to get token metadata by symbol. On the other hand, the second tutorial will teach you how to get token metadata by contract address. So, the two dapps will be relatively similar, but they will focus on utilizing two different endpoints.
The first one uses the “get token metadata by symbol” endpoint, and the second utilizes the “get token metadata by address” endpoint. Both of the endpoints take in one required parameter. Quite intuitively, when searching tokens by symbols, “symbols” is the required parameter. On the other hand, when searching by address, “addresses” is the required parameter. Moreover, the plural form of both required parameters indicates that these two endpoints actually allow you to search by an array of strings.
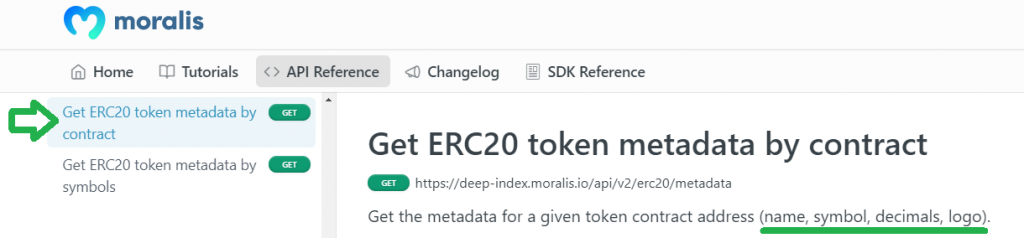
Note: Visit the Moralis docs to test the endpoints.

Nonetheless, if you want to follow our lead and create your own instance of either or even both of our example dapps, you need to have your Moralis account ready. So, in case you haven’t done so yet, make sure to create your account now. By doing so, you’ll be able to access your Moralis admin area and obtain your Web3 API key. Here is the two-step process to get that key:

For now, hold on to your Web3 API key; we’ll point out where you should paste it moving forward. So, without further ado, let’s dive into the first tutorial and explore how to get token metadata by symbol!
Get Token Metadata by Symbol
Before you get your hands dirty, we want you to know exactly what you’ll be building. As such, let’s do a quick demo of our example dapp that we ran on a local host. In the screenshot below, you can see the title of our example dapp at the top. Next comes the “Add Symbol” entry field, followed by the “Select Chain” drop-down menu. For the sake of this demonstration, let us focus on Chainlink (LINK). So, we enter this token’s ticker and select the Ethereum chain:

To get the metadata, we need to click on the “Submit” button:

Looking at the above screenshot, you can see that our example dapp displays several results. Each result contains the LINK token’s metadata for a different address. Moreover, our dapp displays a logo/thumbnail (if applicable) on the far left. Also, it displays the name in the center and the symbol on the far right. Let’s also use our browser’s console to inspect what’s going on behind the scenes:

Of course, the results in the console correspond to the ones that the “get token metadata by symbol” endpoint provides. Now, this also concludes our demo. So, if you want to build your own instance of our example dapp, use our “get-metadata-by-symbol” GitHub repo. There you can find the complete frontend and backend code.
Backend Code Walkthrough
To use our code, make sure to install all the required dependencies – “cors“, “dotenv“, “express“, and “moralis“. If you open the “index.js” file from the “backend” folder, you’ll see how we used those dependencies at the top:
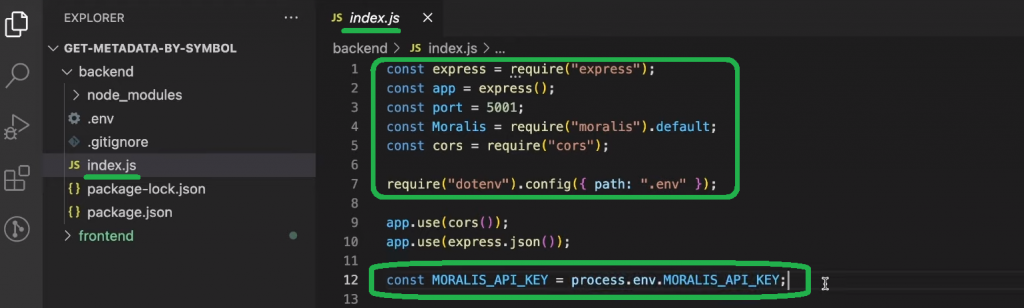
As you can see in the above screenshot, this is also where we used port “5001” for our backend dapp. Of course, you can follow our lead or use any other port available on your computer. You can also see the line of code that processes our Moralis Web3 API key. This brings us to the part where you finally paste the above-obtained API key. As such, create and open the “.env” file and populate the “MORALIS_API_KEY” variable:

If we return to the “index.js” file, you can see the “/symbol” endpoint, which is where we use the power of Moralis to get token metadata by symbol:
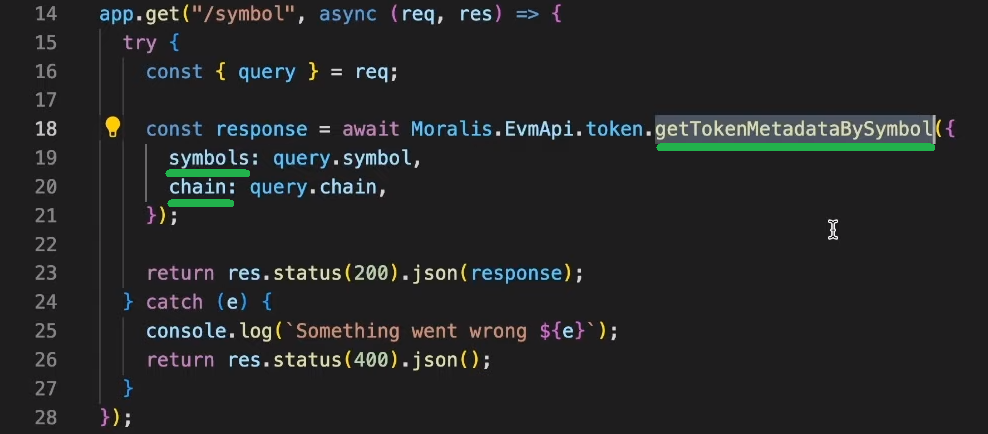
Moreover, we are providing the “getTokenMetadataBySymbol” EVM API endpoint with its required parameter (“symbols“) and an optional one (“chain“). As demonstrated above, our backend dapp will query the values of both of these parameters from the frontend.
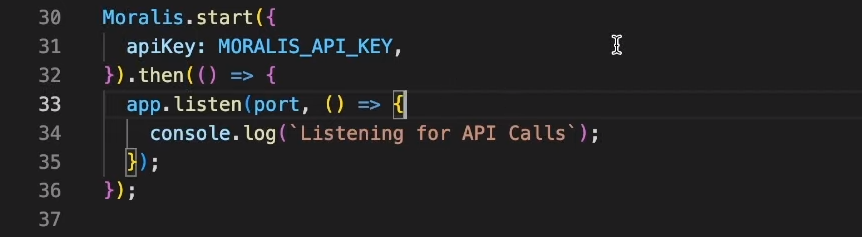
Last but not least, at the bottom of our “index.js” backend file, we are also firing up Moralis with the “start” function and listening to the port:
Frontend Code Walkthrough
Since you probably have more than enough experience using JavaScript (JS) for frontend applications, we won’t be diving into that part herein. However, you may use the video below. Starting at 5:07, you’ll learn which dependencies you need to install to use our NextJS code. Then, you’ll have a chance to check out the script for our example dapp’s homepage. That said, the most important frontend script is “main.js“. Starting at 5:30, you’ll have an opportunity to go through it line by line.
Finally, here’s the video tutorial that will provide you with all the details you need to know to get token metadata by symbol:
Get Token Metadata by Contract Address
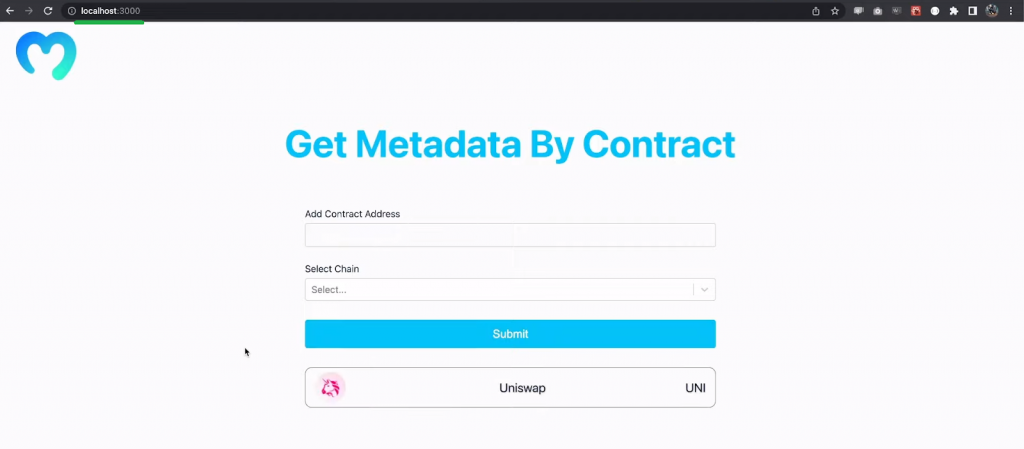
Now that you know the ins and outs of our example dapp to get token metadata by symbol, you’ll find it super easy to get token metadata by contract address. Furthermore, the goal of this part of today’s article is for you to build your own instance of the “Get Metadata by Contract” dapp. Moreover, you can see the gist of this dapp in the following screenshot:
Essentially, this dapp’s backend and frontend scripts are almost exactly the same as those of the dapp in the previous section. As such, you have two options moving forward. On the one hand, you can simply tweak the code used in the above tutorial. Or, you can get the final code from our “get-metadata-by-contract” GitHub repo page. After all, when it comes to the backend code, the only difference is in the endpoint we use. So, instead of the “/symbol” endpoint, we create the “/contract” endpoint:
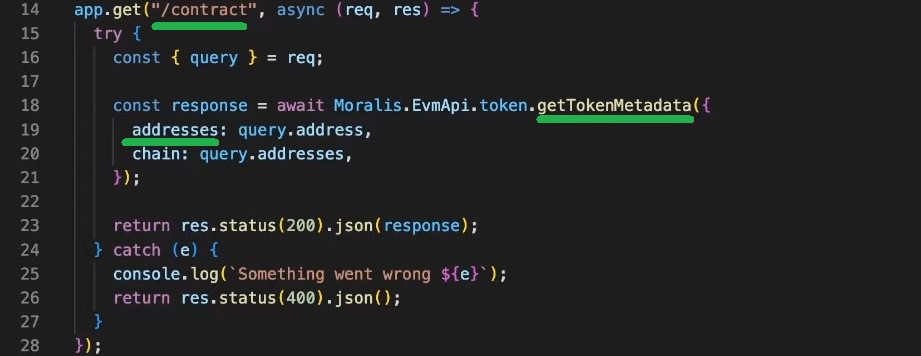
Looking at the image above, you can see that this endpoint takes in the “addresses” parameter instead of “symbols”.
In case you skipped the previous section, make sure to watch the video below. The latter will walk you through the backend and frontend code you need to implement to get token metadata by contract address.
Tutorial on How to Get Token Metadata Using NextJS and NodeJS – Summary
In today’s extensive article, you had a chance to go from knowing basically nothing about token metadata to actually working with this kind of data. You first learned the basics of token metadata and the different types and standards. You also discovered which out of all available providers is the best Web3 provider to get token metadata by contract address and symbol. Nonetheless, you had an opportunity to take on a simple tutorial and create your instance of a neat dapp. Ultimately, you now know how to get token metadata without breaking a sweat or the bank.
If you’re serious about dapp development, make sure to dive into the Moralis documentation and learn how to make the most of this powerful Web3 API endpoint set. After all, there are tutorials in the docs for every API endpoint. On the other hand, do not forget to expand your crypto horizons by visiting the Moralis YouTube channel and our blockchain development blog. Additionally, if you want to improve your chances of landing your dream job in Web3, you should consider enrolling in Moralis Academy. This will give you access to many pro-grade courses; however, we recommend starting with blockchain and Bitcoin fundamentals.
Read More: moralis.io


 Lido DAO
  JasmyCoin
  Mantle Staked Ether
  Marinade Staked SOL
  Raydium
  Binance Bridged USDC (BNB Smart Chain)
  Jupiter Staked SOL
  Pudgy Penguins
  Core
Core  Arbitrum Bridged WBTC (Arbitrum One)
  Bitcoin SV
  Brett
Brett  clBTC
clBTC  Tether Gold
  Solv Protocol Staked BTC
  IOTA
IOTA  Polygon Bridged USDT (Polygon)
  Ethereum Name Service
  PAX Gold
  SPX6900
  Kaia
Kaia  Helium
  Flow
Flow  Official FO
  StakeWise Staked ETH
  Zcash
Zcash  THORChain
  Pyth Network
  Jito
Jito  Decentraland
  Usual USD
  Stables Labs USDX
  Binance-Peg Dogecoin
  Aerodrome Finance
  Onyxcoin
  Ondo US Dollar Yield
  Reserve Rights
  Starknet
  Telcoin